Struggling to reach the Irasak Shrine? Learn the easiest ways to bypass the moving sands and get to this Tears of the Kingdom shrine, including gliding from the Lightning Temple.
Alright, so you've stumbled upon the Irasak Shrine, huh? It's chilling out southeast of the Lightning Temple, near a spot called Arbiter’s Grounds. The tricky part is, it's surrounded by these moving sands that'll drain your stamina faster than you can say 'Hylian Rice'. Don't worry, though, we've got a couple of ways to get you there without losing all your energy.
Walkthrough
- 1Getting Started: The biggest hurdle here is the sand. If you just walk into it, your stamina will plummet. We need a way to cross it without touching the ground too much.
- 2Vehicle Option: Head a little northeast of the shrine to the Southern Oasis Training Area. You can cobble together a vehicle here. Now, a simple wooden board with a Fan won't cut it – the sand is too much for it. But, a Sled? That should work much better! Give that a whirl.
- 3On Foot (The Hard Way): You *could* try going on foot, but it's a real stamina drain. You'd have to climb up the ruins scattered around, then carefully make your way across the sand, trying not to run out of stamina. The more stamina you have, the more feasible this is, but honestly, there are easier ways.
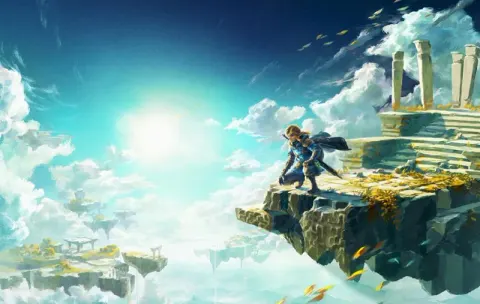
- 4The Easiest Way - Gliding: By far the simplest method is to glide down from the Lightning Temple. If you've completed it, head to the outside top of the temple. You can fast travel there if you've already unlocked it. Then, find the nearby room with a Construct and use your Ascend ability to pop out on the exterior. From there, just keep climbing and using Ascend until you reach the very top. If you've never been up there, you'll find a chest and some Ore Deposits waiting for you.
- 5The Final Glide: Once you're at the summit of the Lightning Temple, spot the Irasak Shrine in the distance. Start gliding towards it. Even with a basic stamina wheel, you should have just enough to make it. Keep an eye out, though – there's an Aerocuda that sometimes patrols the area and might come after you during your glide.
- 6Inside the Shrine: Whichever method you used to arrive, head inside the shrine. You'll find a chest right in front of you containing a Large Zonai Charge. Grab that, then approach the altar to receive your well-earned Light of Blessing.
Tips
- The moving sands around the shrine are the main obstacle; try to minimize your time spent on them.
- A Sled combined with a Fan is a viable vehicle option if you want to build something.
- Gliding from the Lightning Temple is the most straightforward approach, provided you can reach its summit.
- Be aware of the Aerocuda that might interfere with your glide to the shrine.
Large Zonai Charge and a Light of Blessing.
100% Human-Written. AI Fact-Checked. Community Verified. Learn how AntMag verifies content