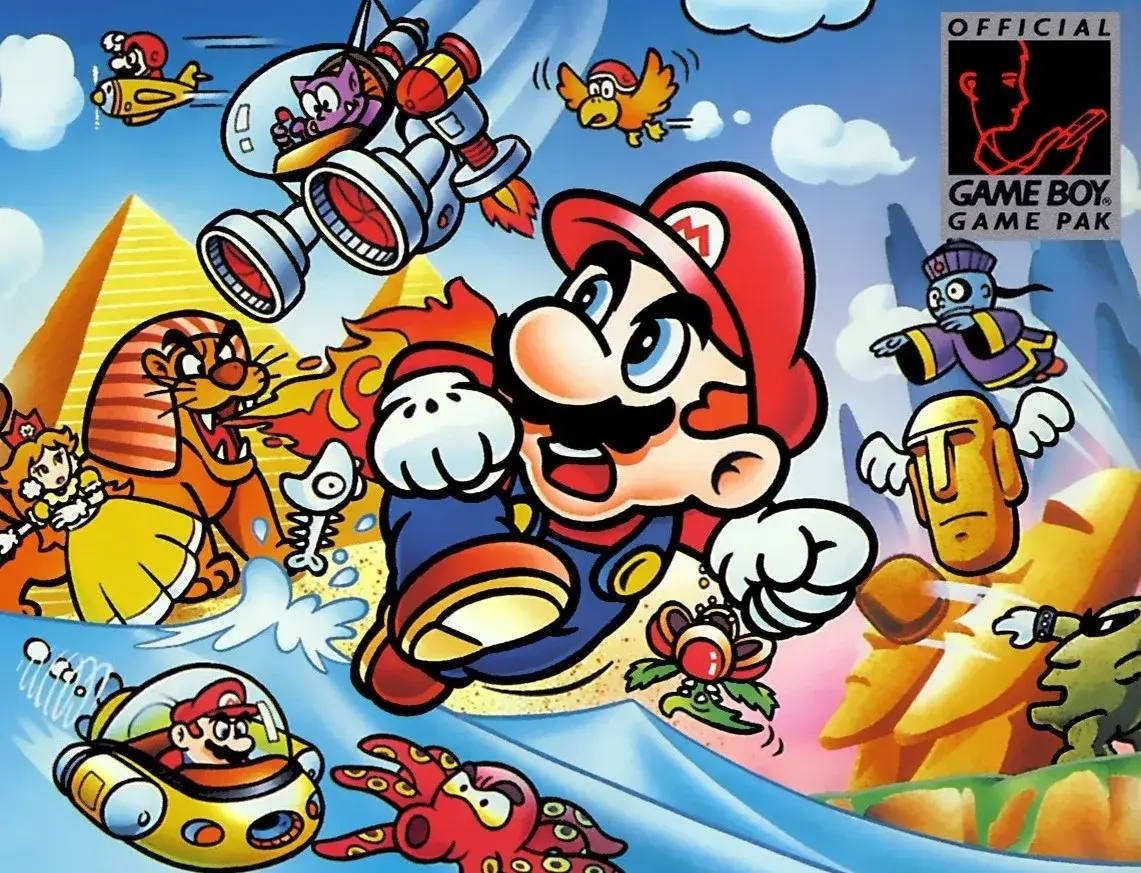
Welcome to Super Mario Land, the 1989 Game Boy classic that took Mario on a wild ride through the whimsical world of Sarasaland! This side-scrolling adventure ditches the Mushroom Kingdom for new challenges, featuring unique power-ups like the Super Ball Mario and the ability to pilot a submarine and an airplane. You'll hop, skip, and jump through distinct kingdoms, battling new foes and familiar faces alike, all while trying to rescue Princess Daisy from the alien Tatanga.
This guide is your ticket to mastering every corner of Sarasaland. We'll cover how to conquer each kingdom, defeat challenging bosses like the Dragon Z Lilac and the final boss Tatanga, and help you find all the hidden secrets scattered throughout the stages. Whether you're aiming for infinite lives or just trying to get past a tough spot, we've got the walkthroughs and tips you need to become a Super Mario Land expert.
Part 1
Your friendly guide to Super Mario Land Part 1! Learn how to navigate the first levels, collect items, and master the basics with easy-to-follow tips.
Hey there! Welcome to Super Mario Land! This guide is going to walk you through the very beginning of the game, helping you get a feel for the controls and how things work. Think of me as your buddy right beside you, pointing out the way. We'll cover how to move, jump, and grab up all those goodies as we go. Don't worry if you're new to this; we'll take it step-by-step, and you'll be a pro in no time!
This walkthrough is designed to be super detailed, so you can follow along and make sure you don't miss a single Star Coin or secret. It might seem a bit long, but that's because we're explaining everything clearly, especially for beginners. If you're just trying to blast through a level, you might find a quicker way, but this guide is all about making sure you understand how to complete each part and find everything. If you're stuck on a specific Star Coin, just jump to that level in the table of contents and look for the special box showing you exactly where it is. We're not going for speed records here, just making sure you can get through and enjoy the game!
Part 2
Dive into Part 2 of our Super Mario Land guide! Learn the basics, explore the main worlds, and get ready for the challenging Special Worlds. Let's play!
Alright, so you've got the hang of the basics from Part 1, and now we're diving deeper into Super Mario Land! This section is all about getting you through the main game, from the first world all the way to the final confrontation. Don't worry, even though the game throws a lot at you, it's designed to guide you pretty smoothly. Unlike some older Mario games where you could wander around, these levels are pretty straightforward. It's a great game for anyone, but even seasoned players will find some fun challenges, especially in the later Special Worlds. Plus, it's a fantastic showcase for the 3DS's cool 3D effect!
The story here is classic Mario: Bowser's gone and snatched Princess Peach again. You'll wake up to find a postcard from him (talk about rude!) and then it's your job as Mario to jump, stomp, and power-up your way through eight worlds to save her. You know the drill: hit those ? Blocks, defeat enemies, and make a dash for the Goal Pole at the end of each level. The controls feel just like you'd expect from a Mario game, bringing back some old-school vibes with Goal Poles and adding some new flair with climbable poles, similar to what you saw in Super Mario Galaxy. Let's get this adventure rolling!
Here's a look at what we'll be covering in this part of the guide:
- Main Worlds: We'll break down each of the eight main worlds, from World 1 all the way to World 8, including all the individual levels and boss areas.
- Special Worlds: Get ready for a tougher challenge! We'll guide you through the secret Special Worlds, which unlock after you beat the main game.
Let's get started with the Main Worlds!
Main Worlds
This is where the bulk of your adventure will take place. There are eight main worlds, each with its own set of levels and a boss or castle at the end. We'll tackle them one by one.
World 1
- World 1-1: Your first taste of the game. Pretty straightforward, focus on getting used to the controls and basic enemies.
- World 1-2: Introduces new elements, maybe some tricky jumps or new enemy patterns.
- World 1-3: Keep an eye out for power-ups here, they'll be crucial.
- World 1-4: Often a more challenging level leading up to the world's boss.
- World 1-Castle: Time to face the first major boss! Learn their patterns and how to defeat them.
World 2
- World 2-1: New environments and challenges await.
- World 2-2: Pay attention to the level design; there might be hidden paths or secrets.
- World 2-3: Practice your platforming skills, as these levels can get a bit more demanding.
- World 2-4: Another step up in difficulty before the next boss.
- World 2-Airship: Airship levels are usually fast-paced and require precise movement.
World 3
- World 3-1: Expect more complex level layouts.
- World 3-2: Utilize any power-ups you've collected effectively.
- World 3-3: Timing is key in these stages.
- World 3-4: Getting closer to the boss, so expect tougher enemy placements.
- World 3-5: A final challenge before the castle.
- World 3-Airship: Navigate the moving platforms and hazards of the airship.
World 4
- World 4-1: The difficulty continues to ramp up.
- World 4-2: Look for opportunities to gain extra lives.
- World 4-3: Master the controls for these trickier sections.
- World 4-4: Prepare for the boss encounter.
- World 4-5: A demanding level before the castle.
- World 4-Airship: More aerial challenges await you here.
World 5
- World 5-1: New mechanics or enemy types might be introduced.
- World 5-2: Focus on smooth execution of your jumps and attacks.
- World 5-3: These levels often test your endurance.
- World 5-4: Getting ready for another castle boss.
- World 5-5: A final push before the boss fight.
- World 5-Castle: Face off against a more formidable foe.
World 6
- World 6-1: The game is pulling out all the stops now.
- World 6-2: Keep your wits about you; mistakes can be costly.
- World 6-3: Practice makes perfect for these challenging stages.
- World 6-4: Approaching the end of the world's challenges.
- World 6-5: The final regular level before the boss.
- World 6-Airship: Master the aerial navigation and combat.
World 7
- World 7-1: You're in the home stretch of the main worlds!
- World 7-2: Expect some of the toughest platforming yet.
- World 7-3: Conserve your power-ups if possible.
- World 7-4: The penultimate level before the boss.
- World 7-5: One last regular level to conquer.
- World 7-Airship: A final airship gauntlet.
World 8
- World 8-1: The final world! It's going to be tough.
- World 8-2: Push through these challenging levels.
- World 8-3: Nearly there!
- World 8-4: The final approach to Bowser's domain.
- World 8-5: The last regular level before the final boss.
- World 8-Bowser's Castle: Prepare for the ultimate showdown.
- World 8-6: More challenges within Bowser's stronghold.
- World 8-Final Castle: The very last level before you save the day!
Special Worlds
Once you've conquered the main eight worlds and saved Peach, a whole new set of challenges opens up: the Special Worlds! These are significantly harder and are designed for players who want to test their skills even further. You'll need to have a good grasp of all the game's mechanics to get through these. We'll cover them in detail in the next section of the guide, so get ready for some tough-but-rewarding platforming!
Part 3
Navigate Part 3 of the Super Mario Land guide, covering Special Courses 1-8, Final Courses, and Other Course Types. Find all levels and secrets.
- 1Special 1-4 [SWW14]
- 2Special 1-Castle [SWW15]
- 3Special 2 [SWW2]
- 4Special 2-1 [SWW21]
- 5Special 2-2 [SWW22]
- 6Special 2-3 [SWW23]
- 7Special 2-4 [SWW24]
- 8Special 2-5 [SWW25]
- 9Special 2-Airship [SWW26]
- 10Special 3 [SWW3]
- 11Special 3-1 [SWW31]
- 12Special 3-2 [SWW32]
- 13Special 3-3 [SWW33]
- 14Special 3-4 [SWW34]
- 15Special 3-5 [SWW35]
- 16Special 3-Airship [SWW36]
- 17Special 4 [SWW4]
- 18Special 4-1 [SWW41]
- 19Special 4-2 [SWW42]
- 20Special 4-3 [SWW43]
- 21Special 4-4 [SWW44]
- 22Special 4-5 [SWW45]
- 23Special 4-Airship [SWW46]
- 24Special 5 [SWW5]
- 25Special 5-1 [SWW51]
- 26Special 5-2 [SWW52]
- 27Special 5-3 [SWW53]
- 28Special 5-4 [SWW54]
- 29Special 5-5 [SWW55]
- 30Special 5-Castle [SWW56]
- 31Special 6 [SWW6]
- 32Special 6-1 [SWW61]
- 33Special 6-2 [SWW62]
- 34Special 6-3 [SWW63]
- 35Special 6-4 [SWW64]
- 36Special 6-5 [SWW65]
- 37Special 6-Airship [SWW66]
- 38Special 7 [SWW7]
- 39Special 7-1 [SWW71]
- 40Special 7-2 [SWW72]
- 41Special 7-3 [SWW73]
- 42Special 7-4 [SWW74]
- 43Special 7-5 [SWW75]
- 44Special 7-Castle [SWW76]
- 45Special 8 [SWW8]
- 46Special 8-1 [SWW81]
- 47Special 8-2 [SWW82]
- 48Special 8-3 [SWW83]
- 49Special 8-4 [SWW84]
- 50Special 8-5 [SWW85]
- 51Special 8-Bowser's Castle [SWW86]
- 52Final Courses [MWW9]
- 53W8-Final Castle Revisited [MWW91]
- 54Special 8-Crown [MWW92]
Other Course Types:
- Toad Houses (Red) [OTH1]
- Toad House (Blue) [OTH2]
- Mystery Boxes [OTH3]
- Normal Mystery Box List [OTH4]
- Golden Mystery Box List [OTH5]
Lists:
- Item List [LIS10]
- Super Mushroom [LIS11]
- Fire Flower [LIS12]
- Tanooki Leaf [LIS13]
- Statue Leaf [LIS14]
- Boomerang Flower [LIS15]
- Super Star [LIS16]
- Invincibility Leaf [LIS17]
- P-Wing [LIS18]
Miscellaneous:
- Unlockables [MIS01]
- Save File Stars [MIS02]
- Characters [MIS03]
- Cosmic Clone Courses [MIS04]
- Time Trial Courses [MIS05]
- The Overworld [MIS06]
- Lives and 1-Up Farming [MIS07]
- Damage and Help Blocks [MIS08]
- Item Slot Mechanics [MIS09]
- Time Trial Mode [MIS10]
- On Course Completion [MIS11]
- Exiting Courses [MIS12]
- Easter Eggs/Trivia [MIS13]
General FAQ Stuff:
- Version History [FQS1]
- Legal Notice [FQS2]
- Contact Me [FQS3]
- Credits [FQS4]
- Final Word [FQS5]
- To navigate to a specific section of the guide, use CTRL + F to open the search bar. Enter or copy and paste the tag next to the desired section and press Enter.
- To find a specific Star Coin location, navigate to the level using the tag method and scroll through the section.
Part 4
Explore the comprehensive controls and move list for Super Mario Land. Learn button mappings for menus and in-game actions, plus essential moves like stomping and jumping.
This section provides a detailed breakdown of all controls and moves available in Super Mario Land, covering menus and in-game actions.
Controls
Save File Selection Screen
- Circle Pad: Move Up and Down between Save Files
- D-Pad: Move Up and Down between Save Files
- A, B: Select highlighted Save File
- X, Y: No Use
- L, R: No Use
- Start: No Use
- Select: No Use
- Touch Screen: Touch Save Files to Select, Touch dot-point boxes for information, touch arrow to return to Title Screen
Overworld Screen
- Circle Pad: Move character left and right between courses and worlds
- D-Pad: Move character left and right between courses and worlds
- A, B: Select level to enter
- X, Y: No Use
- L, R: No Use
- Start: Go to overworld pause menu
- Select: Go to overworld pause menu
- Touch Screen: Touch world buttons to go to corresponding world, touch blue button below a course to move to it, touch blue button of current course to enter it
Overworld Pause Menu
- Circle Pad: Move up and down between items
- D-Pad: Move up and down between items
- A, B: Select highlighted item
- X, Y: Exit out of overworld pause menu
- L, R: No Use
- Start: Exit out of overworld pause menu
- Select: Exit out of overworld pause menu
- Touch Screen: Touch items to select them
In-Game - General
- Circle Pad: Moves the player
- D-Pad: Left/Right moves camera slightly, Up/Down changes 3D type (Normal View/Extended Depth)
- A, B: Jump
- X, Y: Hold to run (with Circle Pad)
- L, R: Crouch, use with Circle Pad to crawl. Can hop whilst crouching/crawling.
- Touch Screen: Touch item to use it, touch yellow arrow buttons to move camera slightly
In-Game Pause Menu
- Circle Pad: Move up and down between items
- D-Pad: Move up and down between items
- A, B: Select highlighted item
- X, Y: Exit out of in-game pause menu
- L, R: No Use
- Start: Exit out of in-game pause menu
- Select: Exit out of in-game pause menu
- Touch Screen: Touch items to select them
Moves List
Moves - General
- Stomping: Land on an enemy to stomp it. Many enemies can be defeated this way.
- Hitting Blocks: Jump underneath a brick or ? Block to hit it and get coins or items. Brick Blocks break or turn into used blocks. ? Blocks always turn into used blocks.
- Enter Warp Pipe: Press L/R on a vertical Warp Pipe to enter. Move into a horizontal Warp Pipe to enter.
- Enter Cannon: Press L/R on a Cannon to enter.
- Running Jump: Press A/B while holding X/Y and moving with Circle Pad.
- High Jump (from crouch/crawl): Hold L/R until Mario/Luigi 'charges up', then press A/B. Can be performed whilst crawling.
- High Jump (on a tightrope): Hold A/B in mid-air just before landing on a tightrope.
- High Jump (from stomping): Hold A/B in mid-air just before landing on a stompable enemy.
- High Jump: Hold A/B in mid-air.
Similar guides you might like


100% Human-Written. AI Fact-Checked. Community Verified. Learn how AntMag verifies content