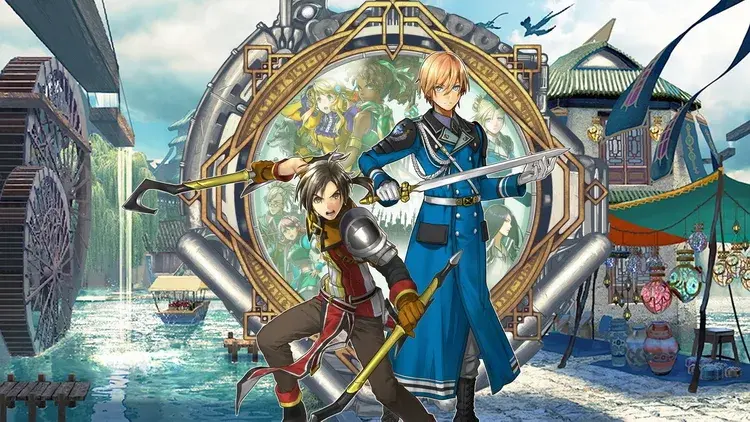
Welcome to Eiyuden Chronicle: Hundred Heroes, a sprawling single-player RPG from Rabbit & Bear Studios, the spiritual successor to the beloved Suikoden series. You'll embark on an epic journey alongside Seign Kesling and Nowa as they navigate the fires of war, exploring a world rich with story and a vast cast of characters. Recruit over 100 heroes, manage your growing base, and master the rune-lens magic system as you strive to save your world from the encroaching Galdean Empire.
This guide is your essential companion to mastering Eiyuden Chronicle. We'll help you track down every collectible, including all 100+ heroes, chests, and key items. Conquer challenging boss fights with detailed strategies, solve every puzzle, and navigate all the game's areas. Plus, we've got you covered on the fishing, cooking, runeshard locations, and the various mini-games, ensuring you don't miss a single piece of content on your path to 100% completion.
Characters
Discover the diverse cast of Eiyuden Chronicle: Hundred Heroes! Learn about the main characters, allies, and factions that shape your journey through the continent of Allraan.
Characters
Discover the diverse cast of Eiyuden Chronicle: Hundred Heroes! Learn about the main characters, allies, and factions that shape your journey through the continent of Allraan.
All Recruitable Characters: Recruitment
Discover how to recruit every character in Eiyuden Chronicle: Hundred Heroes. This guide details locations and recruitment methods for all 120 potential allies.
All Recruitable Characters: Recruitment
Discover how to recruit every character in Eiyuden Chronicle: Hundred Heroes. This guide details locations and recruitment methods for all 120 potential allies.

Dijkstra Recruitment Guide
Learn how to recruit Dijkstra in Eiyuden Chronicle: Hundred Heroes. This guide covers his location, the challenging Chelonian Goliath dungeon, and the Goblomancer boss fight.
Near the end of the main story, after all of the events in Norristar, you will be ready to recruit Dijkstra. It’s unclear if you need to have recruited Quinn already or not, or just need to see Dijkstra as part of her recruitment process. To be safe, it’s better to just recruit her first. Once you’ve done that, head to Twinhorne East and you will find him on the western side of the town. Speak to him and he will ask you to help him find some treasure at the Chelonian Goliath, Vilashnu.
This optional dungeon is quite challenging and Dijkstra will join your party as a guest. If you have a lot of physical attackers, putting him in your active party is a bright idea, as his Warcry ability will buff the physical attack of everyone else for that round. He is also quite defensive in nature, so he can withstand taking hits, too.
Chelonian Goliath, Vilashnu Enemies: The majority of the enemies here are large ones that are more like minibosses than normal enemies. You will want to take each one seriously for the first few battles, since you will likely be leveling up until around 53-55. Mach Eggs are quick and they have a chance to stun your characters; they are also the weakest enemies in the dungeon. The Asterion, Earth Dragon, Azhdahag, and Nidhoggr are all larger enemies and beefier.
Chelonian Goliath, Vilashnu Walkthrough: When you first arrive, you can go left to trigger a scene that gives you an option to leave, should you need to do that. You can always head back to Dijkstra at Twinhorne East to return to this dungeon. When you look at the map of this dungeon, it looks a bit like a maze, but it’s fairly straightforward and not that confusing. There is a save point at the beginning, so use it if you want, then start moving right. The first resource node here just gives some Stone, so loot it and continue right, all the way until you reach a dead end.
There’s another resource node here, which will give you some Orichalcum, an item you cannot get elsewhere right now. There is also a chest at the dead end, which yields a Material Crystal. Backtrack across the wooden bridge nearby, then go up the ramp, where you should see a doorway to your left, as well as another doorway to your right. Use the right doorway to find another dead end with a chest, with this one containing the Pasta Carbonara Recipe. The previously mentioned left doorway will take you further into the dungeon, where you will eventually see another fork.
The ramp to the right seemingly takes you nowhere, though, as it brings you to the top of the tower and there is nothing there. Instead, take the ramp going down and follow this path until you see another ramp heading downwards. At the bottom will be another chest, containing a Rune of Impregnable Defense. Loot that, as well as the resource above you (Stone), then continue west. You’ll pass through another tower and when you reach the next doorway, look to the right of it for a chest ( True Sight Glasses).
Use the doorway just left of the chest and follow the trail until you find another resource node (Stone). Just north of that node will be some trees that are hiding a chest, so go back there and open it for a Rune of the Mage’s Pinnacle. Look to the left now to see two more doors to take. The western of the two will move you along in the dungeon, so take the right one for now. You’ll emerge on top of the nearby structure and it looks like nothing is there, but a keen eye will catch a glimpse of a chest hidden behind the tower on the left side up here ( Forceful Armband).
The left door, as mentioned above, will bring you further into the dungeon. Bypass the first ramp going down as you continue (nothing’s there), then go past the next door, opting to descend the ramp beyond. There will be another chest down here, which contains the Blueberry Pie Recipe. Return to that door you passed and go through it, stopping to collect the next chest you see along the way ( Malachite Bangle). Keep going to reach a second save point, as well as another Orichalcum resource node. Heal up, save your game, then head to the end of the dungeon to face the boss.
Goblomancer and Letus Boss Guide: This can be a very challenging boss fight, depending on what you do here. The Goblomancer is the enemy in front, while Letus is the abomination in the back. The former only gets a single attack per turn, while the latter will always get two (except for one circumstance). The Goblomancer isn’t the problem in this fight, as he will normally just do Sacrificial Brand with his actions. This is a darkness-based spell that inflicts some damage on cast, but it can also do damage at the end of the round; it also hits a single column.
Letus will use either Sickle Slash, an attack that hits your front row, or Sickle Storm, which hits all of your characters. With that in mind, you may think that going after Letus to get rid of it is the best option. However, there’s a catch with doing that, as it appears you can’t actually defeat the creature. Whenever you get Letus’ health to near death, the Goblomancer will heal it for a huge amount, even if you think you can defeat Letus. What makes this even worse is that this can trigger the Goblomancer to use Fire God’s Sword on himself and Letus, increasing their attack.
Squash Recruitment Guide
Learn how to recruit Squash in Eiyuden Chronicle: Hundred Heroes! Find out where to go, what item you need, and how to get it.
Alright, so you want to get Squash on your team in Eiyuden Chronicle: Hundred Heroes? He's a pretty useful character, but you can't just walk up and ask him to join. You'll need to get a bit further into the story first.
When you can recruit Squash: You need to have reached Euchrisse, the Land of Water. This means you'll have to clear out The Proving Grounds dungeon. That place can be a bit tricky with its rotating floors, so if you're getting lost, definitely check out a guide for it. After that, you'll want to head to Hishahn and recruit Carrie. The easiest way to do that is by following the steps on the Unlocking Fast Travel page. Once you've got fast travel sorted, hop over to the Treefolk Village.
Where to find Squash: Once you've arrived at the Treefolk Village, Squash is hanging out near the top. Just head over and chat with him.
What Squash wants: He's not going to join up right away. Squash needs a little persuasion in the form of a Sparklestone. Getting this item is the real grind here.
How to get a Sparklestone: Your best bet is to farm enemies called Phantombirds and Red Wyverns. You'll find them in the second area of the Dappled Forest. Here's the catch: they only have a 5% chance to drop a Sparklestone. Yeah, you might be here for a bit. These enemies aren't too tough at this point in the game, but keep an eye on your health just in case.
Pro-Tip for farming: If you happen to have the Lucky Badge, which you can find in a chest in the Seaside Cavern, equip it! It'll boost your drop rates, making the Sparklestone hunt go a little faster. Every bit helps, right?
Bringing Squash home: Once you've finally snagged that Sparklestone, head back to Squash. Give him the item, and he'll agree to join your cause. With Squash on board, you'll be able to build the Accessory Shop back at your Headquarters, which is a pretty sweet deal for upgrading your gear.
Similar guides you might like


100% Human-Written. AI Fact-Checked. Community Verified. Learn how AntMag verifies content