Learn monster behaviors and strategies to defeat enemies in Pathways into Darkness. This guide details creatures and tactical approaches for survival.
Enemy Types & Strategies
Navigating the treacherous depths of Pathways into Darkness requires a keen understanding of the monstrous entities that lurk within. This section details the common enemy types you'll encounter, their unique behaviors, and effective strategies to dispatch them, ensuring your survival and progress. Mastering these encounters is crucial for delving deeper into the mysteries of the Pyramid and ultimately confronting the Master of the Dark.
Lesser Demons
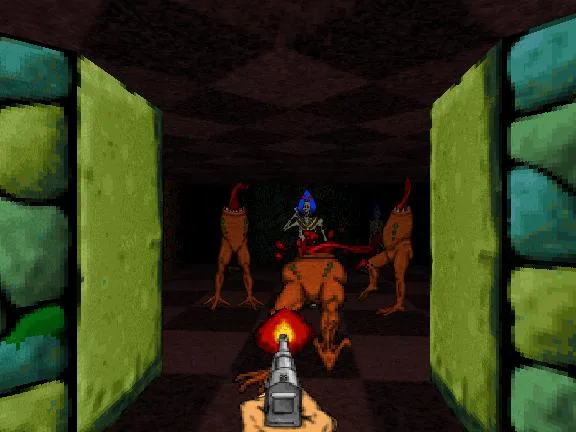
These are the most common adversaries you'll face, often appearing in groups. While individually weak, their numbers can quickly overwhelm an unprepared adventurer. They are the first true test of your combat prowess and resource management.
- Description: Small, agile, and typically armed with rudimentary claws or short-range projectiles (often resembling small, dark energy bolts). They emit a low, guttural growl that escalates to a more aggressive snarl when attacking. They are particularly prevalent in the early levels of the Pyramid, such as the Upper Levels and the Hall of the Serpent.
- Strategy:
- Crowd Control: Prioritize weapons with a wide area of effect. The Grenade Launcher is exceptionally effective, capable of clearing a cluster of Lesser Demons with a single well-placed shot. The Flame Thrower is also a potent tool, burning multiple enemies simultaneously and leaving lingering damage.
- Melee Advantage: If cornered or when ammunition is scarce, the Axe or Mace can be surprisingly effective. Their swing arcs can hit multiple targets, and their damage output is sufficient to fell a Lesser Demon in one or two hits. Strafe backward while swinging to maintain distance and prevent them from closing in.
- Ranged Precision: For smaller groups or when conserving ammo, the Pistol or Submachine Gun can be used. Aim for headshots if possible, though their erratic movement makes this challenging. The Shotgun is excellent for close-to-medium range engagements, capable of staggering and dispatching them quickly.
- Environmental Hazards: Be aware of explosive barrels or other environmental traps that can be used to your advantage against these swarming foes.
- Weaknesses: Susceptible to area-of-effect damage and rapid fire.
- Common Locations: Upper Levels, Hall of the Serpent, Crypts.
- Recommended Loadout: Grenade Launcher (primary for groups), Shotgun (secondary for mixed encounters), Pistol (backup/ammo conservation).
Greater Demons
A significant step up in threat from their lesser brethren, Greater Demons are larger, more resilient, and possess more dangerous offensive capabilities. They often act as mini-bosses or guardians of key areas.
- Description: These hulking figures are typically red or dark-skinned, with glowing eyes and powerful physical attacks. They can also unleash devastating magical projectiles. Their roars are deep and menacing. They are frequently encountered in more secluded or important chambers, such as the Chamber of the Ancients or guarding access to deeper levels.
- Strategy:
- Exploit Weaknesses: Greater Demons are often vulnerable to specific damage types. While direct confrontation is necessary, observe their attack patterns. Many are susceptible to piercing damage from the Rifle or explosive force.
- Hit-and-Run Tactics: Due to their high damage output, prolonged direct engagement is risky. use cover effectively. Attack when they are recovering from an attack animation or when they are reloading their projectiles.
- Ammo Management: These enemies are more ammo-intensive. Ensure you have a healthy supply of powerful ammunition before engaging. The Rocket Launcher, if acquired, is devastating but limited in its ammo.
- Staggering: Concentrated fire, especially with high-impact weapons like the Shotgun at close range or the Rifle, can sometimes stagger a Greater Demon, interrupting their attacks and creating an opening for further damage.
- Weaknesses: Often vulnerable to explosive and piercing damage.
- Common Locations: Chamber of the Ancients, deeper levels of the Pyramid, guarding important artifacts.
- Recommended Loadout: Rifle (for precision and sustained damage), Shotgun (for close-quarters defense and staggering), Rocket Launcher (for critical damage if available).
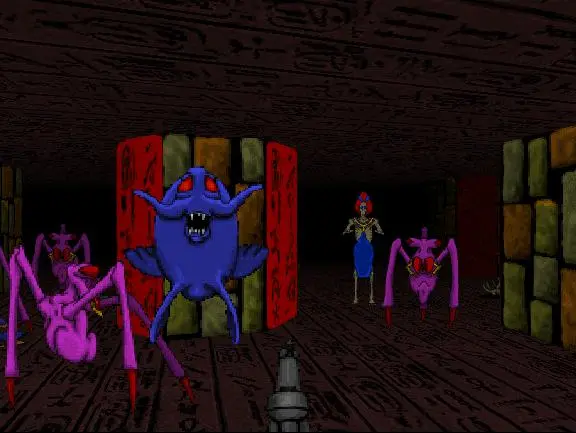
Shadows
These ethereal beings are notoriously difficult to hit and can phase in and out of existence, making them a persistent nuisance. They often appear in dimly lit areas where their stealth is most effective.
- Description: Semi-transparent, shadowy figures that move with unsettling speed. They emit a faint, chilling whisper and attack with dark energy bolts or phasing melee strikes. They are common in the Crypts and areas with low light.
- Strategy:
- Area Denial: Weapons that create persistent damage zones, like the Flame Thrower, can be effective as Shadows may re-enter the area.
- Rapid Fire: The Submachine Gun is excellent for catching them as they materialize. Keep firing in their general direction when you suspect they are nearby.
- Listen Carefully: Their faint whispers and the sound of their phasing can provide audio cues to their location.
- Light Sources: While not a direct weapon, using any available light sources can sometimes make them slightly more visible.
- Weaknesses: Rapid fire, area denial.
- Common Locations: Crypts, dark corridors, areas with magical disturbances.
- Recommended Loadout: Submachine Gun (for rapid engagement), Flame Thrower (for area denial), Pistol (as a backup).
Sentinels
These robotic or construct-like enemies are heavily armored and possess powerful ranged weaponry. They are often found guarding important junctions or technological areas within the Pyramid.
- Description: Metallic, often humanoid or turret-like constructs. They move deliberately and fire precise, high-damage energy beams or projectiles. They are typically found in more structured or technologically advanced sections of the Pyramid.
- Strategy:
- Target Weak Points: Sentinels often have glowing weak points or exposed energy cores. Aiming for these areas will significantly increase your damage output.
- use Cover: Their beams can be incredibly destructive. Always fight from behind cover and only expose yourself to fire when you have a clear shot at their weak point.
- Explosives: The Grenade Launcher and Rocket Launcher are highly effective against Sentinels, capable of bypassing some of their armor or dealing massive damage to their core.
- Strafe and Dodge: While they are precise, their firing rate is not instantaneous. Learn their attack patterns and strafe or dodge to avoid their projectiles.
- Weaknesses: Explosive damage, precision shots to weak points.
- Common Locations: Technological areas, guarded chambers, junctions.
- Recommended Loadout: Rifle (for weak point targeting), Grenade Launcher (for sustained damage), Rocket Launcher (for quick elimination).
The Master of the Dark (Boss)
The ultimate antagonist of Pathways into Darkness. This entity is a formidable foe with multiple attack phases and requires a comprehensive understanding of the game's mechanics to defeat.
- Description: A powerful, often ethereal or monstrous entity that commands dark energies. Its appearance can vary, but it is always a significant threat. The final confrontation typically takes place in the Sanctum of the Dark.
- Strategy:
- Phase 1: Projectile Barrage: The Master will likely begin by unleashing waves of powerful energy projectiles. use cover and strafe to avoid these. Use your most powerful ranged weapons, such as the Rocket Launcher or Rifle, to chip away at its health.
- Phase 2: Summoning: The Master may summon lesser demons or other minions to distract you. Prioritize eliminating these adds quickly with area-of-effect weapons like the Grenade Launcher or Flame Thrower to maintain focus on the boss.
- Phase 3: Melee/Close-Range Attacks: If you get too close, the Master may employ powerful melee or short-range energy attacks. Maintain a safe distance and continue to assault it with your best weaponry.
- Environmental Interaction: Be aware of any environmental elements in the boss arena that can be used for cover or potentially to damage the boss.
- Ammo and Health Management: This fight will drain your resources. Ensure you have collected as much ammunition and health as possible before entering the final area. Prioritize picking up any drops from the boss or its minions.
- Weaknesses: Varies by phase, but generally susceptible to sustained high-damage attacks.
- Common Locations: Sanctum of the Dark.
- Recommended Loadout: All powerful weapons (Rocket Launcher, Grenade Launcher, Rifle), ample ammunition, and health packs.
Item & Reward Summary
Defeating enemies and exploring the Pyramid will yield crucial items. Here's a look at what you can expect:
| Item | Description | Quantity (Typical) | Effect |
|---|---|---|---|
| Ammo (Pistol) | Standard ammunition for the Pistol. | 10-20 | Replenishes Pistol ammo. |
| Ammo (Shotgun) | Shells for the Shotgun. | 5-10 | Replenishes Shotgun ammo. |
| Ammo (Rifle) | Rounds for the Rifle. | 5-15 | Replenishes Rifle ammo. |
| Ammo (Grenades) | Explosive grenades. | 1-3 | Replenishes Grenade Launcher ammo. |
| Ammo (Rockets) | Rockets for the Rocket Launcher. | 1-2 | Replenishes Rocket Launcher ammo. |
| Health Pack | A medical kit. | 1 | Restores a significant portion of health. |
| Key (Various) | Used to unlock doors and progress. | 1 | Opens specific pathways. |
| Artifacts | Mysterious relics. | 1 | Often required for story progression or grant passive bonuses. |
100% Human-Written. AI Fact-Checked. Community Verified. Learn how AntMag verifies content