Guide to Sekiro's Sunken Valley: The Serpent's Domain. Learn to defeat the Great Serpent, find secrets, and prepare for the Guardian Ape boss fight.
Alright, we're diving into the Sunken Valley proper, and this next part is a bit of a doozy. Ahead, you'll see a long bridge. Go ahead and start crossing it, and you'll quickly find out why it's infamous.
A familiar foe will knock you into the lake below. Don't panic! Just swim to the far side of the lake in the direction you were knocked. The Great Serpent will be there, but if you're quick, you can beat it to the shore. If not, hug the sides of the area – the right side has some reeds and a log to hide behind – and make your way to the cave on the far side. Inside, you'll find the Sculptor's Idol: Riven Cave. Phew, a safe spot!
From the Riven Cave idol, you can grapple upwards and out. Keep an eye out as you ascend, you'll snag an Adamantite Scrap – a nice little upgrade material! Once you're out, you'll see some giant Buddha statues. Look up for a monkey as you head out; yes, we're dealing with monkeys now.
Grapple to the first Buddha statue, then the second, and then drop down to the land on the left. While you were grappling, some monkeys likely spotted you. There should be two down here for you to deal with, probably to your right or across the canyon. Take them out. From where you dropped, you can head across to the area you spotted earlier to grab a Pacifying Agent.
Now, grapple upwards to the left and deal with the monkey you find. Keep going past it, and at the end, drop down to kill another monkey (this one's facing away from you) guarding some Snap Seeds x3. Head back the way you came, keeping the wall on your left, and drop down. Before the next drop, look down – you'll see MULTIPLE monkeys below.
Use stealth to take out one from above, then rush the others. Even with the numbers, this shouldn't be too tough. Kill them all (I managed to get four) and grab the nearby item for some Contact Medicine x3. Continue following the left wall, and you'll see a grapple point ahead. Use it, and this time, try to land in stealth!
Up ahead are two crow ninjas. Since we're being stealthy, sneak up on the left one and take him out. The one further away might be looking away, making it tricky to tell. Once he's down, sneak up on the second ninja. After that, head left around the destroyed statue to find some Scrap Magnetite. Now, look into the distance – you should see a TON of monkeys gathered together!
Head around the area so you're above them and get ready for an ambush. Consider using combat arts like Whirlwind Slash and stay on the move between kills, picking off any outliers. If you have the skill that restores health on deathblows, this is a great spot to use it! It's a fun fight with so many enemies, and once they're all down, you'll get some Monkey Booze. Cheers!
Time for some cleanup. Right below where the monkeys were, near the ledge, you'll find another Pacifying Agent. In the back, there's also some Scrap Iron. From this area, which is essentially a dead end, we have two paths: right (which leads onward) or left (back the way we came). We're going LEFT for now to grab a couple of missed items.
Head that way and look across the canyon for a log sticking out. Use it to grapple over and grab the Ungo's Sugar you can see. Grapple back, then over to the next area on the upper left. There's a crow ninja hidden in the back to the left, so rush him to take him out quickly. He was guarding some Contact Medicine x4. You'll also see a Buddha's lap nearby where you can pick up some Ako's Sugar.
If you keep following this path (going lower, killing the occasional monkey), it will lead you down into the "Poisoned Valley". Things get nasty down there with a lot of poison. We don't want to go down there just yet, though, as we have a crucial item to get.
Head back to where the huge group of monkeys were, and we'll take that right path! From where the monkeys were (or rather, from the item in the back), follow the wall on the right and use the grapple point by the Buddhas. You'll need to jump to the rope after that, which is pretty cool. Follow the rope to a patch of land where you'll see a hag and an idol. Talk to the hag; she'll mention the fruit is past the poison swamp, down the nest. Keep that in mind for later. For now, use the idol here to claim the Sculptor's Idol: Bodhisattva Valley Idol.
Now, to the right of the Bodhisattva Valley idol, you can actually see our next boss fight – the giant ape – down below. But first, we have some unfinished business. Warp back to the Sculptor's Idol: Sunken Valley Cavern (the one you unlocked earlier) and head left. Jump down where necessary and make your way out to the large wooden beam. Look below: the Great Serpent is sleeping there. Perfect! You should get a deathblow prompt from up here. Jump down towards its head and activate it!
The resulting cutscene is spectacular. The giant threat is extinguished in a glorious display, and you'll be rewarded with some Fresh Serpent Viscera.
Head down the path once you land (where you would have been earlier if not for the serpent). You can find a Mibu Balloon of Soul, a Dragon's Blood Droplet, and a Bundled Jizo Statue. Nice haul! Head back to the Sculptor's Idol: Bodhisattva Valley. We're about to fight a boss, but before that, you can drop down on the right side all the way to the bottom to grab another Mibu Balloon of Soul. After that, it's boss time! Make sure you SPEND YOUR MONEY and read ahead to prepare.
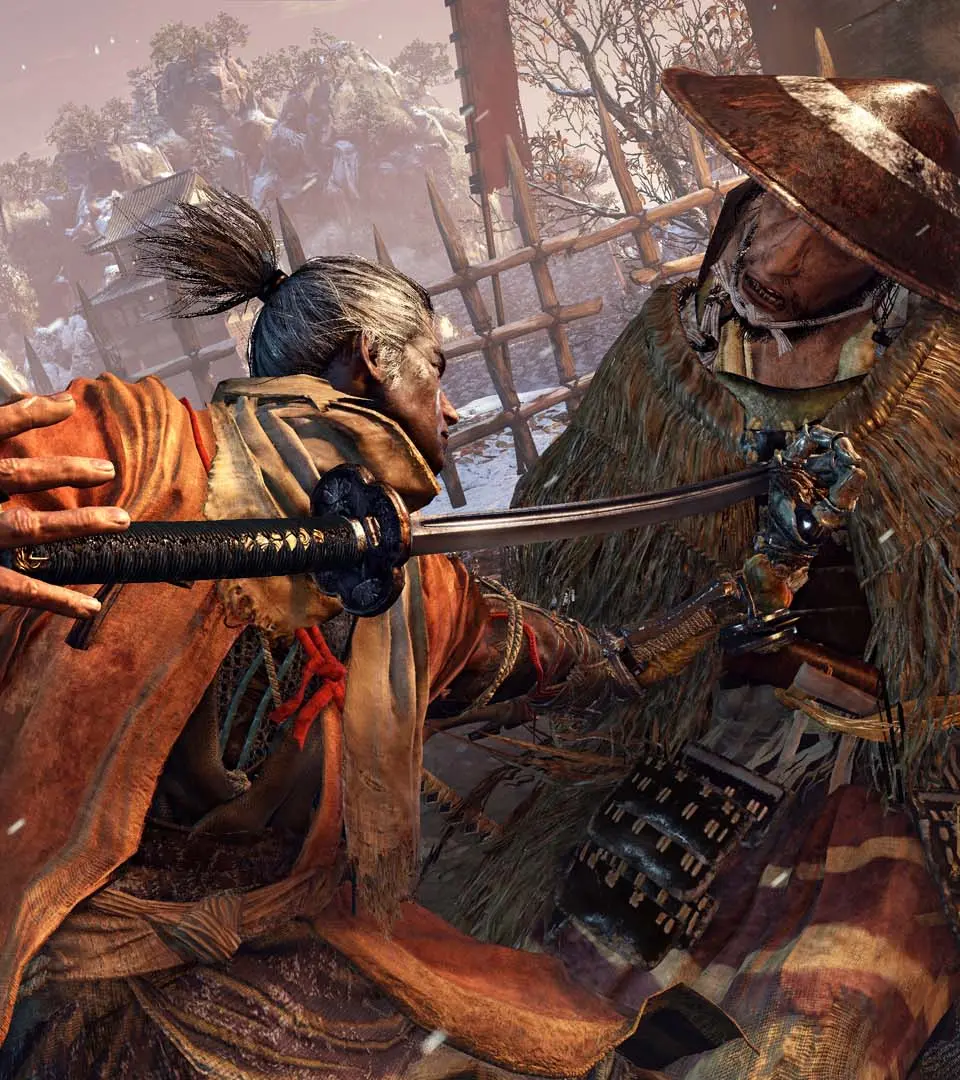
BOSS: GUARDIAN APE
Oh boy, this is a good one. The Guardian Ape can be rather tough. It's important to know there are TWO PHASES to this fight, which we'll cover below. For your item bar, bringing Purifying Agent isn't a bad idea, and Healing Gourds and Pellets are always good. I personally used some Attack UP sugar, but it's not essential.
Phase 1: The "Giant Ape" Phase
Honestly, this phase is the hardest. The Ape acts like a wild animal. The general strategy here is to get behind the Guardian Ape and attack its hindquarters. You can deal good damage this way, but you still need to watch out for its thrashing attacks. The BIGGEST tool you have in this phase is your FIRECRACKER Shinobi Tool. Using this will grant you several free hits. Try to use this tactic every 15-20 seconds. Combining Attack UP sugar with Firecrackers can maximize your free hits.
Let's break down his attacks. He does a TON of lunging and sweeping attacks with his arms. You can block (and deflect) these, but blocking does significant posture damage. He often does 2-3 sweeps, but can chain them into overhead slams, rolls, and even a jumping slam. Deflecting the final jumping slam can open him up for good damage on his side.
Attacking from the front during his combos isn't ideal, but if you can get to his backside, you can sometimes follow him as he moves and keep attacking. That's really the sweet spot.
Speaking of wrecking you, the Guardian Ape loves to do Perilous Grab attacks. You need to quickly jump away. If he grabs you, he'll slam you down and take out most of your health. It definitely hurts!
He also has a couple of other notable moves. At long range, the Guardian Ape will... yes, he poops into his hand and throws it at you. You can deflect this to stay safe, but it does poison damage! He'll also sometimes fart and run away; staying in his fart cloud will poison you.
At times, the Guardian Ape will stand up straight, making the katana stuck in his neck a grapple point. You can grapple to this for some free hits when it happens. Staying at a closer range increases your chances of seeing this.
Lastly, after some combos, the Guardian Ape will lay on the ground and thrash about (his "Tantrum" move). The only dangerous areas are to his sides, but you should be able to get in several hits once it's safe.
It might take a few tries, but avoid those grab attacks and use your Firecracker Tool liberally. Keep your health up, and you'll take down Phase 1!
Phase 2: The "Headless" Phase
You thought you were done!? Not yet! The Guardian Ape will rise, pick up his head and the katana, and come at you! This form is a bit easier than the first, even if it's more intimidating. The key to this fight is deflecting his sword combo attacks.
He'll usually do two outward sword swipes, followed by a third swinging or straight strike. Deflect the last attack, which makes him stand up and do a final downward strike. Deflecting THIS ATTACK will make him fall over for several seconds, allowing you to get in 3-4 hits. Missing it often results in him immediately doing his scream attack or a jumping slam.
Be extra careful of his sweep attack (a Perilous Attack) during his sword combos. Be ready to jump to avoid it. He will also often run at you and slide, swinging his sword. You can actually jump OVER this and get in some aerial hits. Don't jump too early, or the sword will catch you, but with practice, this is free damage.
The only other major thing to watch for is his "Scream Attack". This comes with a "Perilous Move" sign. Whenever he raises his head and you see this, immediately jump backwards or run away. His scream can inflict terror.
100% Human-Written. AI Fact-Checked. Community Verified. Learn how AntMag verifies content