Radiant Historia: Perfect Chronology is a Nintendo 3DS role-playing game where you navigate the intricate timelines of Stocke's journey. You'll be making choices that branch into Standard and Alternate Histories, altering the course of events in the world of Vancoor. Mastering the combo system and understanding how your decisions impact the narrative are key to progressing through this epic adventure.
This guide covers everything you need to conquer Radiant Historia: Perfect Chronology. We'll provide in-depth walkthroughs for both Standard and Alternate Histories, offer efficient strategies for Stocke's quest, and detail how to unlock the full potential of the combo system. Whether you're aiming to see every ending or simply overcome challenging boss fights, this guide has the essential information to help you succeed.
Part 1
Complete walkthrough for Radiant Historia: Perfect Chronology, covering Part 1. Navigate through Alistel, Lazvil Hills, and more with detailed steps and tips.
- 1Alistel (Prologue)
- 2Lazvil Hills (Prologue)
- 3Alistel (Alternate Prologue)
- 4Lazvil Hills (Alternate Prologue)
- 5Alma Mine (Alternate Prologue)
- 6Alistel (Standard Prologue)
- 7Alistel (Standard Chapter 1)
- 8Lazvil Hills (Standard Chapter 1)
- 9Judgement Cliff (Standard Chapter 1)
- 10Sand Fortress (Standard Chapter 1)
- 11Gran Plain (Standard Chapter 1)
- 12Alma Mine (Alternate Prologue)
- 13Alistel (Alternate Chapter 1)
- 14Lazvil Hills (Alternate Chapter 1)
- 15Judgement Cliff (Alternate Chapter 1)
- 16Sand Fortress (Alternate Chapter 1)
- 17Gran Plain (Standard Chapter 1)
- 18Granorg (Standard Chapter 1)
- 19Granorg (Standard Chapter 2)
- 20Underground Waterway (Standard Chapter 2)
- 21Sand Fortress (Alternate Chapter 1)
- 22Sand Fortress (Alternate Chapter 2)
- 23Gran Plain (Alternate Chapter 2)
- 24Alistel (Alternate Chapter 2)
- 25Celestia (Alternate Chapter 3)
- 26Lazvil Hills (Alternate Chapter 3)
- 27Alistel (Alternate Chapter 3)
- 28Celestia (Alternate Chapter 3)
- 29Granorg Palace (Standard Chapter 2)
- 30Granorg (Standard Chapter 3)
- 31Gran Plain (Standard Chapter 3)
- 32Cornet Village (Standard Chapter 3)
- 33Granorg (Standard Chapter 3)
- 34Sand Fortress (Standard Chapter 3)
- 35Judgement Cliff (Standard Chapter 3)
- 36Celestia (Alternate Chapter 3)
- 37Celestia (Alternate Chapter 4)
- 38Lazvil Hills (Alternate Chapter 4)
- 39Judgement Cliff (Standard Chapter 3)
- 40Cygnus (Standard Chapter 4)
- 41Cygnus (Standard Chapter 5)
- 42Itolia Wasteland (Standard Chapter 5)
- 43Itolia Wasteland (Standard Chapter 6)
- 44Skalla (Standard Chapter 6)
- 45Abyssia Forest (Standard Chapter 6)
- 46Holff Ruins (Standard Chapter 6)
- 47Granorg (Standard Chapter 6)
- 48Celestia (Alternate Chapter 4)
- 49Lazvil Hills (Alternate Chapter 4)
- 50Judgement Cliff (Alternate Chapter 4)
- 51Skalla (Alternate Chapter 4)
- 52Itolia Wasteland (Alternate Chapter 4)
- 53Abyssia Forest (Alternate Chapter 4)
- 54Forgia (Alternate Chapter 4)
- 55Skalla (Alternate Chapter 5)
- 56Forgia (Alternate Chapter 5)
- 57Sand Fortress (Alternate Chapter 5)
- 58Gran Plain (Alternate Chapter 6)
- 59Granorg (Alternate Chapter 6)
- 60Underground Waterway (Alternate Chapter 6)
- 61Granorg Palace (Alternate Chapter 6)
- 62Alistel (Alternate Chapter 6)
- 63Underground Lab (Alternate Chapter 6)
- 64Granorg (Alternate Final Chapter)
- 65Imperial Ruins (Alternate Final Chapter)
- 66Royal Hall (Standard Final Chapter)
- This walkthrough covers the initial sections of the game, including prologue and early chapters.
- It details both Standard and Alternate paths where applicable.
- Refer to the Table of Contents for specific section navigation.
Part 2
Your guide to Part 2 of Radiant Historia: Perfect Chronology, covering Alistel and Lazvil Hills. Find treasure, buy gear, and prepare for your journey!
Welcome back to Radiant Historia: Perfect Chronology! We're diving into Part 2, and this section is all about getting you set up in Alistel and Lazvil Hills. Think of this as your friendly nudge to explore and grab some goodies before the real adventure kicks off.
Walkthrough: Alistel (Prologue)
You'll start in Alistel, and the first thing you should do is ignore that main mission for a sec and go treasure hunting. Head left to find a chest with 2 Soothing Balms. Now, hop on the central elevator and go up to the third floor. There's a chest to the right containing a Charm – definitely equip this on Raynie, as it boosts ATK, MAG, and HP.
After that, make your way down to the first floor. In the upper right room, you'll find two more chests holding a Holy Water and 2 Herbal Teas. Don't forget to grab these!
Next, we're heading to the Second Ward. You'll see a tavern on the left and the equipment shop on the right. Take the stairs on the right, go up, and run down to find a chest with an Herbal Tea. Head back to the main corridor and then down to the First Ward.
In the First Ward, climb the stairs on your right and follow the path around. You'll find a chest containing 300 G. Head back to the corridor. The item shop is to your left, and the inn is to your right. Don't skip the inn's second floor – there's a chest there with Beast Skins, which is great for Stocke's defense.
With the extra cash you've picked up, it's time to hit the equipment shop. Grab the Custom Sword for Stocke. Give his old Bronze Sword to Marco. You can also sell any excess equipment you don't need.
Once you're geared up and ready, chat with Rosch as you leave the city, and then it's time to head towards Lazvil Hills.
Recommended Equipment:
- Stocke: Custom Sword, Beast Skins
- Raynie: Spear, Brigandine, Charm
- Marco: Bronze Sword, Brigandine
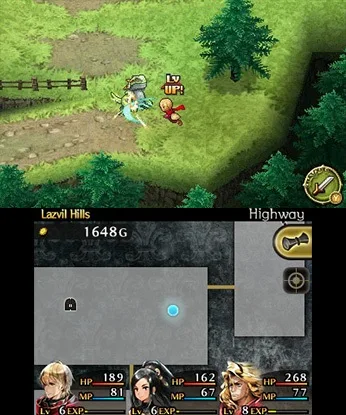
Walkthrough: Lazvil Hills (Prologue)
As soon as you arrive in Lazvil Hills, you'll jump straight into some tutorial battles. Just follow the on-screen prompts to get through these. Keep an eye out for enemies like Dodos and Light Granorgites, but don't worry too much about them for now.
Tips:
- The map shows a chest labeled 'C' that you can't reach yet. Don't worry about it; you'll come back for it later.
- Make sure to grab the items from the chests in the Woodland Path area (Soothing Balm, Royal Jelly) before moving too far ahead.
- The Bronze Mail marked with an asterisk requires
Part 3
Radiant Historia: Perfect Chronology Part 3 walkthrough covering the split between Standard and Alternate History, joining the Rosch Brigade, and sidequests.
- 1Head east to the Woodland Path. Collect 3 SOOTHING BALMS from a chest below.
- 2Continue east and collect 3 ROYAL JELLIES from a chest.
- 3Head north and complete another tutorial battle.
- 4Proceed north to Highway West to gain the Strike ability, which stuns enemies for a preemptive strike.
- 5Note the crates in the cave for later and proceed east to the Highway. Cross the bridge to the east as the chest above is inaccessible.
- 6Engage in a scripted boss battle against Palomides and 3 Granorg Archers. This battle cannot be won.
- 7After events, you will meet Lippti and Teo. Head south to the blockade and receive superhuman strength to move it.
- 8Ignore the blockade and head north to Highway West. Enter the cave and move the crates to access a chest containing a BRONZE MAIL (DEF+14/MDF+10), recommended for Marco.
- 9Return to the blockade, follow the path to another battle, and survive.
- 10Upon awakening at Alistel, leave the infirmary. Attempting to leave to the right triggers a critical decision.
- 11Head upstairs and talk to Rosch. You must choose to either Join the Rosch Brigade (Alternate History) or Stay under Heiss (Standard History). Both paths are accessible later via the White Chronicle. Joining the Rosch Brigade first is recommended as it unlocks sidequests.
ALISTEL (Alternate Prologue) [ALST2]
- 1After talking with Rosch, Raul, and Kiel, Rosch will join your party. Use the Party command to switch Rosch in for Marco, keeping Marco's MP for healing.
- 2Give Marco's Bronze Mail to Raynie. Switch Raynie's Spear with Rosch's Light Lance.
- 3Take the elevator to the first floor and talk to the receptionist to receive the [Soldier Recruit] sidequest.
- 4Head to the First Ward and talk to the soldier on the left to receive the [Night Watch] sidequest. (Note: Two Anti-Sleeps will be needed later, currently unavailable).
- 5Check the inn and talk to the mercenaries to advance the [Soldier Recruit] sidequest.
- 6Return to the receptionist to complete [Soldier Recruit] and receive 1500 G. Save your money as better equipment will be available soon.
- 7Leave Alistel and head for Lazvil Hills again.
LAZVIL HILLS (Alternate Prologue) [LZVL2]
- 1The trip through Lazvil Hills is uneventful. The bridge is out, requiring a detour.
- 2Note the cave under the bridge where a soldier is trapped by a cave-in; this cannot be resolved now but is important for later.
- The Strike ability is crucial for gaining preemptive strikes against enemies on the field.
- The battle against Palomides and Granorg Archers is scripted and unwinnable; do not expend resources trying to win.
- When choosing between Standard History and Alternate History, remember that both paths are eventually accessible.
- For the [Night Watch] sidequest, you will need to purchase two Anti-Sleep items later.
- Save your G instead of upgrading equipment in Alistel, as better gear will be available shortly.
- Recommended Equipment at this point: Stocke (Custom Sword, Beast Skins), Raynie (Spear, Brigandine, Charm), Marco (Bronze Sword, Bronze Mail).
- Recommended Equipment after joining Rosch: Stocke (Custom Sword, Beast Skins), Raynie (Light Lance, Bronze Mail, Charm), Marco (Bronze Sword, Brigandine), Rosch (Spear, Brigandine).
- Recommended Equipment for Lazvil Hills: Stocke (Custom Sword, Beast Skins), Raynie (Light Lance, Bronze Mail, Charm), Marco (Bronze Sword, Brigandine), Rosch (Spear, Brigandine).
- [Soldier Recruit] sidequest: 1500 G.
- BRONZE MAIL (DEF+14/MDF+10).
- 3 SOOTHING BALMS.
- 3 ROYAL JELLIES.
Part 4
Complete walkthrough for Part 4 of Radiant Historia: Perfect Chronology, covering Alma Mine, Alistel, and Lazvil Hills, including decisions, sidequests, and recommended equipment.
- 1Alma Mine (Alternate Prologue)
- Recommended Level: 6
- 2Recommended Party: Stocke, Raynie, Rosch
- 3Enemies: None
- 4Find a merchant outside a house. Buy 3 Horn Charms for Raynie (recommended).
- 5Inside the house, find a chest with 3 SOOTHING BALMS.
- 6Go up the ramp to find a chest with 200 G.
- 7Alistel (Standard Prologue)
- Recommended Level: 6
- 8Recommended Party: Stocke
- 9Enemies: None
- 10Go down and south to the First Ward item shop.
- 11Head to the tavern in the Second Ward to find your target.
- 12Follow the robed man after the scene and confront him.
- 13WEAKNESS: None
- 14STRATEGY: Use Power Wave if learned. Otherwise, use normal attacks and Heal when HP is below 50%.
- 15Head to the first floor to begin the first chapter.
- 16Alistel (Standard Chapter 1)
- Recommended Level: 6
- 17Recommended Party: Stocke, Raynie, Marco
- 18Enemies: None
- 19Find Raynie and Marco at the tavern.
- 20Shops may have new equipment, but not this time.
- 21Pick up sidequests before heading to Lazvil Hills:
- 22Talk to Anna (left of the tavern) and accept [The King's Daughter].
- 23Talk to the kids at the weapon shop and accept [What Was Inherited].
- 24Enter the upper right house and talk to the kids' father to advance [What Was Inherited].
- 25Rest at the inn and head to Lazvil Hills.
- 26Stocke: Custom Sword, Beast Skins, Charm
- 27Raynie: Light Lance, Brigandine, Horn Charm, Horn Charm, Horn Charm
- 28Marco: Bronze Sword, Bronze Mail
- 29Lazvil Hills (Standard Chapter 1)
- Recommended Level: 6
- 30Recommended Party: Stocke, Raynie, Marco
- 31Enemies: Blue Flame (Ice), Feepo (Lightning), Flame Lizard (Ice), Venom Bee (Fire)
- Buying 3 Horn Charms for Raynie provides a significant and long-lasting Magic stat boost.
- Save remaining funds for later, more impactful purchases.
- The decision at Alma Mine is crucial for unlocking all game nodes and endings.
- Progression to the next part of the story.
- Acquisition of sidequests: [The King's Daughter] and [What Was Inherited].
- New equipment and items available from shops.
Similar guides you might like


100% Human-Written. AI Fact-Checked. Community Verified. Learn how AntMag verifies content