Welcome to the Mushroom Kingdom, Paper Mario style! This 2000 Nintendo 64 RPG from Intelligent Systems puts you in Mario's famously flat shoes. You’ll explore vibrant, paper-thin locales, engage in turn-based battles with a unique action command system, and team up with a cast of quirky partners to rescue Princess Peach from Bowser's latest scheme. It’s a charming adventure perfect for anyone who loves classic RPGs with a twist.
This guide is your ultimate companion for mastering every aspect of Mario's first paper-thin adventure. We'll walk you through everything from early game progression and understanding partner abilities to collecting every elusive Star Piece and conquering challenging bosses like the Koopa Bros. Get ready to perfect those action commands and navigate the Mushroom Kingdom like a pro!
++++++++++++++++++++++++++++++++++++++++++++++++++++++++++++++++++++++
A comprehensive walkthrough for Paper Mario's ZeoSpark, covering all chapters, boss fights, and key locations. Navigate through Goomba Village, Toad Town, and more.
This guide covers the ZeoSpark section of Paper Mario. It details the progression through various chapters, including boss encounters and important locations.
- 1Opening
- Princess Peach's Castle
- 2Boss: Bowser
- 3Prologue: A Plea from the Stars
- Goomba Village
- 4Goomba Forest
- 5Jr. Troopa's Playground
- Boss: Jr. Troopa
- 6Goomba Forest (Revisited)
- 7Goomba Village
- 8Goomba Path
- Boss: Red and Blue Goombas
- 9Goomba Fortress
- Boss: Goomba King (with Red and Blue Goombas)
- 10Path before Toad Town
- 11Toad Town
- 12Shooting Star Summit
- 13Pre-Chapter 1
- Path to Shooting Star Summit
- Boss: Kamek
- Path to Shooting Star Summit
- 14Toad Town
- 15Chapter 1: Storming Koopa Bros. Fortress
- Pleasant Path
- 16Koopa Village
- 17Fuzzy Woods
- Boss: Fuzzy (x4)
- 18Koopa Village (Revisited)
- 19Pleasant Path (Revisited)
- 20Koopa Bros. Fortress
- Boss: Bill Blasters (x3)
- 21Boss: Bowser???
- 22Chapter Boss: Koopa Bros.
- 23Princess Peach Playthrough: Part 1
- 24Pre-Chapter 2
- Pleasant Path
- Boss: Jr. Troopa
- Pleasant Path
- 25Chapter 2: The Mystery of Dry Dry Ruins
- Mt. Rugged
- 26Dry Dry Desert
- 27Dry Dry Outpost
- 28Dry Dry Desert
- 29Dry Dry Outpost
- 30Dry Dry Desert
- 31Dry Dry Ruins
- Boss: Stone Chomp (x2)
- 32Chapter Boss: Tutankoopa
- 33Princess Peach Playthrough: Part 2
- 34Pre-Chapter 3
- Dry Dry Desert
- 35Mt. Rugged
- Boss: Buzzar
- 36Toad Town
- 37Toad Town Sewers
- 38Boss: Blooper
- 39Boss: Electro Blooper
- 40Toad Town
- 41Chapter 3: The "Invincible" Tubba Blubba
- Forever Forest
- 42Boo's Mansion
- 43Gusty Gluch
- 44Tubba Blubba's Castle
- 45Gusty Gluch
- 46Windy Mill
- Boss: Tubba Blubba's Heart
- 47Gusty Gluch
- Chapter Boss: Tubba Blubba
- 48Princess Peach Playthrough: Part 3
- 49Pre-Chapter 4
- Gusty Gulch
- 50Boo's Mansion
- 51Forever Forest
- 52Boss: Jr. Troopa
- 53Toad Town
- 54Chapter 4: Trials in the Toy Box
- Shy Guy's Toy Box
- Boss: Anti Guy
- Shy Guy's Toy Box
- 55Toad Town
- 56Shy Guy's Toy Box
- 57Toad Town
- 58Shy Guy's Toy Box
- 59Toad Town
- 60Shy Guy's Toy Box
- Boss: Big Lantern Ghost
- 61Chapter Boss: General Guy
- 62Princess Peach Playthrough: Part 4
- 63Pre-Chapter 5
- Toad Town
- 64Inside the whale
- Boss: Fuzzipede
- 65Toad Town
- 66Chapter 5: Hot Hot Times on Lavalava Island
- Yoshi's Village
- 67Jade Jungle
- 68Yoshi's Village
- 69Jade Jungle
- 70Yoshi's Village
- 71Jade Jungle
- Boss: Putrid Piranhas (x3) and White Magikoopa
- 72Rapheal the Raven's House
- 73Jade Jungle
- 74Mt. Lavalava
- Chapter Boss: Lava Piranha
- 75Princess Peach Playthough: Part 5
- Questions
- 76Pre-Chapter 6
- Jade Jungle
- 77Yoshi's Village
1.1)- Game mechanics
Learn the core game mechanics of Super Paper Mario, including the HUD, leveling up, 2D vs. 3D flipping, and the battle system. Master the game's unique features.
Super Paper Mario blends platforming with RPG elements, featuring leveling up, item usage, and special upgrades. The game's core mechanics are essential for progression.
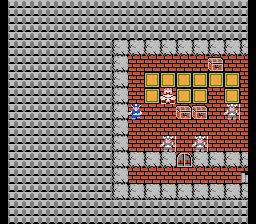
1.1.1) Your HUD
The Heads Up Display (HUD) shows your remaining health (HP), score, and coins. The HUD is located at the top of the screen, displaying HP on the left, score and coins on the right. A 3-D timer bar also appears when in 3-D mode.
- HP: Displays current HP out of total HP. Reaching 0 HP results in a game over.
- Score: Tracks your total points. Reaching certain score milestones triggers a level up.
- Coins: The in-game currency used for purchasing items.
- 3-D Timer Bar: Appears only in 3-D mode, indicating the remaining time.
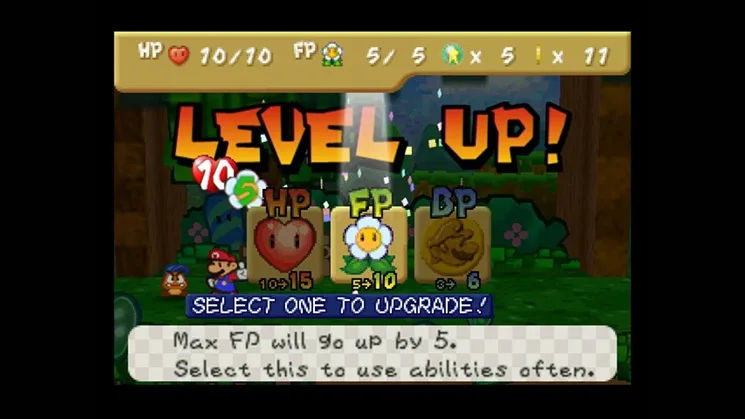
1.1.2) Leveling Up
Leveling up is achieved by accumulating a specific score, viewable in the pause menu. Upon leveling up, the game briefly pauses, displays a "Level up!" message, and fully restores HP. Every even-numbered level increases HP by 5, while every odd-numbered level increases attack by 1. All characters share the same HP, and all except Bowser share the same attack points.
1.1.3) 2-D Versus 3-D
A key feature of Super Paper Mario is the ability to
1.2)- Controls
Learn Paper Mario controls, including Wii Remote orientation, D-Pad functions, and button actions like jumping and using Pixls.
Controls:
- Wii Remote Orientation: Hold the Wii Remote sideways with the buttons facing up and the D-pad in your left hand.
- D-Pad:
- Up: Action (enter, open, talk, etc.) / Walk forward (in 3-D)
- Down: Duck / guard / walk backward (in 3-D) / special attacks
- Left: Walk left
- Right: Walk right
- A Button: Flip dimensions.
- + Button: Pause game / open menu.
- 1 Button: Use Pixl.
- 2 Button: Jump.
- Pointer: Point the Wii Remote at the screen to use Tippi's find and tattle abilities.
- Shaking the Wii Remote: After jumping on something and pausing mid-air, shake the Wii Remote to earn stylish points that are added to your overall score.
1.3)- Pixls
Learn about Pixls in Paper Mario: secondary party members with unique abilities activated by pressing 1. You can only have one active at a time.
Pixls function as secondary party members in Paper Mario. They possess no HP or defense and cannot be targeted by enemies. Each Pixl has a distinct ability, activated by pressing the 1 button. While you can only have one Pixl active on the field at a time (excluding Tippi), you have the flexibility to change your active Pixl at any moment through the pause menu. As you advance through the game, you will discover additional Pixls. It is important to master the use of each Pixl's ability and to approach their application creatively.
- Remember that Pixls cannot be attacked by enemies and have no HP or defense.
- You can switch your active Pixl at any time via the pause menu.
- Experiment with different Pixl abilities to find the best approach for various situations.
Similar guides you might like

100% Human-Written. AI Fact-Checked. Community Verified. Learn how AntMag verifies content