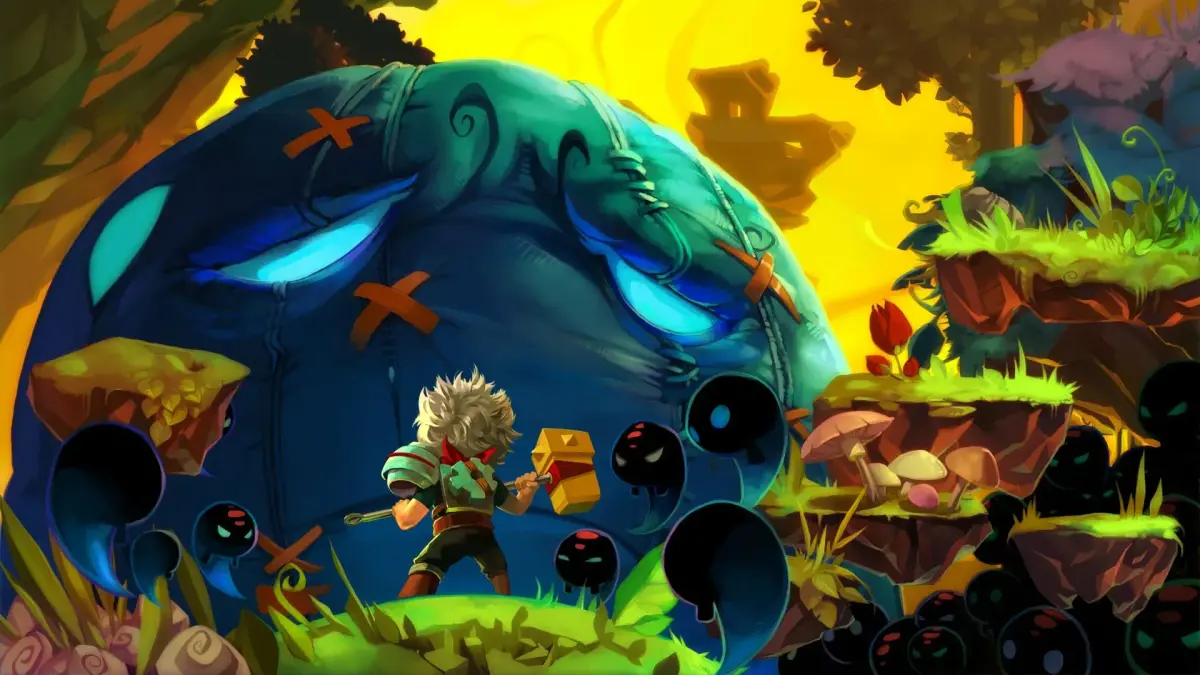
Bastion is a gorgeous action RPG where you play as the Kid, a young hero trying to piece together a shattered world after a cataclysm. You'll blast through enemies with a variety of customizable weapons, from hammers to muskets, all while a dynamic narrator reacts to your every move. It's a game that rewards exploration and skillful combat, with a story that unfolds as you rebuild the titular Bastion.
This guide is your go-to resource for mastering Bastion. We'll help you track down every last collectible, including those elusive Mementos, and provide strategies for overcoming the toughest challenges, like the Proving Grounds and difficult boss encounters. Plus, we'll cover how to earn all those Steam Achievements and unlock the game's various endings.
FAQ/Walkthrough #58
Learn how to move, attack, defend, and use skills in Bastion. Understand weapon types, combat mechanics, and how the world builds around you.
Hey there! So you're diving into Bastion, huh? Awesome choice! This guide is going to walk you through the absolute essentials – how to actually play the game and get a handle on its unique mechanics. Think of it like me showing you the ropes right here, so don't sweat it if things seem a little wild at first.
Controls
First things first, let's get you moving. Here’s a quick rundown of what button does what. It might seem like a lot, but you'll get the hang of it super fast:
| D-Pad | Move |
| Left Analog Stick | Move |
| Right Analog Stick | Defend |
| Start | Pause |
| Back | Open Pack |
| X Button | Attack |
| Y Button | Heal |
| A Button | Evade |
| B Button | Attack |
| Right Trigger | Secret Skill |
| Left Trigger | Defend/Lock On |
| Right Bumper | Cycle Targets |
| Left Bumper | Cycle Targets |
The Basics
The Overworld
Bastion has this gorgeous art style, right? One of the coolest things is how the world actually builds itself around you as you move. You'll start on these little islands, and as you walk towards the edges, paths and bridges will just appear. It’s really neat to watch!
Heads up though: sometimes you might not see where to go immediately. You might need to explore the edges of an area to get a path to pop up. If you're not careful and wander off the edge, you'll fall. Don't worry too much, it only costs a little bit of health, so it's not a huge deal if it happens.
Weapons and Combat
You can carry two weapons at a time, mapped to your X and B buttons. Think of them as melee and ranged. While you can mix and match, most folks find it easiest to go with one of each – say, a sword for close-up and a bow for distance.
You've also got a shield, always ready with the Left Trigger. It's your best friend for blocking enemy attacks. You can swap out your weapons at the Arsenal, which is usually back in the Bastion hub, though sometimes you'll find one in certain levels.
Ranged weapons are cool, but keep an eye on their ammo and how they reload. They reload automatically when you run out, and you have unlimited ammo overall. When you're close to an enemy, the game helps you out by auto-aiming, shown by a line of dots and an arrow. If you need to switch targets quickly, use the Right or Left Bumpers.
Here’s a neat trick: some weapons let you charge up your attack by holding the button. When the Kid glows white for a split second, let go at that exact moment for a Power Shot – it hits way harder!
Don't forget your Secret Skill, mapped to the Right Trigger. These are flashy, powerful moves, and many are tied to specific weapons, so you can only use a Secret Skill if you have its matching weapon equipped.
You'll also be managing two key items: Health Tonics (the green bottles) to heal yourself with the Y button, and Black Tonics for your Secret Skills. You start with space for three of each, but you can find more by fighting enemies and searching around.
Rebuilding the Bastion
The Bastion itself is your main hangout spot, the hub world. When you first get there, you'll see it's in pretty rough shape, and a big part of the game is rebuilding it piece by piece.
THE RIPPLING WALLS [0401]
Follow our guide to complete The Rippling Walls mission in Bastion. Learn how to defeat enemies like Gasfellas and Squirts, find items, and use new weapons.
- 1The Kid wakes up on a miniature island. Move through the doorway to reveal a staircase.
- 2Cross the rainbow-colored bridge.
- 3When you reach a pile of junk, pick up the Cael Hammer with X. Smash obstacles and railings with B. Be careful not to fall off the edge; falling only reduces health slightly. Use A for an evasive roll.
- 4Proceed up the stairs to a clearing. A Gasfella will appear and pursue you. Defeat it with two or three hits. Its health bar is indicated by a blue ring.
- 5On the southern end of the clearing, walk towards the edge near floating wooden boards to reveal a path to Fragments. Look for signs of hidden paths like small floating land pieces. Fragments are the game's currency.
- 6Ascend the stairs and pick up the Fang Repeater. Use X to fire it. It has unlimited ammo and reloads automatically.
- 7Continue up the staircase and approach the fountain. Press X next to it to gain up to three Health Tonics. Heal with Y if necessary.
- 8After healing, a school of Squirts will drop down. Defeat them. To the right of the fountain, find Fragments. To the left, find a Crystal Barrette Memento. Then, go past the fountain into the saloon.
- 9Inside the saloon, walk around and break boxes. Smash Rondy's stone remains until a shield falls from the ceiling. Pick up the Bullhead Shield to equip it automatically. Defend by holding Left Trigger or using the Right Analog Stick.
- 10A Security turret activates and attacks. Deflect its blue energy balls back at it using the Bullhead Shield by defending just before the projectile hits (Counter ability).
- 11After destroying the Security, a Health Tonic appears along with white boxes. These crates reveal Windbags, which are weaker versions of Gasfellas.
- 12Another school of Squirts drops in, accompanied by a green Gasfella. Green Gasfellas have a lunge attack. Defend, heal, and use your ranged weapon to clear out all enemies.
- 13The Narrator points to a window in the corner of the bar. Break through it to enter the next area.
- Be cautious of falling off edges when smashing railings.
- Look for floating land pieces to find hidden paths leading to Fragments.
- The Bullhead Shield's Counter ability is crucial for defeating the Security turret.
- Fragments
- Crystal Barrette Memento
- Bullhead Shield
- Health Tonics
WHARF DISTRICT [0402]
Walkthrough for Bastion's Wharf District. Learn how to use the Breaker's Bow, Whirl Wind, Spirits, and defeat enemies like Security, Squirts, Gasfellas, and Scumbags.
- 1After recovering from your fall, you'll find the Breaker's Bow. Hold the attack button to charge arrows for Power Shots, which are faster and stronger.
- 2As you walk forward, three Security enemies will appear. Block their cannon fire and use the Breaker's Bow to defeat them. The game automatically locks onto targets when you hold the attack button close enough.
- 3Continue onto the pier and wooden walkway. More Security will appear on floating rocks; use your ranged weapon or the Bullhead Shield's Counter to defeat them.
- 4When the path turns right, smash the junk to find Whirl Wind, your first Secret Skill. Press the Right Trigger to use it and demolish the nearby Squirt army.
- 5Cross the bridge and defeat the Security enemies. Enter the Distillery on the left.
- 6Inside the Distillery, you can equip Spirits, which provide special perks. At Level 1, you have one Spirit slot. Squirt Cider (+10% Max Health) is recommended.
- 7Next, enter the Arsenal to swap weapons and Secret Skills.
- 8After leaving the Arsenal, a new path appears. Head across it and collect the Black Tonics.
- 9Two blue cornbins will continuously spawn Squirts. Focus on destroying these cornbins first.
- 10Step onto the blue-trimmed ferrybarge. A Gasfella will appear; defeat it, collect the Health Tonic, and press the switch to activate the barge.
- 11While the barge transports you, defend against Security and Gasfellas.
- 12Upon arrival, defeat the two Gasfellas. Collect Something Heavy in the center. Two large Scumbags will appear. Scumbags are blue blob-like creatures that spew toxic acid and leave trails of it. They shrink as you attack them.
- 13More monsters will appear, including two cornbins. Destroy the cornbins first, then the two Scumbags, and finally the oversized Gasfella.
- 14Collect the Fragments and exit through the gate.
- 15At the end of the road, pick up the shiny blue Core. The walkway will start crumbling, and fire will rain down. Quickly run forward, rolling through obstacles.
- 16Reach the portal leading to the Skyway. If you fall off, you will return to the Bastion.
- Mastering Power Shots with the Breaker's Bow takes practice but can be very effective.
- The Arsenal becomes more useful as you unlock more weapons and skills.
- Prioritize destroying enemy spawn points like cornbins to control enemy numbers.
- Scumbags leave behind damaging acid trails, so be mindful of your positioning.
- Fragments
- Progression to the Skyway
THE BASTION [0403]
Discover The Bastion, the central hub of Bastion. Learn about all the buildings you can construct, from the Distillery and Arsenal to the Forge, Shrine, Memorial, and Lost-and-Found.
The Bastion serves as the game's central hub and is home to the remaining Caelondian population. Upon arrival, speak with the Narrator (also known as the Stranger) and discuss collected items: City Crest, Core, and Crystal Barrette.
Place the Core into the Monument at the center of town to begin rebuilding The Bastion. Three foundations will appear, allowing you to construct buildings. The order of construction is up to you and contributes to the game's non-linear progression. Here are the types of buildings you can create:
- Distillery: Houses Spirits, which are equipment pieces that enhance your character's abilities. The number of Spirits you can equip is tied to your level.
- Arsenal: Allows you to equip and swap weapons and Secret Skills. Finding an Arsenal outside The Bastion is rare, making it important for preparation.
- Forge: Used to upgrade weapons. Upgrades require a Material alloy (items prefixed with "Something") and Fragments. Various enhancements are available.
- Shrine: Contains Idols that, when unlocked, increase enemy difficulty (similar to Skulls in Halo). Idols provide a Fragment and XP boost alongside the added challenge.
- Memorial: Houses Vigils, which are challenges that can be completed at any time. Most Vigils are weapon-specific, but others have different goals. Completing Vigils rewards Fragments, with significant rewards for tougher challenges.
- Lost-and-Found: Functions as the game's shop, where you can buy items like Spirits, Idols, and Secret Skills. It may also contain items missed in completed levels, offering a second chance to acquire them.
Initially, only three foundations are available, allowing the construction of either a Distillery, Arsenal, or Forge. The Shrine, Memorial, and Lost-and-Found become available later in the game.
After building your first structure (the Forge is recommended early on) and exploring, proceed north to the Skyway, which provides access to all game levels. From here, you can either advance to the next level or attempt the first Proving Ground.
Similar guides you might like


100% Human-Written. AI Fact-Checked. Community Verified. Learn how AntMag verifies content