Welcome to the AntMag.NET hub for The Legend of Zelda: Phantom Hourglass! This Nintendo DS adventure casts you as Link, sailing the Great Sea in search of the Ghost Ship and the kidnapped Princess Zelda. You'll pilot your trusty boat, the S.S. Lineback, explore a variety of islands, and delve into challenging temples filled with puzzles and enemies. It's a classic top-down Zelda experience, but with unique stylus controls for movement, combat, and even playing musical instruments.
This guide is here to help you navigate the treacherous waters and overcome the trials within Phantom Hourglass. We'll cover everything you need to know to conquer the game's temples, defeat its formidable bosses, and uncover all the secrets hidden across the Great Sea. Whether you're aiming to find every collectible or just want to make sure you don't miss any crucial steps on your journey, we've got you covered.
The Beginning
Learn about the opening sequence of The Legend of Zelda: Phantom Hourglass, including Niko's story and Tetra's disappearance.
- 1The game opens with a slideshow of paper cutouts detailing Link's adventure from Wind Waker, narrated by Niko.
- 2After Niko's tale, you awaken and are scolded by Tetra, a pirate captain who dislikes being called Zelda.
- 3As the ship sails, it becomes surrounded by a dense fog.
- 4Niko spots a spooky ship in the distance.
- 5Tetra boards the mysterious ship and vanishes into the fog.
- 6You hear a scream from the ship.
- 7You jump from the pirate ship and grab the handrail of the Ghost Ship but lose your grip and fall into the ocean.
- Pay attention to Niko's narration, as it provides backstory from Wind Waker.
- Tetra is a key character who dislikes being referred to as Zelda.
- The appearance of the Ghost Ship and the dense fog signals a shift in the narrative.
Mercay Island
Learn how to get Oshus's sword and find Linebeck on Mercay Island in The Legend of Zelda: Phantom Hourglass. Includes walkthrough for the Temple of the Ocean King.
- 1Awaken on the shore of Mercay Island and speak with the fairy (Ciela) who explains Tetra was taken by the Ghost Ship.
- 2Follow Ciela to Oshus's house and speak with him. He will direct you to the port to find Linebeck.
- 3As you head east towards town, an earthquake collapses the bridge.
- 4Return to Oshus's house and speak with him again. He tells you to wait for the bridge to be rebuilt.
- 5Go to the cave east of Oshus's house.
- 6At the far end of the cave, find a stone slab with palm trees. Write the number '7' on the sign to open the slab.
- 7Open the chest revealed by the slab to obtain Oshus's sword. A book explaining sword basics is also present.
- 8Speak with Oshus outside the cave again. He will scold you but allow you to keep the sword and offer swordplay lessons.
- 9Head back to Oshus's house for swordplay instruction.
- 10After your lesson, head north through the entrance to the Path.
- 11Defeat the 3 Chu-Chus and continue north and east past the springy rock.
- 12Perform a roll attack on the large tree to get a Red Rupee (worth 20 Rupees).
- 13Head south, defeat more Chu-Chus, and slice through trees to enter a cave.
- 14Inside the cave, clear the path by picking up and throwing three rocks.
- 15Defeat 4 Chu-Chus past the locked door and open the chest to get a key.
- 16Use the key to open the locked door. Defeat 5 more Chu-Chus in the large room.
- 17Tap the block on the left side of the room to enter a chamber with 2 Keese. Read the sign: "When pulling the levers: First: 2nd from the left."
- 18Head right, past another block, into a chamber with 4 Keese and a chest. Defeat the Keese, open the chest for a Red Rupee, and read the sign: "When pulling the levers: Second: 1st on the left. Last: 2nd from the right."
- 19Go back to the large room and pull the levers in the correct order: 2nd from the left, then the far left, then the far right, then the 2nd from the right. Pulling them in the wrong order causes snakes to drop from the ceiling.
- 20A key will drop. Use it to open the locked door and proceed up the stairs.
- 21On the second floor, head down the path, defeating rats.
- 22At the end, a key-carrying rat runs between two rat holes. To catch it, push the block in front of the nearest hole.
- 23Let the rat run out, then ambush it as it turns back towards the blocked hole. Take the key.
- 24Use the key to open the locked door and proceed past Keese to the exit.
- 25Once outside, head to the port. You'll learn Linebeck has been missing for days.
- 26Go to the Milk Bar on the western edge of town and speak with the bartender.
- 27The bartender will tell you Linebeck was last seen heading towards the Temple of the Ocean King on the north side of the island.
- You can mark Oshus's initial pointing location on your map by pressing the Map button and drawing a symbol, or simply remember the ship-like landmark.
- If you get stuck on the lever puzzle, remember the order is: 2nd from left, far left, far right, 2nd from right.
- Reading the book in the cave near Oshus's house will teach you the basics of sword usage.
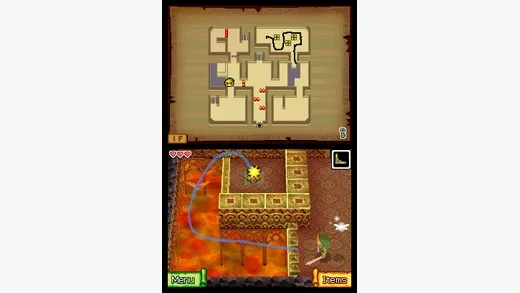
Temple of the Ocean King
Follow this walkthrough for The Legend of Zelda: Phantom Hourglass to navigate the Temple of the Ocean King, rescue Linebeck, and find the Sea Chart.
- 1Enter the temple and speak with the skeletons for advice.
- 2Proceed through the door at the far end of the room.
- 3An unseen voice calls out; Ciela identifies it as Linebeck, trapped behind a spike wall.
- 4Linebeck explains that the temple will suck out your soul unless you stay on the purple spaces and move quickly between them.
- 5Head left and north past Linebeck to a safe zone with a locked door and a switch.
- 6Hit the switch to release Linebeck.
- 7Return to the entrance where Linebeck is waiting.
- 8After Linebeck's comments, explain you are looking for the Ghost Ship. Linebeck, initially thinking of treasure, agrees to help you find Tetra and search for the Ghost Ship.
- 9Linebeck gives you a key and tells you to find a clue in the temple.
- 10Return to the location of the locked door and go to the northwest corner.
- 11Hit the first switch to stop the nearby spikes from moving.
- 12Proceed past the large stone slab in the middle and through another set of spikes (the other path leads to a collapsing floor).
- 13Time your movement through the spikes to avoid damage.
- 14Hit the second switch in the far northeast corner. You have a limited time to hit the second switch after the first before it deactivates.
- 15After hitting both switches, the stone slab will drop, revealing a chest containing the Sea Chart.
- 16With the Sea Chart, return to the entrance. Linebeck will have disappeared.
- 17Head back outside.
- The purple spaces are safe zones; run between them quickly to avoid the soul-draining effect of the temple.
- The order in which you hit the two switches does not matter, but you must hit both within the time limit after activating the first.
- Be careful when navigating the spike traps.
Mercay Island (2)
Continue your adventure in The Legend of Zelda: Phantom Hourglass! Learn how to decipher the treasure chart, meet Astrid, and prepare for your next journey on the Isle of Ember.
Alright, you've just finished up in the temple and Linebeck's waiting for you outside. Don't mind him if he's being his usual grumpy self about you taking too long – he always has something to say! He'll snatch that chart you found and try to ditch you to find the treasure himself. Typical Linebeck, right?
Head back to town and make your way to the port where his ship is docked. You'll find Linebeck there, but more importantly, you'll see old Oshus. He's going to give Linebeck a good scolding, and then he'll take the map back. Even though Linebeck thinks the chart is nothing special, Oshus points out a flaky spot on it. He believes you can solve whatever puzzle it holds.
Use your stylus to rub over the southwest corner of the island on the map. You'll reveal a strange symbol! Oshus recognizes it and tells you it marks the Isle of Ember, home to a fortune-teller named Astrid. That's where you're headed next!
Before you set sail, though, it's a really good idea to visit the town shop. Grab a shield for 80 Rupees if you don't have one already. Trust me, it'll be super useful down the line. Once you're all set on Mercay Island, chat with Linebeck to set sail for your next destination.
Similar guides you might like

![Under Night In-Birth Exe:Late[cl-r]](/images/covers/under-night-in-birth-exe-late-cl-r.webp)


100% Human-Written. AI Fact-Checked. Community Verified. Learn how AntMag verifies content