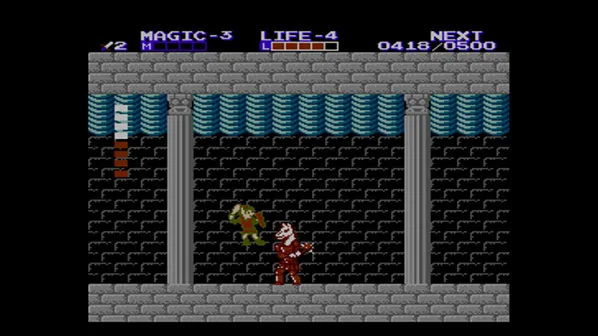
Welcome to Zelda II: The Adventure of Link, a unique entry in the legendary series that trades top-down exploration for side-scrolling action and RPG elements. As Link, you'll venture across Hyrule to find the Triforce of Courage and awaken Princess Zelda from her eternal slumber. This means mastering a new combat system featuring blocking and magic, exploring towns, and delving into dangerous dungeons filled with enemies and challenging platforming.
This guide is your key to conquering Hyrule's toughest challenges. We'll walk you through essential spells and techniques, help you uncover every hidden item scattered throughout the land, and provide strategies for defeating formidable bosses like the Iron Knuckle. Get ready to equip yourself with the knowledge needed to overcome every obstacle and reignite the Triforce.
Guide and Walkthrough (NES) by TheRewster
Comprehensive walkthrough and guide for Zelda II: The Adventure of Link on NES. Includes secrets, items, palace details, and leveling tips for this challenging action-adventure.
Welcome to _Zelda II - The Adventure of Link_! Widely considered among the most challenging entry in the _Zelda_ series, as well as the only title that prominently features side-scrolling action, this game is very different from the rest. This guide covers the original NES version of the game released in North America, so be aware there may be regional differences.
This guide is intended to be as thorough and comprehensive as I can make it. Along the way, I'll be pointing out to you every secret that can be found in the overworld, as well as every item that can be found in each and every one of the palaces (which are this game's version of traditional _Zelda_ dungeons). In a game as difficult as this one, it's important to acquire every single advantage you can find. So though this guide is written with the completionist in mind (as is my usual approach), it should also be useful for those just looking to clear the game regularly, as it's tough to beat without finding everything.
Before each dungeon, I'll tell you what all it's possible to have at that point in the game (after walking you through how to get everything of course), then take you room by room through the dungeons. At the end is an appendix that serves as a quick reference if you want to look up where certain things (e.g. Treasure Bags) are located, as well as some handy charts about experience points and the like. After that is a quick version of the walkthrough for those more experienced with the game who just want to know the best order for completing the adventure and have a brief list of all there is to do in the game.
Experience Points and Leveling Up
A unique feature of this game compared to the rest of the _Zelda_ series is the leveling system for three of Link's stats: the attack power of his sword (i.e. Attack), his magic meter (i.e. Magic), and his life meter (i.e. Life). Link levels up by collecting experience points or EXP. You can acquire EXP by defeating most enemies or by obtaining Treasure Bags. The latter can be picked up from certain locations, or on rare occasions they can be dropped by defeated enemies (in which case they will contain significantly more EXP than just beating the enemy regularly).
As you progress through the game, you level up at certain EXP milestones, per the chart below:
| Level Up | EXP |
|---|---|
| Life - Level 2 | 50 |
| Magic - Level 2 | 100 |
| Life - Level 3 | 150 |
| Attack - Level 2 | 200 |
| Magic - Level 3 | 300 |
| Life - Level 4 | 400 |
| Attack - Level 3 | 500 |
| Magic - Level 4 | 700 |
| Life - Level 5 | 800 |
| Attack - Level 4 | 1000 |
| Magic - Level 5 | 1200 |
| Life - Level 6 | 1500 |
| Attack - Level 5 | 2000 |
| Magic - Level 6 | 2200 |
| Life - Level 7 | 2500 |
| Attack - Level 6 | 3000 |
| Magic - Level 7 | 3500 |
| Life - Level 8 | 4000 |
| Attack - Level 7 | 5000 |
| Magic - Level 8 | 6000 |
| Attack - Level 8 | 8000 |
| 1-Up | 9000 |
Every time you level up, however, your EXP count resets to zero, making the next level milestone that much harder to reach. If you don't want your EXP to reset, you can choose to cancel, and thus continue acquiring EXP to reach a different milestone. (For example, if you gain 50 EXP but would rather focus on leveling up Magic or Attack instead of Life, you can cancel the Life level up--which postpones it--and keep your 50 EXP to make reaching 100 or 200 EXP more efficient.)
As you can see from the above chart, the maximum level for each of the three stats is level 8. After you've fully leveled up every stat, you'll gain an extra life each time you acquire 9000 EXP from then on. Suffice it to say then, it is absolutely worth your while to learn the game's combat and fight as many enemies as you can. See the dedicated section of the appendix for more details and charts on enemy EXP.
Lives, Continuing, and Saving
One final note about saving and the lives system. Unlike other _Zelda_ titles, this game does have a lives system. You start with three lives. If your life meter runs out completely, or if you fall into a pit of water or lava, you will lose a life and start back at the beginning of the corresponding screen. You can obtain more lives (or 1-ups) by picking up Dolls that look like miniature Links (there are only six in the game though) or, much later, after you have maxed out all your stats, you get an extra life each time you accumulate 9000 EXP.
If you run out of lives, however, you get a game over.
A game over does three things: First, regardless of whether you choose to continue or save, it adds a number next to the save file on the menu select screen, which can best be thought of as a "death counter." This counter is permanent until you erase the file. Second, you'll be sent back to the North Castle at the very beginning of the game no matter how far you've gotten, even if you ran out of lives against a boss deep inside a palace. (The only exception to this is if you get a game over inside the Great Palace, which is the final palace--in which case you respawn at the entrance to that palace--but only if choose _continue_.) So getting a game over will require an incredible amount of backtracking! Third, you lose whatever experience points you've accumulated to that point. Now if you get a game over, your progress will still be saved--you retain the same levels, spells, items, and overall game progress.
Guide and Walkthrough (NES) by TheRewster (2)
Zelda II: The Adventure of Link guide and walkthrough covering Parapa Palace, Midoro Palace, Death Mountain, and more.
- 1Introduction
- 2Setting Out
- 3Parapa Palace
- 4Through the Swamps
- 5Midoro Palace
- 6Navigating Death Mountain
- 7Island Palace
- 8To Eastern Hyrule
- 9Maze Palace
- 10Walking on Water
- 11Palace on the Sea
- 12Hidden Places
- 13Three-Eye Rock Palace
- 14Through the Valley of Death
- 15Great Palace
Appendix:
- Enemy Index
- Heart Containers, Magic Containers, Dolls
- Treasure Bags
- Fairies & Red Magic Jars
Additional Sections:
- Quick Guide
- Outro
- Refer to the Appendix for detailed information on enemies, items, and helpful resources.
- Use the Quick Guide for a faster overview of key objectives.
Through the Swamps
Guide to navigating the Tantari Desert, Ruto Town, and the treacherous Moruge Swamp in Zelda II: The Adventure of Link. Find Magic Containers, Trophies, and learn the Jump spell.
- 1Tantari Desert: Depart Parapa Palace southwest, re-enter the cave passage. Fight Lowders (3 EXP each) and exit. Head southwest of North Castle to a cave. Fight Lowders and Red Octoroks (10 EXP each). Obtain Magic Container #1 at the end. Exit and head north of North Castle to Tantari Desert. Enter the cave near the sea. Defeat Aches, then two Red Octoroks while avoiding lava pits. Defeat the Red Goriya (20 EXP) and obtain the Trophy. Exit and head south to the road, then west into mountains to find Ruto Town.
- 2Ruto Town: Heal at the first house. Restore magic at the second house. The man in the next building says "I am Error" initially. An old woman mentions "Hammer... Spectacle Rock... Death Mtn." The maiden in the next building invites you in if you have the Trophy. Go to the basement to learn the Jump spell from an old man. This spell allows Link to jump twice his height on the current screen. Townsfolk offer hints: use Keys in palaces, don't go south without a Candle, and a Magic Container is south of the castle (referring to the one found earlier).
- 3Passage to the Swamp: Exit Ruto Town and head south to a cave. This cave has three sections. First section: Red Octoroks. Cast Shield. Second section: Red Goriya, then Lowders, then another Red Goriya. Cast Shield again. Third section: Aches, and a red Ache that transforms into an Acheman (10 EXP). Conserve magic here. At the end, cast Jump to scale a tall wall and exit.
- 4Moruge Swamp: You emerge near Moruge Swamp. Go east to a lone tree bordering the swamp to find a hidden Fairy.
- Crouch to block Octorok projectiles and attack when they jump.
- Be cautious of lava pits when fighting Red Octoroks in caves; time your jumps carefully.
- The Jump spell is essential for traversing certain areas, including the exit of the cave passage to Moruge Swamp.
- Conserve magic in the third section of the cave passage to the swamp, as the Acheman can be challenging.
- Heal and restore magic in towns before undertaking difficult cave sections.
- Magic Container #1 (increases magic meter)
- Trophy (required for progression in Ruto Town)
- Jump Spell (enhances mobility)
- Hidden Fairy (restores health)
Guide and Walkthrough (NES) by TheRewster (3)
Navigate Zelda II: The Adventure of Link NES with this complete table of contents, covering walkthroughs, appendices, and more.
Sections:
- Introduction
- Setting Out
- Parapa Palace
- Through the Swamps
- Midoro Palace
- Navigating Death Mountain
- Island Palace
- To Eastern Hyrule
- Maze Palace
- Walking on Water
- Palace on the Sea
- Hidden Places
- Three-Eye Rock Palace
- Through the Valley of Death
- Great Palace
- Appendix: Enemy Index, Heart Containers, Magic Containers, Dolls, Treasure Bags, Fairies & Red Magic Jars
- Quick Guide
- Outro
- Use the Table of Contents to quickly jump to specific sections of the guide.
- The Appendix provides detailed information on enemies, items, and helpful resources.
Similar guides you might like


100% Human-Written. AI Fact-Checked. Community Verified. Learn how AntMag verifies content