Navigate the tricky Lemmings Revolution Part 24, 'Waste Not... Want Not,' with our step-by-step guide. Learn to save all 10 Lemmings and beat the 10-minute timer!
Alright, let's tackle Part 24, which is actually split into two levels: 'Waste not... want not' and 'Ouch me head.' We've got a bit of a puzzle on our hands here, especially in the first level, so pay close attention!
- 1Level: Waste not... want not.part 1
You're starting with 10 Lemmings, need to save all 10, and have 10:00 on the clock.
First, make the very first Lemming out of the box a 'climber-floater.' This guy will abseil down a wall and float to the bottom. He'll then walk until he hits a switch. This switch is crucial because it reverses the positions of two walls to your left, allowing the rest of the Lemmings to pass through.
After hitting that switch, you need to have this Lemming dig a hole to contain the others. He'll stop at a steel bar and then walk right, climbing out of his own hole. Let him walk a bit, then have him mine until he hits steel. He'll try to climb out, fail, and turn around. This action will flip another switch to the left, opening a small door directly in front of him.
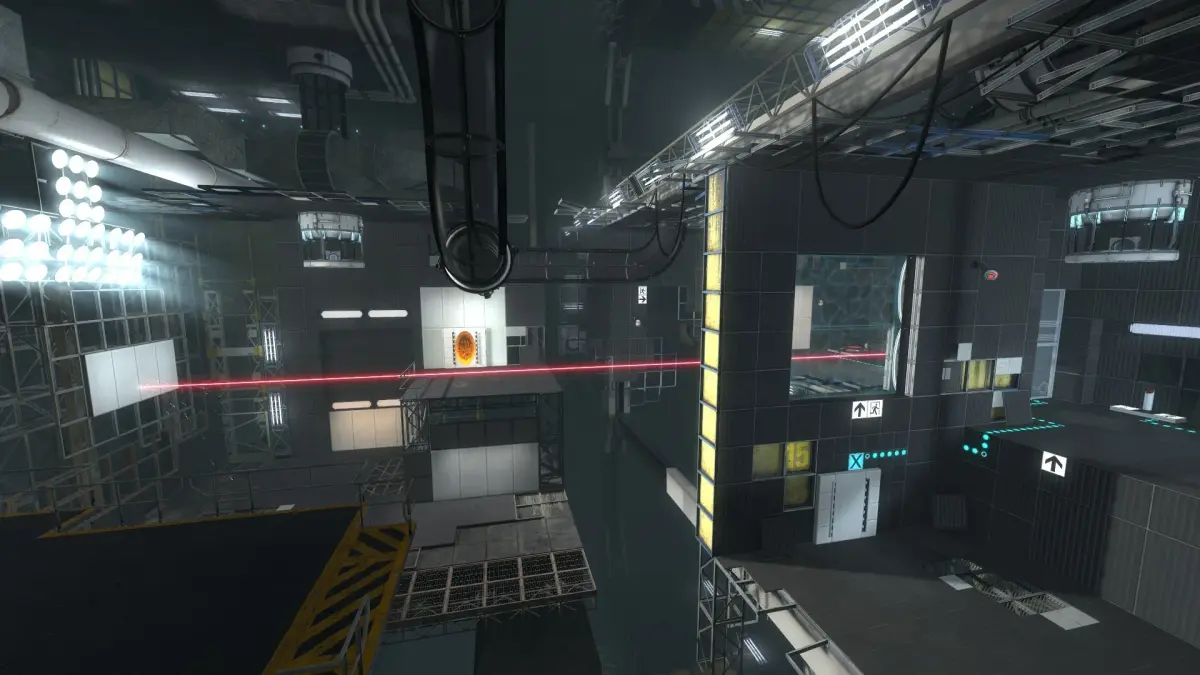
When he drops to the next ledge, have him mine before he reaches the wall. This is important because it creates a roof over your head if you need to bash to the left later. You don't want him climbing over the wall to oblivion. Just have him mine and bash into the wall, which will make him turn right. Now, dig to the left of the laser detector below. This action closes the steel door above him without opening the other one. Even though this laser gate isn't critical for the mission, you need to be down here anyway.
Over to the right of the laser apparatus, there's a small piece of steel. Build one bridge on it or just to its right. The Lemmings coming from above will need to land on this bridge when they bash through the hole they're currently crowded in. Let your builder give up after his 12 steps and walk over to the anti-gravity field on the right. When he's launched up, he'll land on the bottom part of two thin planks. Dig twice through the middle section of this ledge. This upside-down Lemming will now slowly walk to a gravity reversal pad at the top, putting him back on solid ground.
When he falls back down, he'll walk right and climb over a small section of steel. On the wooden ledge below, have him start building in the middle of the plank section farthest to the right. If you build here, his bridge will touch the wall just as he hits his 12th tile. Have your 'basher' Lemming ready for the wall while the builder works. As soon as the builder shrugs (meaning he's out of bridge materials), bash through the wall. The laser gate inside will extend two long metal floors, which the other Lemmings can use.
Immediately after this busy Lemming triggers the laser, have him mine and bash again. He'll hit the wall and turn left. Have him dig when he's to the left of the gate. He'll float down to safety and be the first Lemming in the exit balloon. Now, focus on the rest of the Lemmings still in that thin hole.
To get them out, you'll need to bash twice to the right. If a Lemming starts bashing and goes left, don't worry too much – there's a small steel wall to the left to stop him. Bash twice to the right, and they'll land on the bridge you built earlier for them to fall onto (you did build that bridge, right?). From here, it's a long walk to the end, taking almost two minutes. You might want to speed up the game here if you're getting bored. But wait, there's one more thing! When the Lemmings reach the anti-gravity vortex at the top, they'll hit the steel to the right and fall to the thin plank below. Wait for a Lemming to walk into the wall on the left and turn around, then dig when you're above the steel floor on the right. This creates a clear path to the balloon for everyone!
- 2Level: Ouch me head.
This is the second level in Part 24. You need to save 50 Lemmings out of 50 within 5:00.
This level is surprisingly straightforward to end the set. Have the first Lemming out of the hatch dig a path. One Lemming will get by the hole, but that's fine; you need him to forge the path. A short way into the hole, have the digger build a bridge to cut it off.
- In 'Waste not... want not,' the level description mentions that the switch and the spiked log are totally useless. Don't waste time trying to figure out how to use them!
- The 'Waste not... want not' level can be tedious. Feel free to use the game's speed-up function when Lemmings are just walking for long stretches.
- Pay close attention to the directions Lemmings are facing after mining or bashing. This often dictates their next action and your next move.
- Successfully completing Part 24 means you're one step closer to finishing Portal: Revolution!
100% Human-Written. AI Fact-Checked. Community Verified. Learn how AntMag verifies content