Master advanced shop customization in PC Building Simulator 2. Learn to strategically place power outlets and optimize cooling for peak workshop efficiency.
Welcome, master builders! While the basic shop upgrades in PC Building Simulator 2 offer a solid foundation, truly optimizing your workspace for both aesthetics and efficiency requires a deeper dive into advanced customization. This section will guide you through unlocking and strategically utilizing every available option to create the ultimate PC building sanctuary.
Unlocking Customization Options
Many of the most impactful customization features aren't available from day one. They are typically unlocked through a combination of:
- Player Level Progression: As you complete more jobs and gain experience, new items and customization categories will become available in the shop's "Decorate" menu. Keep an eye on your level-up notifications for these unlocks.
- Story Missions/Special Jobs: Certain unique jobs or story progression milestones will grant access to specific, often powerful, customization items or even entirely new shop layouts. Don't skip those special requests!
- Financial Investment: Some of the most impressive upgrades, like expanding your workshop or purchasing high-end display cases, require a significant monetary investment. Prioritize these purchases once your income stream is stable.
The "Decorate" Menu: Your Customization Hub
Access the "Decorate" menu by clicking the paintbrush icon in the bottom-left corner of your screen while in your workshop. This is where all your customization magic happens.
Workshop Layout & Expansion
Early in the game, your shop is a cozy, if cramped, space. As you progress, you'll unlock options to expand and reconfigure your workshop:
- Wall Removal/Addition: Navigate to the "Walls" tab within the "Decorate" menu. Here, you can click on existing walls to remove them, opening up your space. Conversely, you can add new walls to create distinct zones for building, testing, or displaying. This is crucial for larger, multi-station setups.
- Floor Plan Upgrades: Keep an eye on the "Shop Upgrades" section (accessible via your tablet's "Shop" app). These upgrades often include expanding your overall shop footprint, providing more room for additional workbenches, storage, and decorative elements.
Strategic Furniture Placement
Beyond aesthetics, furniture placement directly impacts workflow and customer satisfaction.
- Workbenches: You can purchase additional workbenches from the "Furniture" tab. Place them strategically to minimize walking distance between components and tools. Consider a dedicated "diagnostics" bench near your testing area.
- Storage Units: Essential for organizing your ever-growing inventory of parts. Purchase various "Storage Cabinets" and "Shelving Units" from the "Furniture" tab. Group similar components together (e.g., GPUs on one shelf, CPUs on another) for quick access.
- Display Cases: Once unlocked, "Display Cases" (found under "Furniture" or sometimes "Special Items") are vital for showcasing your completed builds. Strategically placing these near the entrance can impress clients and potentially lead to higher tips or repeat business. Remember to place your best-looking builds in them!
- Comfort Items: Items like "Office Chairs," "Couches," and "Coffee Tables" (all under "Furniture") might seem purely aesthetic, but a well-decorated, comfortable shop can subtly improve employee morale (if you hire assistants later) and client perception.
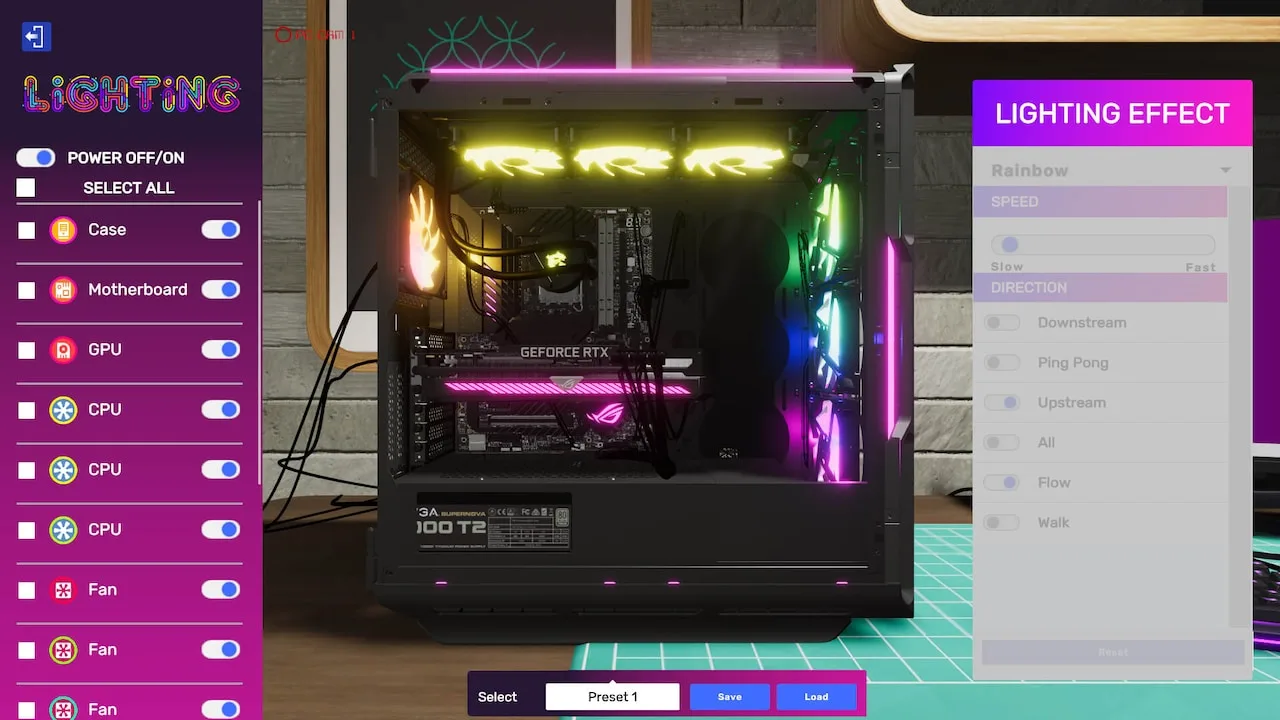
Lighting & Ambiance
The right lighting can transform your workshop from a drab garage into a professional studio.
- Overhead Lighting: In the "Lighting" tab, you'll find various "Ceiling Lights," from basic fluorescents to stylish LED panels. Experiment with different types to achieve optimal illumination for detailed work.
- Accent Lighting: "Wall Sconces," "Desk Lamps," and "Floor Lamps" can be used to highlight specific areas, such as your display cases or a particularly intricate build. Consider using colored lights for a more dynamic and personalized look.
- Window Treatments: Once unlocked, "Blinds" and "Curtains" (under "Decorations") can control natural light and add a touch of privacy or style.
Wall & Floor Finishes
Don't underestimate the power of a fresh coat of paint or new flooring.
- Wallpapers & Paint: The "Walls" tab isn't just for structural changes; it also houses a vast selection of "Wallpapers" and "Paint Colors." Experiment with different schemes. A clean, professional look often involves neutral tones, while a more "gamer" aesthetic might include bold colors or themed wallpapers.
- Flooring: Under the "Flooring" tab, you can choose from various materials like "Hardwood," "Tile," "Carpet," and even "Concrete." Each offers a different visual appeal and can help define distinct areas within your shop. For instance, a durable, easy-to-clean tile might be best for the main work area, while a carpeted section could be used for a client waiting area.
Decorative Elements & Personal Touches
This is where your shop truly becomes yours.
- Posters & Art: The "Decorations" tab is filled with "Posters," "Paintings," and other wall art. Choose items that reflect your personal style or the brand image you want to project.
- Plants: "Potted Plants" and "Desk Plants" can add a touch of life and freshness to your workshop, improving the overall atmosphere.
- Collectibles & Trophies: As you achieve milestones and complete challenging jobs, you'll earn "Trophies" and other unique "Collectibles." Display these proudly on shelves or desks to showcase your expertise.
- Branded Items: Later in the game, you might unlock branded merchandise from in-game companies (e.g., "CORSAIR Mouse Pad," "NZXT Figurine"). These can add a professional and authentic touch to your shop.
Advanced Strategies for Shop Customization
- Theme Your Shop: Decide on a theme early on. Do you want a sleek, futuristic look? A cozy, retro vibe? Or a hardcore gaming den? Sticking to a theme will help guide your choices for colors, furniture, and decorations.
- Optimize Workflow: Place your most frequently used tools and components within easy reach of your workbenches. Group related items together. For example, have a "testing station" with a monitor, keyboard, and mouse right next to a dedicated "diagnostics bench."
- Client Impression: Remember that clients visit your shop. A clean, organized, and well-decorated space can positively influence their perception of your professionalism, potentially leading to better reviews and higher tips. Consider a dedicated, comfortable "waiting area" if space allows.
- Experiment & Iterate: Don't be afraid to try different layouts and decorations. You can always move or sell items if they don't work out. The "Decorate" menu allows for real-time adjustments, so play around until you find what feels right.
- Budget Wisely: While customization is fun, remember to balance it with your financial goals. Prioritize functional upgrades (more workbenches, storage) before purely aesthetic ones, especially in the early game.
By following these advanced customization tips, you'll not only create a visually stunning workshop but also a highly efficient and enjoyable space to build the ultimate PCs for your clients.
100% Human-Written. AI Fact-Checked. Community Verified. Learn how AntMag verifies content