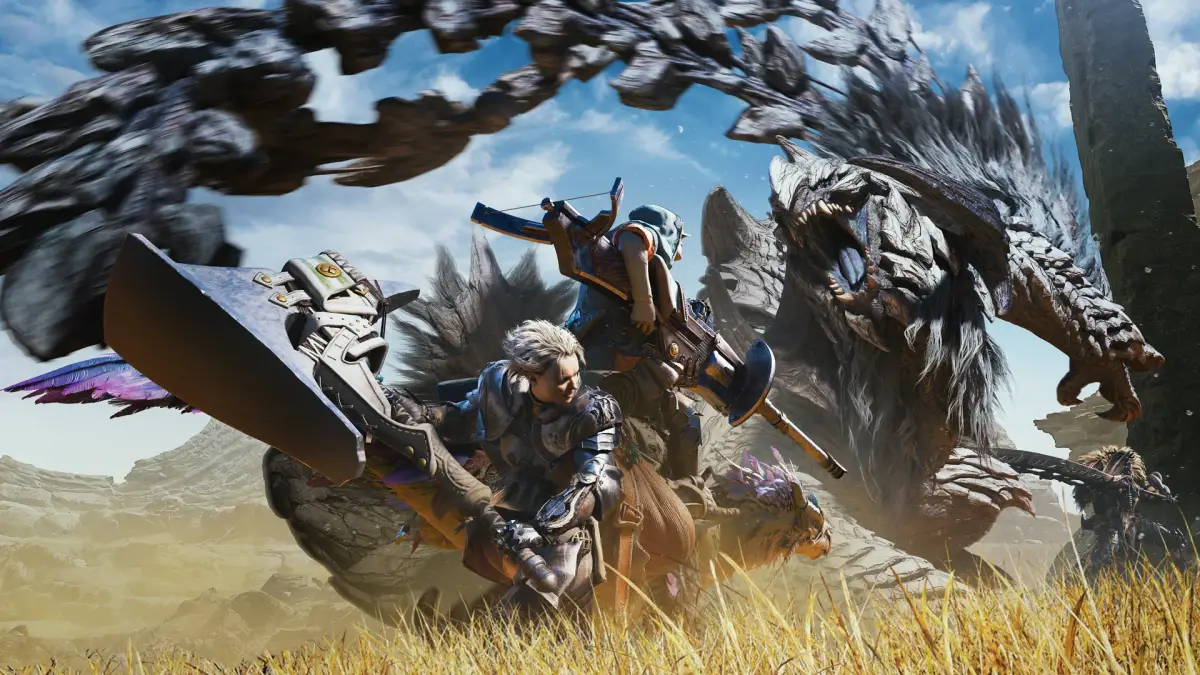
Welcome to Monster Hunter Wilds, the latest installment in Capcom's thrilling action RPG series. As a hunter, you'll venture into a dangerous new world, tracking and battling colossal monsters. Master your weapons, craft powerful gear from your fallen foes, and prepare for challenging hunts that test your skill and strategy. Whether you're a newcomer or a veteran hunter, the wilds are calling.
This guide is your essential companion for conquering the challenges ahead. We'll cover everything from mastering beginner quests and understanding essential armor skills to taking down formidable monsters like the Barroth. Dive deep into uncovering hidden secrets and ensuring you're fully equipped for every hunt the New World throws your way, helping you achieve those coveted Steam Achievements.
Explorer of the Eastlands Trophy and Achievement Guide: Trophies Achievements
Master Monster Hunter Wilds with our comprehensive guide to Eastlands Trophies and Achievements. Discover locations, requirements, and strategies for every collectible and objective.
Explorer of the Eastlands Trophy and Achievement Guide: Trophies Achievements
Master Monster Hunter Wilds with our comprehensive guide to Eastlands Trophies and Achievements. Discover locations, requirements, and strategies for every collectible and objective.
Explorer of the Eastlands Trophy and Achievement Guide: Guides
Master Monster Hunter Wilds with our comprehensive Explorer of the Eastlands Trophy and Achievement Guide. Find all 10 rare gathering items needed for this trophy.
Explorer of the Eastlands Trophy and Achievement Guide: Guides
Master Monster Hunter Wilds with our comprehensive Explorer of the Eastlands Trophy and Achievement Guide. Find all 10 rare gathering items needed for this trophy.

Fishing Achievement/Trophy Guide
Unlock all fishing achievements in Monster Hunter Wilds! Learn how to catch small fish, giant whoppers, and even squid with our comprehensive guide to lures and techniques.
This guide covers how to unlock fishing and achieve all related fishing achievements in Monster Hunter Wilds, including catching small fish, whoppers, and squid.
Unlocking Fishing
Fishing becomes available after reaching the Scarlet Forest. Speak to Kanya near a pond by the base camp to start a series of side quests. Her first quest is Fishing: Life, in Microcosm, which requires catching any fish. The Fishing Rod tool should have unlocked earlier after fighting the Quematrice. While you can fish anytime after unlocking the rod, Kanya's quests are essential for unlocking useful accessories like lures, which expand the variety of fish you can catch. Completing her questline is highly recommended to fish at your full potential.
Kanya's questline progresses through several stages. After completing her first quest, you'll receive the second quest, Catch a Goldenfish, along with Emerald Jitterbait and Golden Bughead lures, in addition to the starting Common Wood Minnow. The subsequent quest, The Catch of a Lifetime!, introduces whoppers and provides the Tuff Joint Bait and Duster Rig lures. The final quest, Razzle Dazzle, unlocks the Tentacle Jig bait. Utilizing these lures is crucial for catching specific fish and fully mastering the fishing minigame.
Catching Small Fish
The fishing minigame has two phases: catching small fish and catching whoppers. Small fish are relatively simple to catch. To begin, equip your Fishing Rod, select the appropriate lure for your target fish, and cast your line near it. The lure's effectiveness depends on the fish, as does how you move it. You can jerk the lure using the button, or rotate the left analog stick counter-clockwise to reel it in smoothly. Some fish prefer jerking, others smooth movement, and many are not picky. Rarer fish, however, can be very selective, requiring trial and error.
Once a fish bites, press the / button to complete the bite phase. Smaller fish are automatically reeled in. If a whopper bites, you proceed to the second phase.
Area 17 in the Scarlet Forest is considered the best location for catching whoppers and fishing in general, with a nearby campsite.
Catching Whoppers - A-fish-ianado Achievement
Whoppers are fish large and strong enough to initiate the second phase of the fishing minigame, where you must contend with the fish's strength. Most whoppers are attracted to the Tuff Joint Bait, except for squids (which count as fish for this guide), which respond to the Tentacle Jig lure. Generally, whoppers prefer a steady reeling motion; rotate the left analog stick counter-clockwise until one bites, then begin the second phase.
When a whopper bites, it will attempt to swim away. Move the left analog stick in the direction the whopper is swimming () to maintain line tension. The game is forgiving, so brief incorrect inputs usually won't cause the whopper to break free. When the whopper tires and stops moving, rapidly move the left analog stick up and down () while holding / to reel it in. This process may take 2-3 cycles. If the whopper is close to shore, it might be easier to reel in.
During the tension management and reeling phases, be aware of two additional factors that can complicate the process.
Miniature Crown and Giant Crown Farming
Learn how to get Miniature and Giant Crowns in MHF1 by mastering Treasure Hunting Quests. Discover the best items, strategies, and rewards.
Similar guides you might like


100% Human-Written. AI Fact-Checked. Community Verified. Learn how AntMag verifies content