
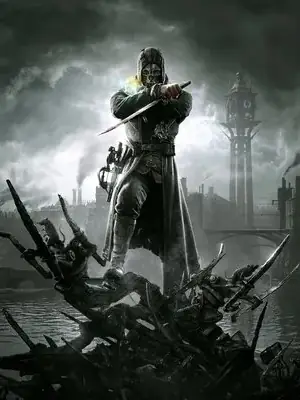
Step into the worn boots of Billie Lurk, a notorious killer-for-hire, in Dishonored: Death of the Outsider. Reunited with your mentor Daud, you’ll embark on a mission to assassinate the enigmatic Outsider himself, a figure central to the Empire’s darkest deeds. This standalone adventure plunges you into the grimy underworld of Karnaca, where you’ll uncover ancient mysteries and confront formidable opposition. Master Billie’s unique abilities and navigate a world rich with story and open-ended gameplay.
This guide is your key to mastering every aspect of Billie’s journey. We’ll provide a complete, step-by-step walkthrough covering all missions, from “One Last Fight” to “The Bank Job.” You’ll find the exact locations of every collectible, including Bonecharms, Paintings, and Coins, alongside detailed information on all Contracts and Special Actions. Plus, get the lowdown on Black Market Shops and a comprehensive Trophy & Achievement Guide to ensure you don’t miss a single detail.
Part 1
Begin your journey in Dishonored: Death of the Outsider! This guide covers the first mission, 'One Last Fight,' helping you navigate the initial steps and master the controls.
Alright, let's dive into Dishonored: Death of the Outsider! This is your starting point, where we'll get you acquainted with the controls and the very first steps of Billie Lurk's mission. Think of this as getting your bearings before the real chaos begins.
The controls are pretty much what you'd expect if you've played Dishonored 2, so if you're familiar with that, you're already ahead of the game. We'll be using the default 'Preset A' controls here, but remember you can always tweak them in the options if something doesn't feel right.
Here's a quick rundown of the essential buttons:
| BUTTON | FUNCTION |
| D-Pad | Quick-select weapons/powers/items |
| Options | Toggle main menu |
| Share | Toggle share/broadcast menu |
| PS Button | Toggle PS4 main menu |
| Touchpad | Toggle mission/powers/bonecharms/lore/travel log menus |
| Circle | Toggle normal and crouch (stealth) mode |
| Square | 'Use' button (or hold to sheathe weapons) |
| Triangle | (Hold) Lean out from cover |
| X-Button | Jump button |
| L1 Button | (Hold) Toggle quick-access wheel |
| L2 Button | Use power or fire weapon in left hand |
| L3 Button | (Hold) sprint |
| R1 Button | Block/Choke button |
| R2 Button | Swing melee weapon |
| R3 Button | Toggle spyglass (zoomed-in) mode for all characters |
| L. Analog | Controls Billie's movement |
| R. Analog | Controls camera POV |
Now, let's talk about how you'll actually deal with folks. You've got a few ways to go about it:
- Combat Kill: When you're in a straight-up fight, use R2 to swing your sword and R1 to block. If you time a block or a charged R2 thrust just right, you'll stagger your opponent, opening them up for a finishing move. Keep an eye out, as major targets often have their own special animations for this.
- Assassination: The classic stealth takedown. Creep up behind an unaware enemy and hit R2 to slit their throat. You can then immediately pick up the body to move it out of sight – handy for avoiding noise if they fall.
- Drop Assassination: Get above your target, leap down, and press R2 as you get close. You'll silently take them out mid-air. Just a heads-up: Clockwork Soldiers are only instantly killed this way if you've already removed their head armor.
- Sliding Kill: If you're running towards an enemy, you can slide into them and perform a quick kill. It's a bit more aggressive but can be useful in a pinch.
We'll get into the actual missions soon, starting with 'One Last Fight,' but getting comfortable with these controls is your first real objective. Don't be afraid to experiment a little in safe areas to see how everything feels!
Part 2
Learn all about lethal and non-lethal takedowns, unique powers like Semblance and Displace, and essential tips for a smooth playthrough in Dishonored: Death of the Outsider.
Alright, let's dive into the nitty-gritty of how to handle yourself in Dishonored: Death of the Outsider. Whether you're going for a clean, silent approach or a more… direct method, knowing your options is key. We'll cover the tools at your disposal, from basic moves to Billie's unique powers, and wrap up with some general advice to keep you from pulling your hair out.
Lethal Actions
Sometimes, you just gotta get the job done. Here's how to do it permanently:
- Basic Takedowns: Approaching an unaware enemy from behind and pressing R1 initiates a quick, lethal throat cut. If they're aware, you can initiate a slide with a button press and then use R2 near them for a swift, frontal kill. Doing it on unaware targets offers more brutal animations, like kicking their legs out from under them.
- Grenades/Sticky Grenades: These are your standard thrown projectiles that deal damage in an area. Normal grenades can be upgraded to explode on contact with living targets, while Sticky grenades cling to surfaces before detonating.
- Displace: This is one of Billie's signature powers. You can use it lethally by
Part 3
Follow our comprehensive walkthrough for Dishonored: Death of the Outsider's Part 3, covering the 'One Last Fight' mission, including loot locations, bonecharms, and strategies.
- 1One Last Fight
- This walkthrough is written for medium difficulty. Loot distribution and locations should not be significantly affected by difficulty settings.
- 2Dreadful Wale
- Players assume the role of Billie Lurk, tracking down her mentor, Daud.
- 3Unlike Dishonored 2, the Dreadful Wale contains no coins, only documents for flavor. There is no trophy for reading all documents.
- 4Contracts are introduced: optional side missions found on Billie's desk or later on black market bulletin boards. They offer extra coin for specific actions and are missable if not discovered in-game.
- 5Contract rewards contribute to the mission's total coin count and are awarded after the mission. Completing a contract's objective before learning about it can save time. The trophy for completing all contracts requires killing.
- 6When ready, read the mission board and exit to the Albarca Baths via the nearby rail station.
- 7Billie's starting power, Rat Whispers, is introduced. Rats can provide hints about shortcuts and bonecharm locations. Speaking to rats five times earns a trophy.
- 8Northern Campo Seto District
- Coins: 522 [522/2050]
- 9Bonecharm: 1 [1/6]
- 10Paintings: 0 [0/1]
- 11Billie arrives via carriage near an old tunnel. Break through a boarded wall to reach the derelict rail station.
- 12Loot in the rail station area includes two copper wires, one in a small garage outside.
- 13The area has guards; they can be dealt with individually by splitting up. Players can proceed at ground level through a sewer tunnel or climb using drainage pipes to a balcony with an open window.
- 14The balcony route leads directly to the Albarca Baths' bookmaker apartment, containing a significant portion of the game's loot.
- 15A safe in the apartment contains valuable loot. Its combination can be found by stealing a note from the bookmaker or by observing the book organization on a shelf (451).
- 16The first bonecharm is located on the desk in the bookmaker's apartment.
- 17Coins found in the rail station area: 10 in an off-street shack, 10 in the sawmill's garage.
- 18Coins found in the bookmaker's apartment: 10 (avocet feathers on desk), 15 (bath salts in shower), 395 (safe contents), 35 (kitchen table). Total: 440.
- 19The apartment's front door key is on a hook nearby. A duplicate key is in a shelf basket near the entryway.
- 20Remaining coins are on the Baths' outer street, on a balcony by the pawnshop (accessible via awnings), or in the train tunnel.
- 21Coins in the train tunnel: 2 (on mattress near wolfhounds).
- 22Coins on the Baths' street: 5 (balcony by pawn shop), 10 (NPC: male civilian).
- 23A springrazor is hidden in a broken shop window.
- 24Raw whalebone can be found, stolen from Eyeless thugs. Custom bonecharm crafting with raw whalebone is not available until mission three.
- 25Wolfhounds are present in the train tunnel. Killing them does not count as a 'kill' for game tracking purposes.
- The Concealment Finish upgrade can help with enemy AI perception.
- Rat Whispers can provide hints for shortcuts and bonecharm locations.
- Completing contracts is optional but can provide significant coin.
- Be aware of missable contracts; they must be discovered in-game to be undertaken.
- Wolfhounds do not count towards the game's kill count.
- Raw whalebone can be collected early, though custom bonecharm crafting is not yet available.
- Contract rewards are given after the mission and contribute to the overall coin total.
- Speaking to rats five times earns a trophy.
- Completing all contracts (requiring kills) earns a trophy.
Part 4
Guide your way through the Albarca Baths in Dishonored: Death of the Outsider. Find loot, uncover secrets, and confront enemies in this walkthrough.
Alright, we're heading into Part 4, which means we're diving deep into the Albarca Baths. This place used to be a spa, but now it's a bit of a dive – an underground fight club run by the Eyeless. The main action is happening downstairs in the B1 area, which is pretty much neutral ground, but watch out for the 1F areas; they're off-limits unless you're being super sneaky. Don't worry, though, you can hop between the two levels without causing a fuss if you play it smart.
The entryway itself doesn't have much loot, but there's a little side-quest waiting. If Billie checks out a locked door, an Eyeless guy will offer immediate access to a private lounge for 100 coins. You can totally pay up, and then just pickpocket the cash right back later. Since that lounge is hostile territory, we'll save it for after we've explored the B1 area.
Downstairs, in the arena, you'll spot Daud, but he's out of reach for now. To free him, we need to get a special key from Jeanette Lee, who's got an office on the 2F. If you're in a hurry, you could go grab that key first. Releasing Daud is a good move because he'll take out all the remaining Eyeless in the Baths, making it way easier to grab all the loot without any trouble. Plus, those guys he kills don't count against Billie's mission tally, so it's a win-win.
Now, about the arena itself: it's got the 'Black Magic Brute' ring where Daud is held, a boxing ring, a betting area, a bar, and some showers. Be careful, though – the betting area near the bookmaker is hostile, and you can also make the Eyeless there hostile by sneaking behind the bar or getting caught pickpocketing too many times.
Loot-wise, most of it is pretty easy to get. Some items are tucked away behind the betting cage and the bar, and in the locked shower room stairway, which are a bit trickier to nab in plain sight. But remember, if you free Daud, he'll clear out the arena, so you can always come back for those later.
Pro Tip: If you want to thin out the enemies early, try luring them into the showers. It's a neutral zone with a handy ceiling hole that leads to the 1F maintenance area, perfect for hiding bodies. It's tough to get *everyone* in there, but it's a great way to reduce their numbers. You can also use chloroform bottles or hook mines later for any stragglers if Daud doesn't get to them first.
| AMT | TOTAL AMT | LOCATION |
| 10 | 532/2050 | 1F entryway; copper wire on podium |
| 10 | 542/2050 | NPC: Eyeless in 1F entryway |
| 50 | 592/2050 | B1 arena; Konos Star Tables map on...well, a table |
| 30 | 622/2050 | B1 arena; heavy pouch on bench outside showers |
| 10 | 632/2050 | B1 arena; copper wire on workbench near bartender |
| 11 | 643/2050 | B1 arena; coins behind bartender's counter |
| 20 | 663/2050 | B1 arena; silver dust on bench near punching bag |
| 30 | 693/2050 | NPC: bookmaker walking near bar |
| 6 | 699/2050 | B1 arena; coins inside betting cage (door guard area) |
| 11 | 710/2050 | B1 arena; coins inside betting cage's cash register |
| 15 | 725/2050 | B1 arena showers; bathing salts in shower area |
| 15 | 740/2050 | B1 arena showers; bathing salts in locker |
| 20 | 760/2050 | B1 arena showers; pouch in a locker |
| 11 | 771/2050 | B1 arena showers area; stairway to Jennette's office |
Next up, we're heading into the 1F hostile territory. There are a few ways to get there:
- Pay the 100 coins to the entryway Eyeless.
- Sneak into the 1F maintenance room through the ceiling in the showers.
- Use the showers' stairway (it's locked, though).
- Use the betting cage's stairway (this one's always guarded).
The 1F area has the 'Plagued Spirits' lounge, some maintenance rooms, a small workshop with hook mines, and Jeanette Lee's office – watch out, there are two enemies in there, including her. The lounge is the easiest to get into, so let's start there.
There's only one guard in the lounge, and he's got a workshop key that unlocks a cabinet drawer nearby. You'll find coins scattered around the countertops, tabletops, and in the cash register. Keep an eye out for a black bonecharm near the recipe. Also, grab the chloroform bottles; you can use these to rain down on enemies in the B1 area, often without raising an alarm if you're careful.
- CONTRACT: INDUSTRIAL ESPIONAGE [450 coins]: Your goal here is to steal the 'Plagued Spirits' recipe from the cabinet and then destroy the entire supply of this nasty rodent brew. It's a good idea to try for the 'Side Effects' trophy before you trash everything – you need to make three people puke with just one bottle of Plagued Spirits. You can do this later, but the drink is most plentiful here.
In the 1F hall above the arena, you'll find a few rooms. The one closest to the lounge has the 'prize bonecharm' that's meant for whoever defeats Daud in the arena. This is always the Agility black bonecharm, which gives Billie the double-jump ability.
Across from that mini-workshop is the maintenance room above the showers. It's got some extra loot, including another bonecharm, but you'll need to access it from the showers' ceiling because of the loose steam.
Finally, if you're a Dishonored veteran, you'll recognize 'The Outsider in Conditional Dreams,' a Sokolov painting hanging in the 1F area.
Similar guides you might like


100% Human-Written. AI Fact-Checked. Community Verified. Learn how AntMag verifies content