Welcome to The Lake House, the terrifying new chapter in Alan Wake 2. As you delve into this mysterious facility, you'll face down challenging painted enemies and navigate treacherous archives. Your mission is to restore power and uncover every secret hidden within its shadowy halls. This experience is built for those who love a good survival horror challenge.
This guide is your key to conquering The Lake House. We'll help you master its controls, defeat every challenging boss, and find all the hidden secrets. Get ready to restore power and survive the darkness.
Gameplay
Explore the gameplay mechanics of Alan Wake 2: The Lake House, covering combat, exploration, and unique mechanics for both Alan and Saga.
Alan Wake II features two distinct storylines: Saga Anderson's 'Return,' set in the Pacific Northwest with semi-open world exploration and collectables, and Alan Wake's 'Initiation,' taking place in the surreal Dark Place, where reality can be manipulated through 'Light Shift' and 'Writer's Room' mechanics.
Saga utilizes a Mind Place with a Case Board to organize clues, while Alan navigates the Dark Place by altering the environment. Combat is infrequent but challenging. Saga's starting pistol is weak, requiring many shots per enemy. Alan's .357 magnum is more effective initially. While Saga finds better weapons quickly, Alan's shotgun offers little improvement over his revolver, and flare gun ammo is scarce.
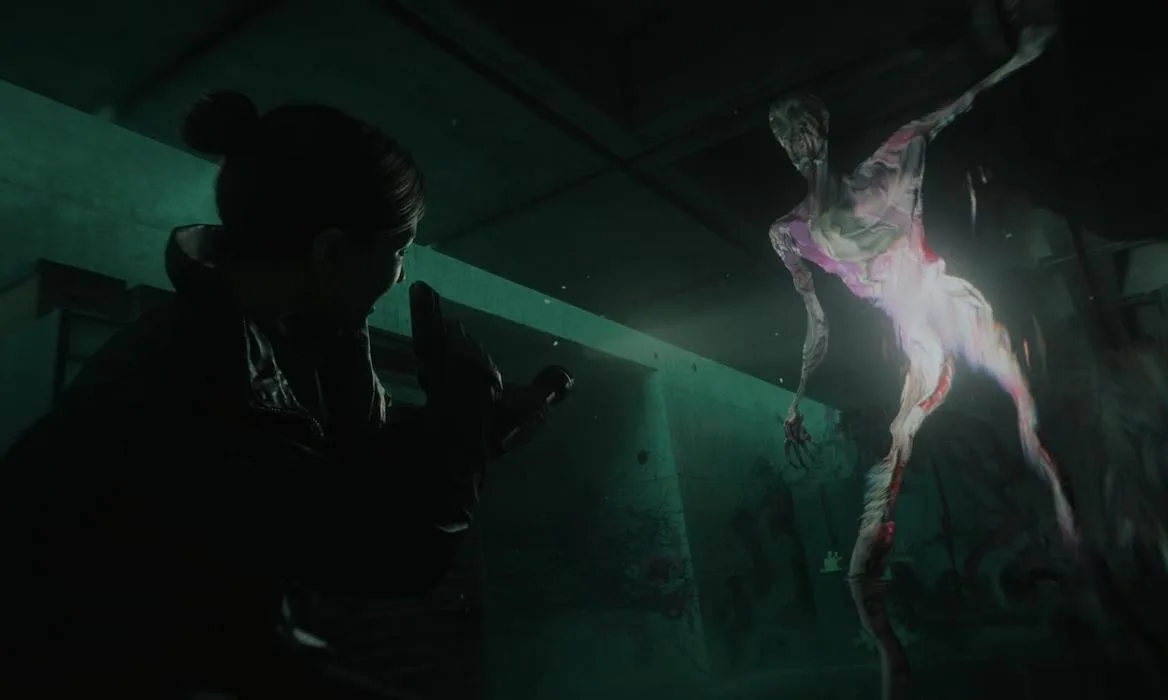
Enemies, known as Taken for Saga and Shadows for Alan, are aggressive. Unlike previous games, enemies do not despawn in Safe Havens and will pursue players. Stealth is an option, particularly for Alan with specific upgrades, but Saga's torch-off stealth is less effective due to enemy awareness. Encounters primarily serve to deplete resources, making avoidance often preferable.
Enemies:
- Taken: Basic melee enemies encountered during Return 2. Burn their protection with a torch and shoot weak spots (head or 'Source'). Cultist variants have masks that block one headshot.
- Taken Thrower: First seen in Return 3, these enemies throw hatchets from a distance and move erratically. Stun them with a torch to split them into weaker foes. The hunting rifle is effective before they aggro.
- Taken Bruiser: Encountered in Return 3, these are tougher melee enemies. Their attacks are damaging and can knock players down. Use shotgun blasts to the head or weak spot when they are close.
- Taken Diver: The toughest non-boss enemies, appearing in Return 5. They attack with ranged waves and can grapple players, requiring a Hand Flare to escape. They can briefly become invulnerable by folding. Use the hunting rifle or crossbow from range, switching to a shotgun for close combat.
- Taken Wolves: Found in wilderness areas, often after Nursery Rhyme Puzzles. Difficult to see and target in the dark. Use a shotgun.
- Hostile Shadows: In the Dark Place, some Shadows attack. They close in for melee. Burn their darkness shield and shoot them in the head with a revolver. Some launch projectiles that can be evaded or burned with a torch.
Tips
Master Alan Wake 2: The Lake House with tips on combat, inventory, healing, and trophies. Learn how to manage limited space and conserve resources.
Tips:
- The difficulty in Alan Wake 2: The Lake House is extreme, potentially harder than Nightmare difficulty in Alan Wake Remastered. Do not hesitate to lower the difficulty setting if you wish to focus on the game's atmosphere and story, as combat is not a highlight and enemies are bullet sponges.
- Save manually whenever possible, as the checkpointing system is very sparse and autosaves are unreliable.
- Inventory space is limited. Use consumable items to free up space, otherwise your inventory and shoeboxes will fill with items like Hand Flares. Crossbow bolts are particularly space-consuming, stacking only 4 per slot. Use the crossbow regularly or leave bolts behind. Items not picked up do not disappear; you can also destroy unwanted items to keep the map clean.
- Healing is item-based. Painkillers are best for combat. Trauma Pads can be used during brief respites or when retreating to a safe haven. First Aid Kits offer full heals but take too long for combat and occupy two inventory slots; store them in a shoebox and use them in a Break Room.
- Loot in stashes is fixed, but supply container contents are semi-randomized, often providing items you currently need. You don't need to hoard ammunition like shotgun shells, as more will generally be found when you are low. If you are well-stocked, you may find nothing in supply containers; consider leaving them for later.
- Damage to enemies is significantly reduced unless their Darkness Shield is destroyed with your torch first. This uses a single charge; one battery provides four charges (five with an upgrade), and five battery packs fit in one inventory slot. The hunting rifle has an upgrade to bypass enemy shields, which is highly recommended. Combining this with the FBC charm allows for one-shot kills on most non-boss enemies from a distance.
- While there is a trophy for fully upgrading a weapon, consider using a temporary save for this, as there are not enough manuscript fragments for all upgrades. Prioritize fragments for new weapons. Recommended upgrades include reload speed and health restoration for the sawed-off shotgun, two-shot and magnetic bolt for the crossbow, and hunting rifle upgrades.
- Alan's weapon upgrades are less impactful. Flare gun upgrades are less useful due to limited ammo. The
Guide and Walkthrough (PS5) by chris-williams
Navigate Alan Wake 2: The Lake House with this comprehensive PS5 guide by chris-williams. Find walkthroughs, tips, and collectible locations to master the game.
This guide covers the PS5 version of Alan Wake 2: The Lake House expansion, authored by chris-williams. It's a detailed walkthrough that aims to help players through every aspect of the game, from main story progression to finding all the collectibles.
The guide is structured to be easily navigable, with a clear table of contents that breaks down the game into its various Returns, Initiations, and the Night Springs episodes. Additionally, there are dedicated sections for items, collectibles, FBC files, and trophies, ensuring that players have access to all the information they might need.
Gameplay
The gameplay section likely delves into the core mechanics of Alan Wake 2, explaining how to survive the challenges presented in the game. This would include combat, puzzle-solving, and resource management, all crucial for progressing through the narrative.
Tips
This section is designed to offer players helpful advice to make their journey smoother. Expect tips on combat effectiveness, efficient use of resources, environmental navigation, and perhaps strategies for dealing with specific enemy types or challenging encounters.
Copyright and Acknowledgements
Standard section for any FAQ, this part credits the author and any sources used, while also outlining the terms of use for the guide itself.
Walkthrough Structure:
The main body of the guide is organized by the game's narrative structure:
- Returns: These are the main story chapters for Alan, including
Return 1: Invitation
Follow our comprehensive walkthrough for Alan Wake 2: The Lake House's 'Return 1: Invitation' mission. Uncover clues, find collectibles, and progress through Saga Anderson's investigation at Cauldron Lake.
Walkthrough:
- After the opening credits, Saga Anderson and Alex Casey arrive at Cauldron Lake. Examine the map on the noticeboard where Alex is standing to unlock the Cauldron Lake map and a related trophy.
- Open your inventory (△ button) to find a pistol, 12 bullets, and Logan's Charm (1/18), which increases Saga's maximum health. Finding all 14 unique Charms unlocks a trophy.
- Follow Alex along the path to meet Mulligan, then Deputy Thornton at the crime scene. Learn that the victim's heart was removed and that witnesses are at the sheriff's station.
- Climb through the hole in the fence and head north. Saga will mention the Case Board. Open the Case Board (touchpad right) to enter the Mind Place.
- In the Mind Place, examine the pictures on the Case Board. There are no immediate actions here. Close the Case Board (touchpad again) to leave.
- Follow Alex down the stairs and jump down. Examine the Mirror Peak sign if desired.
- Continue down the slope to a wider track. The left path is blocked. Turn right up the track, then left down another trail to a viewing platform.
- Follow the trail of colored stones to find an Alex Casey Lunch Box (1/21) in the corner. Open it for two manuscript fragments, used for weapon upgrades. You can view potential upgrades in the Mind Place, but you'll need at least 12 fragments for any. Finding all 21 lunch boxes unlocks a trophy.
- Examine the Mortar Falls sign if desired. In the Mind Place, add the 'Alex Casey Lunch Boxes' case to the Case Board and answer the questions, adding the lunch box photo to the 'Cauldron Lake Area' question.
- Rejoin Alex and continue down the slope. At a fork, take the left path towards the General Store.
- Find Deputy Thornton at a picnic table. Go inside the General Store, switch on your torch (◯ button), and search the table for notes.
- In the next room, collect playing cards and poker chips to recover a clue.
- Back outside, follow the trail north past the blockage to find another Alex Casey Lunch Box (2/21) by fallen trees. Open it for one manuscript fragment.
- Return to Alex and Thornton and follow them to the murder scene.
- Examine the body to obtain a Key Image.
- Go to the Mind Place and place the 'Cauldron Lake Murder Scene' key image on the Case Board to start the 'Murder at Cauldron Lake' investigation. Add the 'Consistent with Prev. Murders?' question.
- Leave the Mind Place. Examine the body again for clues: bruising on wrists, heart, chest trauma.
- Back in the Mind Place, add these three clues to the 'Consistent with Prev. Murders?' question. Saga concludes the murder is consistent with previous cases, unlocking 'The Victim?' and 'The Killer(s)?'.
- Return to the crime scene. Speak to Thornton to identify the victim as Robert Nightingale, a former FBI agent.
- Examine the victim again, noting blood spatter. Examine footprints by markers
Similar guides you might like


100% Human-Written. AI Fact-Checked. Community Verified. Learn how AntMag verifies content