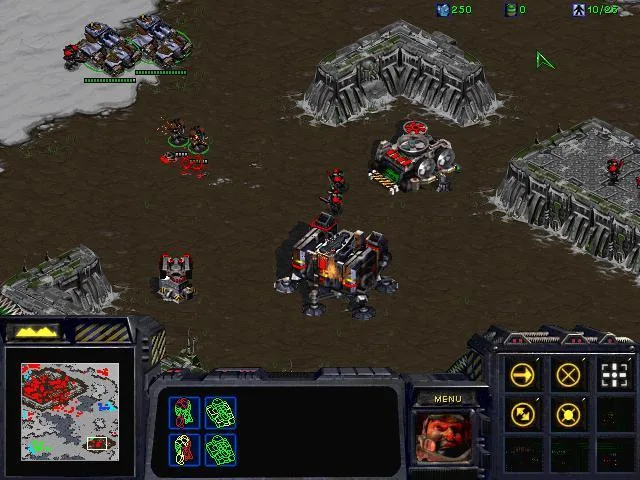
Welcome to StarCraft: Brood War, the ultimate real-time strategy classic. You'll command one of three iconic races – the Terran, Zerg, or Protoss – managing resources, building bases, and leading your armies in epic interstellar conflicts. It's a game of intense strategic depth, demanding quick thinking and precise execution to outmaneuver your opponents.
This guide dives deep into the game's mechanics, offering detailed insights into unit compositions, build orders, and effective macro management for all three races. Whether you're navigating the challenging campaign walkthroughs or mastering advanced techniques, we'll help you become a formidable commander and conquer the challenges that await on PC and macOS.
-+- 4.1. Chapter I: Rebel Yell -+- [4100]
Complete walkthrough for StarCraft: Brood War's Chapter I: Rebel Yell. Learn how to complete the Boot Camp tutorial, Mission One: Wasteland, Mission Two: Backwater Station, and Mission Three: Desperate Alliance.
In the decade since the end of the Guild Wars, the oppressive Terran Confederacy has stood unchallenged in its supremacy over colonized space. All of that changed four days ago when a large alien fleet emerged from warp-space and laid waste to the unsuspecting Confederate colony of Chau Sara. The Confederacy, fearing that the alien fleet's next target will be the colony of Mar Sara, has sent you to intervene. Acting as Magistrate, you are to safeguard the colonists and keep their state of panic from escalating any further.
- 1Tutorial: Boot Camp
- Build 3 Supply Depots. Start with Marines and SCVs. Build more SCVs to gather minerals. Build two more Supply Depots. Explore the map with Marines; Zerglings are present but not aggressive.
- 2Build a Refinery. Construct a Refinery on a Vespene Gas geyser. Vespene Gas is needed for higher-tier units.
- 3Gather 100 Vespene Gas. Select all SCVs to gather Vespene Gas. Only one SCV can be in the Refinery at a time.
- 4Mission One: Wasteland
- Find Raynor. Start with 5 Marines and 5 SCVs. Move southeast across the bridge, then south to find Raynor. Engage Zerglings with Raynor's help.
- 5Build a Barracks. Have SCVs gather minerals. Build more SCVs if desired. Construct a Barracks. Zerg attacks are minimal and only occur if provoked.
- 6Train 10 Marines. Train enough Marines to reach a total of 10 (including starting Marines). Continue gathering minerals if needed.
- 7Mission Two: Backwater Station
- Eradicate the alien infestation. Start with Marines and Raynor. Build more SCVs and Marines. Build Supply Depots. Move north, clear Zerglings on the left plateau, and destroy the Creep Colony. Capture the Terran installation to use as a main base. Build more SCVs for mineral gathering. Optionally, mine minerals from the southeast corner. Research Stim Packs and U-238 Shells at the Academy. Train 6 Marines and 6 Firebats. Assault the Zerg base in the northeast corner, defended by Zerglings and Hydralisks. Destroy Creep Colonies and the Infested Command Center.
- 8Mission Three: Desperate Alliance
- Survive for 30 minutes. Focus on defense. Repair the damaged Bunker and Vulture with SCVs. Place Marines in Bunkers. Build more SCVs.
-+- 4.2. Chapter II: Overmind -+- [4200]
StarCraft: Brood War Chapter II Overmind missions 'Among the Ruins' and 'Egression'. Learn how to create Zerg units and destroy enemy bases.
Mission One: Among the Ruins
- 1Create a Spawning Pool. Begin by sending your starting Drones to gather resources. Select the larvae and create a few more Drones. Have at least five Drones on minerals before you build your Spawning Pool. Create Overlords to compensate for control (Overlords increase your unit capacity). Once you finish that, you can create Zerglings. Note that you lose a Drone once it morphs into a structure.
- 2Create a Hydralisk Den. Select another Drone and have it morph into an Extractor (an Extractor gathers Vespene Gas). Put one or two more Drones on Vespene Gas gathering. Build a Hydralisk Den when you attain enough resources.
- 3Destroy the Terran encampment. The Terran base is to the northeast. Leave a few Zerglings back at the Chrysalis and build up a force of Zerglings and Hydralisks. Morph the Creep Colony near the Chrysalis into a Sunken Colony for defense against ground troops. You can also build an Evolution Chamber to upgrade your Zerg attacks. Create a good attack group of about 24 Zerglings, with a few Hydralisks for support. Move your force east to find a small fortification consisting of a Barracks, some Missile Turrets, and a good deal of infantry. Focus on eliminating the infantry first. Goliaths should also move in to cause some trouble. Destroy the Barracks and reinforce your current forces with a few more Zerglings. Move the force north to the main base. Destroy the defending units first and then work on dismantling the remainder of the base. There's a Starport you need to also eliminate to the west. Once the Terran forces have been dispatched, the mission will end.
- Zerg typically fight in large numbers. Zerglings are created in groups of two.
- The Chrysalis must be protected at all times.
Mission Two: Egression
- 1Bring the Chrysalis to the beacon. Send a unit back toward the Chrysalis to gain control of the six Hunter Killers there. Hunter Killers are essentially powered-up Hydralisks and cannot be re-created if killed.
- 2Begin setting up your base. Turn the single Creep Colony you start with into a Sunken Colony and begin pumping out Drones. Put an Extractor on top of the Vespene Gas geyser to the north. Group your Hunter Killers and scout the area around your base, eliminating scattered Protoss forces.
- 3Prepare for Protoss attacks. You might consider putting up a few more Sunken Colonies. Get up two Evolution Chambers and start upgrading your units' weapons and carapaces. Transform one of your Hatcheries into a Lair so you can access the Spire building. Build a Hydralisk Den and upgrade Muscular Augments and Grooved Spines. Research Metabolic Boost at the Spawning Pool.
- 4Destroy the Protoss forces. The main Protoss base is at the southwest end of the map. Rely on your Hunter Killers, backed up by a few Hydralisks, to destroy Protoss fortifications. Prioritize Photon Cannons first, then eliminate other attacking units. A good force of about 25+ Zerglings backed up by Hydralisks and Hunter Killers can destroy the Protoss base. Prioritize Photon Cannons and try to eliminate Gateways. Have your Hydralisks target air units and Zerglings swarm ground units.
- 5Transport the Chrysalis. Once the area is clear of immediate threats, have a Drone transport the Chrysalis to the beacon.
- Hunter Killers deal very heavy damage and should be used strategically.
- Common sense should tell you when to retreat units back to base for healing if overwhelmed.
- Prioritize destroying Photon Cannons as they are powerful defensive structures.
-+- 4.3. Chapter III: The Fall -+- [4300]
StarCraft: Brood War First Strike mission walkthrough: meet Fenix at Antioch, destroy the Zerg base, and defend against attacks in Into the Flames.
- 1Start with Zealots and Dragoons. Group them and head north down the ramp.
- 2Proceed west to Antioch, then north along the river. Defeat the three Zerglings that attack.
- 3Continue north across the narrow landbridge and eliminate the Zerglings and Hydralisks.
- 4Cross the stone bridge northwest over the river.
- 5Head southwest, defeating any Zerg units, and reclaim Antioch. Fenix will greet you.
- 6Take control of Protoss structures. Build Probes to gather nearby minerals.
- 7Place Zealots and Dragoons on defense at the base entrance.
- 8Construct a Pylon near your Gateway to power it and produce more Zealots.
- 9Research weapon, armor, and shield upgrades at the Forge.
- 10Build a Cybernetics Core to produce Dragoons.
- 11Assemble a force of 10+ Zealots and a few Dragoons, taking Fenix along, to attack the Zerg base in the northwest corner.
- 12The Zerg base entrance is a ramp directly north of your base.
- 13Focus on destroying the three Sunken Colonies defending the base.
- 14Defeat the Zerglings and Hydralisks that unburrow.
- 15Use Dragoons to eliminate any Mutalisks that attack.
- 16Destroy all Zerg units to complete the mission.
- There is no need to build Photon Cannons during the First Strike mission.
- Fenix's damage is significantly higher than a regular Zealot; keep him alive.
- Fenix can kill Zerglings in a single hit, making him a huge asset.
- 1A fifteen-minute timer begins, indicating when Fenix will arrive with a strike force.
- 2Use your starting units to scout the plateau and surrounding areas for burrowed Zerg.
- 3Position most of your defenses on the southern ramp, as most Zerg attacks will come from there.
- 4Build Probes for resource gathering and advance your tech tree.
- 5Spread out Pylons to accommodate more buildings.
- 6Construct a Gateway and produce Zealots.
- 7Upgrade Zealot shields, weapons, and armor at the Forge in that order.
- 8Build a Cybernetics Core for Dragoons.
- 9Consider establishing a secondary base on the plateau south of your starting position, which is rich in minerals but lacks Vespene Gas. Escort Probes with Zealots.
- 10By the time the timer nears its end, build a force of Zealots and Dragoons. Construct more Gateways to increase production speed.
- 11Fenix will arrive at the northeast corner with Zealots, Dragoons, and Scarabs.
- 12Move your units down the ramp near Fenix's position, which leads into the Zerg base.
- 13Harass Zerg forces to the south from this general area.
- 14Build Scarabs for your Reavers to fire.
- 15Move down the ramp and stay in the general area to harass Zerg forces to the south.
- 16Use your Reavers to fire.
- Keep defenses on the southern ramp, as it's the primary attack route.
- Consider Photon Cannons for defense and anti-air support against Mutalisks.
- Shield Batteries are not particularly useful during this mission.
- There is no rush to assault the Zerg base immediately after Fenix's arrival.
Reward: Mission completion.
-+- 5.1. Terran -+- [5100]
Learn about StarCraft: Brood War Terran units like SCVs, Marines, Firebats, and Ghosts, including their costs, abilities, and upgrades.
SCV
The SCV is essential for any Terran base in StarCraft: Brood War. It costs 50 Minerals and is built at the Command Center, which is also its prerequisite. SCVs have 60 Hit Points and can construct buildings, gather minerals, and repair mechanical units. Only one SCV can build at a time, and only SCVs can gather minerals. It is recommended to have multiple SCVs for base maintenance and repairing units during combat.
- Cost: 50 Minerals
- Built At: Command Center
- Prerequisite: Command Center
- Hit Points: 60
- Supply: 1
- Armor: 0 (+3 upgradeable)
- Build Time: 20
- Range: 1
- Ground Attack: 5
- Sight: 7
SCV Upgrades:
- Infantry Armor (Engineering Bay): Level 1 costs 100 Minerals/100 Vespene Gas (Armor +1), Level 2 costs 175 Minerals/175 Vespene Gas (Armor +2), Level 3 costs 250 Minerals/250 Vespene Gas (Armor +3).
Marine
The Marine is the basic Terran unit in StarCraft: Brood War, costing 50 Minerals and built at the Barracks, which is its prerequisite. Marines are versatile, capable of attacking both ground and air targets. Upgrades like U-238 Shells and Stim Packs significantly enhance their combat effectiveness.
- Cost: 50 Minerals
- Built At: Barracks
- Prerequisite: Barracks
- Hit Points: 40
- Supply: 1
- Armor: 0 (+3 upgradeable)
- Build Time: 24
- Range: 4 (+1 upgradeable)
- Ground Attack: 6 (+3 upgradeable)
- Air Attack: 6 (+3 upgradeable)
- Sight: 7
Marine Upgrades:
- Infantry Weapons (Engineering Bay): Level 1 costs 100 Minerals/100 Vespene Gas (Attack +1), Level 2 costs 175 Minerals/175 Vespene Gas (Attack +2), Level 3 costs 250 Minerals/250 Vespene Gas (Attack +3).
- Infantry Armor (Engineering Bay): Level 1 costs 100 Minerals/100 Vespene Gas (Armor +1), Level 2 costs 175 Minerals/175 Vespene Gas (Armor +2), Level 3 costs 250 Minerals/250 Vespene Gas (Armor +3).
- U-238 Shells (Academy): Costs 150 Minerals/150 Vespene Gas (Sight +1).
Marine Special Abilities:
- Stim Packs (Academy): Costs 100 Minerals/100 Vespene Gas. Temporarily increases speed and rate of fire by using 10 Hit Points.
Firebat
Firebats in StarCraft: Brood War are powerful close-range units that cost 50 Minerals and 25 Vespene Gas. They require a Barracks and an Academy to be built. While they lack the range of Marines, their flamethrowers deal significant damage in an arc, devastating grouped enemies, especially Zerg rushes. Stim Packs further increase their damage output, but they have no anti-air capability, making them best paired with Marines.
- Cost: 50 Minerals/25 Vespene Gas
- Built At: Barracks
- Prerequisite: Barracks, Academy
- Hit Points: 50
- Supply: 1
- Armor: 1 (+3 upgradeable)
- Build Time: 24
- Range: 2
- Ground Attack: 16 (+6 upgradeable)
- Sight: 7
Firebat Upgrades:
- Infantry Weapons (Engineering Bay): Level 1 costs 100 Minerals/100 Vespene Gas (Attack +2), Level 2 costs 175 Minerals/175 Vespene Gas (Attack +4), Level 3 costs 250 Minerals/250 Vespene Gas (Attack +6).
- Infantry Armor (Engineering Bay): Level 1 costs 100 Minerals/100 Vespene Gas (Armor +1), Level 2 costs 175 Minerals/175 Vespene Gas (Armor +2), Level 3 costs 250 Minerals/250 Vespene Gas (Armor +3).
Firebat Special Abilities:
- Stim Packs (Academy): Costs 100 Minerals/100 Vespene Gas. Temporarily increases speed and rate of fire by using 10 Hit Points.
Ghost
Ghosts in StarCraft: Brood War are specialized units for stealth and disruption, costing 25 Minerals and 75 Vespene Gas. They require a Barracks, Academy, and a Science Facility with Covert Ops. Ghosts can cloak, paint targets for nuclear missiles, and use Lockdown against mechanical units, effectively neutralizing threats like Battlecruisers or Carriers. However, their base attack power and rate of fire are limited.
- Cost: 25 Minerals/75 Vespene Gas
- Built At: Barracks
- Prerequisite: Barracks, Academy, Science Facility w/ Covert Ops
- Hit Points: 45
- Energy: 200 (+50 upgradeable)
- Supply: 1
- Armor: 0 (+3 upgradeable)
- Build Time: 50
- Range: 7
- Ground Attack: 10 (+3 upgradeable)
- Air Attack: 10 (+3 upgradeable)
- Sight: 9 (+2 upgradeable)
Ghost Upgrades:
- Infantry Weapons (Engineering Bay): Level 1 costs 100 Minerals/100 Vespene Gas (Attack +1), Level 2 costs 175 Minerals/175 Vespene Gas (Attack +2), Level 3 costs 250 Minerals/250 Vespene Gas (Attack +3).
- Infantry Armor (Engineering Bay): Level 1 costs 100 Minerals/100 Vespene Gas (Armor +1), Level 2 costs 175 Minerals/175 Vespene Gas (Armor +2).
- SCVs are crucial for base building and resource collection; maintain a sufficient number.
- Marines are effective against both air and ground units, especially when upgraded.
- Pair Firebats with Marines to cover (press the cover button to crouch behind walls or objects) their lack of anti-air capabilities and maximize damage against ground forces.
- Ghosts are excellent for disabling high-value mechanical units and can be vital for strategic plays.
- Stim Packs can be used by both Marines and Firebats to significantly boost their combat effectiveness at the cost of Hit Points.
Similar guides you might like


100% Human-Written. AI Fact-Checked. Community Verified. Learn how AntMag verifies content