Complete walkthrough for the Gnarled Root Dungeon in The Legend of Zelda: Oracle of Ages. Find the Dungeon Map, Compass, Small Keys, Seed Satchel, and defeat the boss Aquamentus.
Walkthrough
- 1From F-4, head up to E-4.
- 2In E-4, move the top right block to open doors, then go right.
- 3In E-5, defeat all Stalfos, collect the Small Key, and go left two screens to E-3, using a Small Key.
- 4In E-3, defeat all Stalfos and collect the Dungeon Map from the chest, then go up.
- 5In D-3, defeat the Zol (Blobs), then jump on the mine cart to C-2.
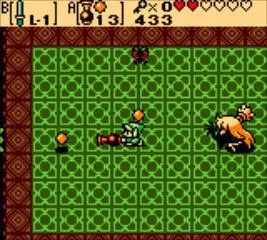
- 6In C-2, defeat the Moblins, move the middle block to open the door, and go left to C-1.
- 7In C-1, navigate the maze: walk left until you hit the block, push the block below down, push the block on your left to the left, walk up, left, down, move the block below down, push the block on your left to the left, head up to collect the Gasha Seed from the chest, jump down, and exit the room.
- 8Return to C-2, head up the steps on the right, then go right. Hit the switch, collect the Compass from the chest on your right. Go back left, down the steps, and jump in the mine cart to C-4.
- 9In C-5, go left and collect the Bombs from the chest. Go back right, up the steps, then down the steps on the right. Follow the path to a switch, step on it to reveal a chest with a Small Key. Head back, go up the steps, then go left and Bomb the weak section of wall to B-4.
- 10In B-4, navigate the maze, hiding in the alcove to avoid spikes. Head up using a Small Key to unlock the door to A-4.
- 11In A-4, defeat the mini-bosses, the Twin-Minotaurs. Then go left to A-3.
- 12In A-3, move the far left block up, then go down the stairs. Collect the Seed Satchel with Ember Seeds. Use Ember Seeds to light Torches. Go back up the stairs, move the block below the far left one down, then go right and jump on the warp to D-3.
- 13In D-3, use Ember Seeds on the torches on the left to open the door, then go through it.
- 14In D-2, defeat all Moblins, open the chest to get a Boss Key. Go right, down, right, push the top right block, then go right. Light the torches, then go up to D-5.
- 15In D-5, avoid the Wall Masters and open the chest for a Magic Ring. Go right via the top path and use the Boss Key on the Boss Door to get to C-6 and Aquamentus.
- 16In C-6, fight Aquamentus the Unicorn Dragon.
- 17After defeating Aquamentus, collect the Heart Container, then head right to collect the Fertile Soil.
Tips
- Use Ember Seeds from the Seed Satchel to light torches and open doors.
- Be mindful of spike traps in B-4.
- The Twin-Minotaurs in A-4 are the mini-bosses.
- Aquamentus is the boss in C-6.
- Heart Container
- Fertile Soil
100% Human-Written. AI Fact-Checked. Community Verified. Learn how AntMag verifies content