Venture into the vibrant world of Paper Mario: Sticker Star, a unique RPG adventure on the Nintendo 3DS. This guide offers 57 detailed sections, covering everything from the Main Walkthrough and Getting Started tips to specific challenges like Mega Goomba and Tower Power Pokey. Find strategies for defeating bosses, completing your Thing Sticker collection, and navigating all the worlds.
Part 1
Your friendly guide to starting Paper Mario: Sticker Star! Learn how to navigate the early game, collect essential stickers, and overcome initial challenges.
Hey there! Ready to jump into Paper Mario: Sticker Star? This guide is here to help you through the very beginning, making sure you don't miss anything important. We'll cover the initial steps to get you rolling!
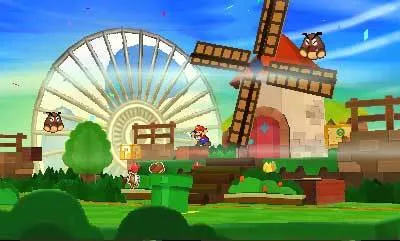
- 1You'll start in Toad Town, which is basically your main hub. Take a moment to get acquainted with the area. You'll see shops and other characters, but for now, your main goal is to head towards the Royal Sticker Museum.
- 2Inside the museum, you'll witness the Sticker Fest ceremony. Unfortunately, things go wrong when Bowser Jr. crashes the party and steals the Royal Sticker! This event kicks off your adventure.
- 3After the cutscenes, you'll be tasked with retrieving the stolen Royal Sticker. Your journey begins in earnest as you leave Toad Town and head towards your first real area.
- 4Your first destination will likely be World 1-1. Follow the path out of town, and you'll enter a more natural environment. Keep an eye out for any early-game enemies like Goombas or Koopa Troopas. Remember to use your stickers in battle to exploit enemy weaknesses!
- 5As you progress through the world, you'll encounter various obstacles and puzzles that require specific stickers to overcome. Pay attention to the environment and any hints you might find.
- Always try to conserve your stickers in battle if possible. You'll need them for both combat and solving environmental puzzles.
- Explore thoroughly! Hidden stickers and useful items are often tucked away in corners or behind breakable objects.
- Talk to all the Toads you meet. They often provide helpful hints about where to go or what to do next.
- Don't be afraid to experiment with different sticker combinations in battle. Finding the right sticker for the right enemy is key.
By completing these initial steps, you'll be well on your way to recovering the Royal Sticker and saving the Mushroom Kingdom!
Part 2
Navigate Paper Mario: Sticker Star's Part 2! This guide covers chapters, locations, and secrets to help you conquer Decalburg, Drybake Desert, and more.
Alright, let's dive into Part 2 of our Paper Mario: Sticker Star adventure! This section of the guide is going to break down the main walkthrough content, covering Chapters 1 through 6. We'll hit up all the key areas, from the familiar Decalburg to the scorching Drybake Desert, and all the way up to Bowser's Sky Castle. Get ready to explore some new locales and tackle some tough challenges!
- 1Chapter 1: We'll start by revisiting some earlier areas like Warm Fuzzy Plains and Bouquet Gardens, then move on to Water's Edge Way, Hither Thither Hill, and finally Whammino Mountain.
- 2Chapter 2: This chapter kicks off back in Decalburg before taking us into the expansive Drybake Desert. You'll also explore the mysterious Yoshi Sphynx, Sandshifter Ruins, and Surfshine Harbor, eventually reaching Damp Oasis and the Drybake Stadium.
- 3Chapter 3: After a quick stop in Decalburg, we'll venture into the Leaflitter Path and the confusing Bafflewoods. From there, it's on to Wiggler's Tree House, Strike Lake, Loop Loop River, and Outlook Point. We'll also navigate Rustle Burrow, Tree Branch Trail, Gauntlet Pond, Stump Glade, and The Bafflewoods II, before heading to Holey Thicket, Whitecap Beach, and finally Surfshine Harbor again.
- 4Chapter 4: This chapter begins with visits to Decalburg and Surfshine Harbor. Then, we'll head to the chilly Snow Rise and Ice Flow, before delving into The Enigmansion and Shaved-Ice Cave. The journey continues through Whiteout Valley, culminating at Bowser's Snow Fort.
- 5Chapter 5: We'll make our way through Decalburg and then into the dense Shy Guy Jungle. From there, we'll navigate Jungle Rapids and Long Fall Falls, before exploring Chomp Ruins and Rugged Road, and finally reaching Rumble Volcano.
- 6Chapter 6: The final chapter starts with a trip to Decalburg, followed by Gate Cliff. We'll then face Bowser Jr.'s Flotilla and make our way to the ultimate showdown at Bowser's Sky Castle.
- Keep an eye on your sticker inventory, especially when heading into new areas like the Drybake Desert or the snowy regions. You'll want the right stickers for the job!
- Don't forget to explore thoroughly in areas like The Bafflewoods or The Enigmansion – hidden paths and secrets are common.
- Pay attention to environmental clues; they often hint at how to solve puzzles or overcome obstacles.
- Boss fights in later chapters, especially those in Bowser's castles, can be challenging. Make sure you're well-equipped and have a good grasp of enemy patterns.
Part 3
Navigate Paper Mario: Sticker Star's Part 3 with our guide covering Sticker Listings, Thing Listings, FAQ sections, and more. Find all the info you need!
This section of the guide covers the reference materials for Paper Mario: Sticker Star. Think of it as your go-to spot for looking up specific details about the game's collectibles and mechanics.
We've got breakdowns for all the Stickers and Things you'll find, including directories and detailed info. Plus, we'll point you to the FAQ section for common questions and even cover how to find those elusive HP-Up Hearts. If you're looking for a specific item or need to check a game mechanic, this is where you'll find it.
Sections Covered:
- Sticker Listing & Directory
- Sticker Info
- Thing Listing & Directory
- Thing Info
- Secret Doors
- FAQ
- HP-Up Hearts
To quickly jump to any of these sections, you can use the 'Ctrl + F' shortcut in your browser and type in the bracketed codes provided in the guide (e.g., [EX.2.00]).
Part 4
Master Paper Mario: Sticker Star! This guide details all controls for overworld, Sticker Album, and battle, ensuring you know every button's function.
Hey there! So, you've made it to Part 4. This section is all about getting a handle on the game's controls, which is super important for smooth sailing. Think of this as your quick-reference cheat sheet so you don't have to guess what each button does. We'll break it down by what you're doing in the game: moving around the overworld, managing your Sticker Album, and what to do when you get into a scrap!
Overworld Controls
When you're just exploring, the controls are pretty straightforward:
- Circle Pad: This is how you move Mario around. Just push it in the direction you want to go.
- A Button: Tap this to make Mario jump. Useful for small gaps or just for fun!
- B Button: This is your trusty Hammer. Swing it at enemies or objects in the environment.
- X Button: Press this to open up your main menu, where you can check your inventory, status, and more.
- L Button: Handy for talking to Kersti, your little guide. You'll be doing this a lot!
- Start Button: Use this to leave a course once you've cleared it. No backtracking needed!
- Touch Screen: You can also use the touch screen to navigate menus and interact with the world.
Sticker Album Controls
Your Sticker Album is where all the magic happens. Here's how to get around in it:
- Circle Pad: Use this to scroll through your stickers or navigate menus within the album.
- Y Button: Press this to view the details of a selected sticker. Essential for knowing what each one does!
- X/B Buttons: These will close the current menu or album screen.
- L/R Buttons: These are your page-turners! Use them to flip between different pages of your Sticker Album.
- Touch Screen: Just like in the overworld, you can tap and swipe on the touch screen to navigate your album.
Battle Controls
When a battle kicks off, things get a little more intense. Here's what you need to know:
- Circle Pad: Use this to navigate through your Sticker Album when selecting a sticker to use in battle.
- A Button (First Press): This selects the sticker you've highlighted in your album.
- A Button (Second Press): After selecting a sticker, you'll often have a chance to perform an 'Action Command'. Timing your A button press here can boost your attack or defense!
- X Button: This starts the Battle Spinner. You can land on different segments to get bonuses like extra damage or special effects.
- L/R Buttons: Similar to the Sticker Album, these let you quickly switch between pages of your album during battle.
- Touch Screen: You can also use the touch screen to select stickers and navigate your album during combat.
Knowing these controls will make your adventure through the Mushroom Kingdom so much smoother. Don't be afraid to experiment a little, especially with the Action Commands in battle – they can make a huge difference!
Similar guides you might like


100% Human-Written. AI Fact-Checked. Community Verified. Learn how AntMag verifies content