Embark on a legendary adventure across Hyrule with The Legend of Zelda: Four Swords Adventures. Master the shared strengths of the Four Links as you conquer treacherous stages and collect vital items to defeat the evil Vaati. This cooperative multiplayer experience on the GameCube lets you team up with friends to overcome challenges, making it a unique entry in the Zelda series.
This guide covers everything you need to know to fully experience Four Swords Adventures. We detail how to navigate each stage, defeat bosses like Vaati, and find all the hidden collectibles. If you're aiming to achieve Gold Medals or simply want to overcome the toughest challenges, this walkthrough will provide the strategies and tips you need.
```
Welcome to Four Swords Adventures! This guide will help you get started with controlling multiple Links, navigating unique stages, and mastering the game's mechanics. Let's play!
[Characters](https://zelda.fandom.com/wiki/Characters_in_Four_Swords_Adventures "Characters in Four Swords Adventures")
[
[
[
[
[
[ | Quick Links _The Legend of Zelda: Four Swords Adventures_ is the eleventh main installment of _The Legend of Zelda_ series "The Legend of Zelda (series)"). It incorporates a graphical style that combines _[Four Swords](https://zelda.fandom.com/wiki/The_Legend_of_Zelda:_Four_Swords "The Legend of Zelda: Four Swords")_ and _[A Link to the Past](https://zelda.fandom.com/wiki/The_Legend_of_Zelda:_A_Link_to_the_Past "The Legend of Zelda: A Link to the Past")_. It is the only console _Zelda_ title to date to incorporate multiplayer elements into its main campaign. Because of its single-player elements, _Four Swords Adventures_ is also the first game in the series to allow a single player to control more than one Link at once, and it utilizes various methods to allow the player to make use of the four Links, such as formations. Also, it is the only title to break locations and temples up into succinct, separate stages and levels which can be replayed even after beating them once. The game itself, though an innovation in _Zelda_ gameplay, is heavily inspired by the music, graphics, and locations of _A Link to the Past_. ## Contents * Story * Intro * Hyrulean Adventure * Timeline Placement * Gameplay * Game Information * Development * Graphics * Audio * Speedrun Records * Listings * Characters * Bosses * Enemies * Stages * Items * Translations * Credits * Glitches * Reception * Trivia * Nomenclature * Gallery * External links * References
----------------------------------[Nintendo DSiWare]---------------------------
Discover the Nintendo DSiWare version of The Legend of Zelda: Four Swords Anniversary Edition! Learn about gameplay, controls, and the initial stages in this guide.
Hey there! So, you're diving into The Legend of Zelda: Four Swords Anniversary Edition on your DSi or 3DS? Awesome choice! Nintendo put out this cool version to celebrate Zelda's 25th anniversary, and it was even a free download for a while. Whether you're playing solo or with up to three friends, you'll be teaming up to solve puzzles and take down baddies.
If you're flying solo, you'll be controlling the Green Link and can pick one of the other Links (Red, Blue, or Purple) to be your buddy. The main goal is to help Princess Zelda, who's been nabbed by the evil Vaati, and grab as many Rupees as you can along the way. It's all about teamwork, whether you're coordinating two Links on your own or coordinating with friends.
Just a heads-up, this guide is written with the single-player experience in mind, so things might feel a bit different if you're playing with others.
Getting Started: The First Stages
To get your bearings, I really recommend starting in the Chambers of Insight. It's the perfect place to learn the ropes and get a feel for all the items and mechanics.
Here's a look at the stages you'll encounter initially:
- Chambers of Insight
- Sea of Trees
- Talus Cave
- Death Mountain
Once you snag all three silver keys, you'll unlock the path to Vaati's Palace. But don't worry, the adventure doesn't stop there! You'll unlock more levels in this order:
- Realm of Memories - Right Door
- Realm of Memories - Left Door
Controls Quick Guide:
- D-pad: Move around.
- B button: Use your sword (hold it down to charge a Spin Attack) or back out of menus.
- A button: Grab, pick up, throw items, swap sub-items, accept prompts, talk to characters, or swim.
- Y button: Use your currently equipped item.
- X button: This is your Regroup/Group Action Setup button in single-player mode.
- L and R buttons: Switch between your different Links when playing solo.
- Start button: Opens the pause menu.
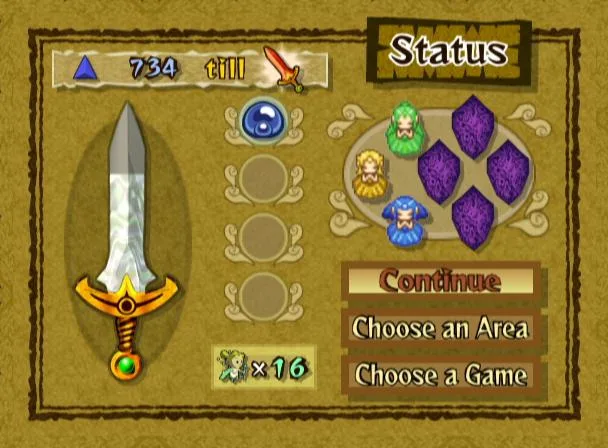
Inside the Chambers of Insight: Your First Steps
When you first enter the Chambers of Insight, you'll meet a helper who welcomes you. They'll point you towards another helper to the north. Chat with that second helper, and the bricks above will vanish, revealing warp zones. To get through, have one Link step into the left warp circle, then quickly switch to the other Link and have them step into the right one. You can also make this easier by having one Link step on a circle, then pressing the X button to have your other Link join them. This area is designed to teach you the absolute basics of how the game works!
Basic Training 1
Master Basic Training 1 in The Legend of Zelda: Four Swords Adventures. Learn about Rupees, sword combat, pushing blocks, and more.
- 1Have each Link collect the Red Rupees on their side.
- 2A helper will explain Rupees, which cost 50 Rupees to revive a fallen Link, with the cost increasing per revival.
- 3Another helper explains Seeds: Red Razor Seeds (increase power), Blue Armor Seeds (increase defense), and Green Pegasus Seeds (increase speed), boosting power up to two levels.
- 4The helper below explains using your Sword by pressing the B button to chop bushes.
- 5Hold the B button then release it to perform a Spin Attack.
- 6Step on floor buttons to reveal treasure chests, unlock paths, and reveal hidden objects and passages.
- 7Step on the outer floor buttons for treasure chests.
- 8Position the Links on the inner floor buttons simultaneously to open the next passage.
- 9Walk up to a gray block and push it in the direction you are moving to move it forward.
- 10Collect the treasure chests containing 2 Gold Rupee Shards (4 Gold Rupee Shards are worth 500 Rupees).
- 11Press X to Regroup and perform a team push to move big blocks with both Links.
- 12Collect the treasure chest on the left worth 50 Rupees (Big Green One).
- 13Have both Links strike the fireplace simultaneously with their swords to set it ablaze, opening the next area.
- 14Push or pull statues into two of the four floor buttons and have the Links step on the other two to proceed.
- 15Step on the switch together to make Ropes (snakes) appear.
- 16Kill the Ropes, watching out for pits hidden by bushes.
- 17Fairies can replenish your health.
- 18The left treasure chest contains a key to open the way to the right.
- 19Ride the moving platform over the pit.
- 20Collect the key in the treasure chest at the end.
- 21Use the key to get past the key block above.
- 22Enter the water and swim to the other side. Deep water is darker than shallow water.
- 23Beware of whirlpools, currents, and rapids. Currents are darker than rapids and you can swim against them, while rapids are too strong to swim through.
- 24Swim ahead to dry land.
- 25Use your swords to chip away at the cracked wall to destroy it.
- 26Open the bomb in the left chest.
- 27Move right through the hole in the wall.
- 28Collect the rupees upstairs, including the one in the chest worth 20.
- 29A helper explains switching items. Ignore the shields if you already have one.
- 30Ready your shield and hold the Y button to knock Togezos on their backs and slash them.
- 31Defeat all Togezos to proceed.
- 32Get the gnat hat and press the Y button to shrink down in size and go through small holes.
- 33To cross the pit, you can ride tiny platforms or toss another Link across. Tossing a Link is safer.
- 34Shrink again when across to proceed south.
- 35Only Links of matching colors can walk on color-coded paths that flash; other color Links will fall.
- 36Tiles are similar; only specific Links can see tiles of like color, but any Link can walk on them in that path. These paths will be invisible to other colors but flash when stepped on.
- 37Step on the button to make the directional platform appear. Guide it to where you need to go.
- 38Beware of spikes as the ice is slippery.
- 39In the next area, slash the balls into the holes for bonus rupees.
- 40The path opens once all 6 balls are in place.
- 41Go through and step on the big button.
- 42Defeat the knight by staying away as it swings its mace and launches it. When it retracts, it will pause, allowing you to get in a few shots. Run away and repeat.
- 43You will get a big blue Rupee worth 100.
- 44Proceed and step on the warp circles to return to the main area.
- Rupees: Red Rupees are worth 20, Blue Rupees are worth 5, and Green Rupees are worth 1.
- Reviving a Link costs 50 Rupees initially, with the cost increasing for subsequent revivals.
- Gold Rupee Shards: 4 Gold Rupee Shards are worth 500 Rupees.
- A Big Green Rupee treasure chest is worth 50 Rupees.
- A Big Blue Rupee is worth 100.
- Fairies can replenish your health.
- When crossing pits, tossing another Link is safer than riding tiny platforms.
- When fighting the knight, wait for it to retract its mace before attacking.
Bomb Training
Learn how to use bombs to clear cracked walls and activate switches in The Legend of Zelda: Four Swords Adventures Bomb Training.
- 1Obtain the Bomb.
- 2Toss the Bomb at a cracked wall. If left alone, it will flash red and explode in a few seconds.
- 3Press the Y button to make the Bomb explode immediately.
- 4Blow up the section of the cracked wall behind the big stone.
- 5Use a Team push to push the big stone back.
- 6Blow up either the left or right side of the cracked wall to create a hole and proceed north.
- 7Some weak walls are not obvious. Hold B and touch the wall; listen for a strange sound. This part can be blown up by the Bomb.
- 8Proceed east.
- 9Throw the Bomb at the switch to form a bridge.
- 10Cross the bridge.
- 11Have one Link use the Gnat Cap to go through the small tunnel.
- 12Regroup with the other Links.
- 13Blow up the next section of the wall.
- 14Take this path to the exit.
- Pressing Y makes the Bomb explode immediately.
- Weak walls may not be obvious; listen for a strange sound when touching them while holding B.
Similar guides you might like


100% Human-Written. AI Fact-Checked. Community Verified. Learn how AntMag verifies content