
Guide through Still Wakes the Deep's terrifying events. Follow step-by-step instructions and strategies to survive supernatural threats on the Beira D oil rig.
Welcome to the comprehensive story walkthrough for Still Wakes the Deep. This guide will lead you through the terrifying events aboard the Beira D oil rig, providing step-by-step instructions, item locations, and strategies to help you survive. We'll focus on progressing the narrative and overcoming the supernatural threats that plague the rig.
Chapter 1: The Awakening
Your journey begins with Caz McLeary waking up in a dire situation aboard the Beira D. Follow these steps to get your bearings and understand the immediate crisis.
- Objective: Find a way out of the initial area.
- You'll start in a cramped, flooded living quarter. Look around the room for interactive objects.
- The door to your quarters is jammed. You'll need a tool. Search the immediate vicinity. A Crowbar is crucial here. It can usually be found leaning against a locker or near some scattered debris within your quarters.
- Equip the Crowbar and use it on the jammed door to force it open.
- Exit your quarters and proceed into the corridor.
- Objective: Reach the main deck.
- Navigate through the dimly lit and increasingly chaotic corridors of the living quarters. Pay close attention to environmental clues and any audio logs or notes you find; they offer vital context about the unfolding disaster and the fate of your crewmates.
- You'll soon encounter the first signs of the monstrous entity. These initial encounters are often scripted and designed to instill dread. Your primary goal is to avoid direct confrontation. Use the environment for cover, move quietly, and observe the entity's patterns.
- Continue through the corridors, looking for signs pointing towards the main deck or higher levels. You may need to use the Crowbar again to pry open other jammed doors or access points.
- Locate the access point to the main deck. This might involve climbing a ladder or navigating through a service tunnel.
Chapter 2: The Shifting Rig
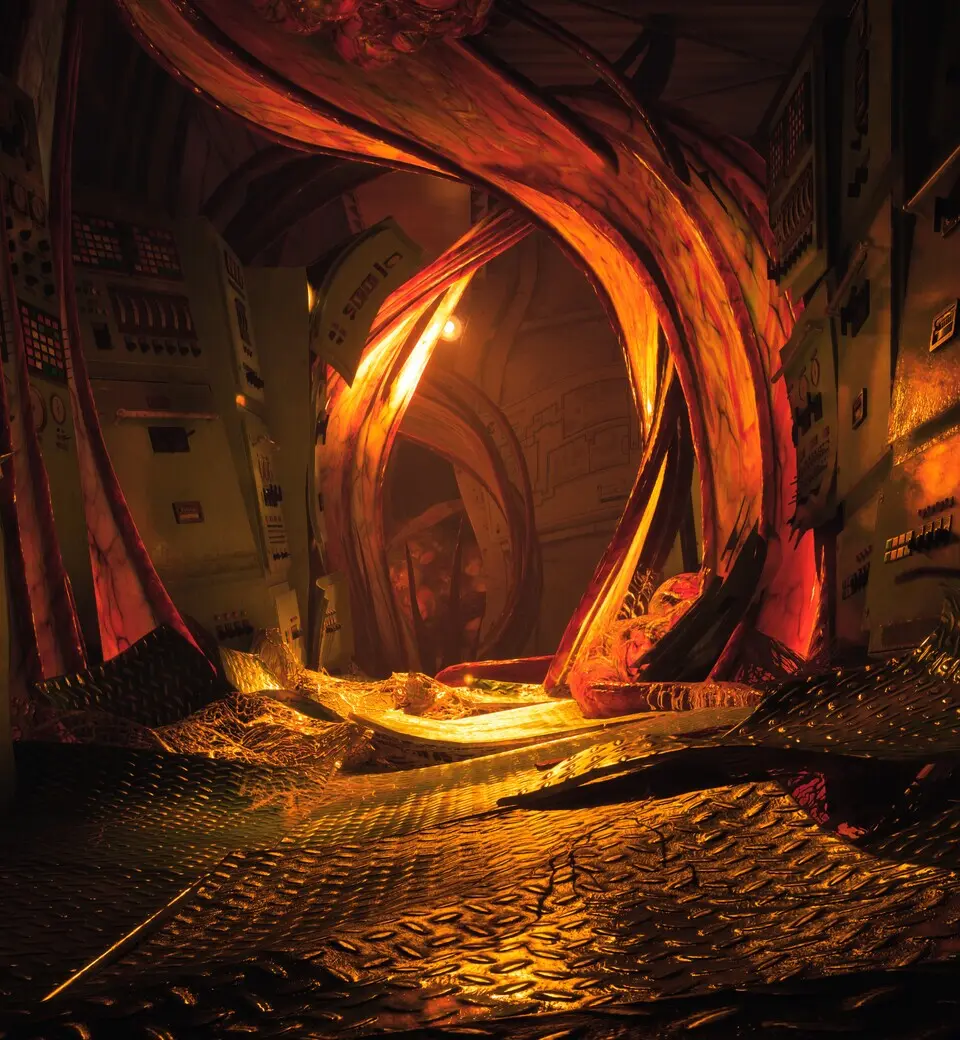
The Beira D is no longer a safe haven. The rig itself seems to be changing, twisting and groaning under an unseen force, and the entity's influence grows stronger, manifesting in terrifying ways.
- Objective: Secure a communication device.
- Your primary goal is to contact the mainland and call for help. This means heading towards the communications room.
- Be prepared for environmental hazards such as collapsing structures, electrical surges, and the entity's direct manifestations. Use the darkness, steam, and cover to your advantage. Stealth and careful observation are paramount.
- To access the communications room, you will likely need a Keycard. Search nearby offices, control rooms, or the personal quarters of crew members. Look for desks, lockers, and workstations. The Keycard is often found in a prominent, but not immediately obvious, location within these areas.
- Objective: Repair the communications equipment.
- Once inside the communications room, you'll discover the equipment is damaged or offline.
- Search the room and adjacent storage areas for specific components needed for repair. This might include a Fuse, a Power Cell, or a Repair Kit. These items are typically found on workbenches, in toolboxes, or on shelves.
- Follow the on-screen prompts to complete the repair mini-game. This often involves reconnecting wires or inputting codes.
- After repairs, attempt to send a distress signal.
Chapter 3: The Heart of the Storm
As you delve deeper into the Beira D's industrial heart, the true nature of the threat begins to reveal itself, and the rig's structural integrity is severely compromised. This chapter involves navigating more dangerous, unstable, and claustrophobic sections.
- Objective: Reach the engine room.
- The engine room is a critical area, likely holding vital clues about the entity or a potential means of escape or defense.
- Expect more aggressive and direct encounters with the entity. Learn its movement patterns, its attack tells, and use the environment to evade and create distance. Some areas may require you to move quickly through hazardous zones.
- Look for environmental puzzles that require manipulating heavy machinery, rerouting power through complex control panels, or activating emergency systems.
- Objective: Find a way to disable or bypass a major obstacle.
- This objective will likely involve a significant environmental challenge. It could be shutting down a dangerous, malfunctioning system (like a runaway turbine), finding an alternate, perilous route through a collapsed section, or using a specific, newly acquired tool to overcome a unique barrier.
- Keep an eye out for any unique items introduced in this chapter. For instance, you might need a Wrench to tighten a valve or a Welding Torch to cut through a damaged grate. These tools are often found in maintenance closets or on the person of deceased crew members.
- Carefully assess the situation and use your acquired tools and knowledge of the environment to proceed.
Chapter 4: The Descent
The situation escalates as Caz is forced deeper into the rig, facing increasingly desperate circumstances and confronting the entity more directly. Survival becomes a constant struggle against both the supernatural and the failing structure.
- Objective: Navigate the flooded lower decks.
- The lower decks are likely partially or fully submerged. You'll need to find ways to traverse these areas, possibly by swimming through flooded corridors or finding alternative pathways above the water level.
- Be aware of submerged hazards and the entity's ability to move through water.
- Look for essential items like air pockets or tools that can help you clear debris or create new paths.
- Objective: Find a way to reach the command center.
- The command center is often the nexus of control and communication on an oil rig. Reaching it is crucial for understanding the full scope of the disaster or finding a means to fight back.
- This section will likely involve more complex environmental puzzles and stealth sequences as the entity's presence is at its strongest.
- You may need to activate auxiliary power systems or find specific access codes to bypass security measures leading to the command center.
Chapter 5: The Eye of the Storm
In the penultimate chapter, Caz confronts the core of the entity's influence and must make critical decisions that will determine the fate of the Beira D and its remaining inhabitants. This chapter is often a climax of narrative and gameplay.
- Objective: Confront the entity's source.
- You will likely be guided towards the heart of the rig's operations, where the entity's power is most concentrated.
- This may not be a traditional boss fight but rather a series of intense environmental challenges and evasion sequences as you attempt to disrupt the entity's hold.
- Utilize any tools or knowledge gained throughout the game to overcome the final obstacles.
- Objective: Make a choice that impacts the ending.
- The game will present you with a critical decision point. Your choices will have significant consequences.
- Consider the information you have gathered and the characters you have encountered.
Chapter 6: The Reckoning
The final chapter brings the narrative to its conclusion, resolving the events of the Beira D disaster based on the choices made in the previous chapter.
- Objective: Experience the final outcome.
- Follow the concluding narrative sequence.
- The ending will vary depending on your actions and decisions throughout the game.
This walkthrough will be continuously updated as we uncover more details about Still Wakes the Deep's narrative progression. Check back for in-depth guides on specific puzzles, challenging encounters, and collectible locations.
100% Human-Written. AI Fact-Checked. Community Verified. Learn how AntMag verifies content