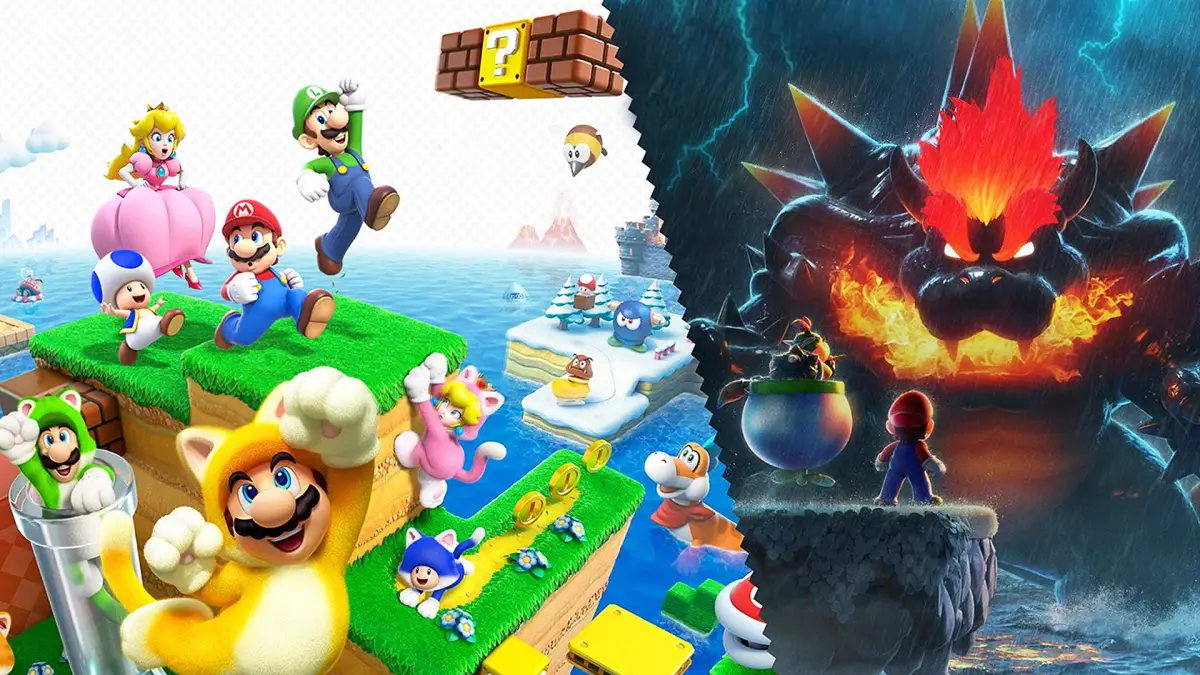
Welcome to Super Mario 3D World + Bowser's Fury, a vibrant 3D platformer that blends classic Mario gameplay with innovative twists. Whether you're navigating the colorful worlds of 3D World solo or teaming up with friends in local multiplayer, or exploring the open-world chaos of Bowser's Fury, the core experience is about mastering precise jumps, utilizing unique power-ups like the Super Bell, and reaching the flagpole at the end of each stage. It's a fantastic package for both seasoned Mario veterans and newcomers looking for a fun, accessible adventure.
This guide is your ultimate companion to conquering both adventures. We'll help you master every jump, uncover every hidden collectible like Green Stars and Stamps, and provide strategies for overcoming challenging boss battles. Whether you're aiming to achieve a perfect score, unlock all the secrets, or simply get through the tougher levels, we've got you covered with detailed maps, gameplay tips, and walkthroughs for every aspect of Super Mario 3D World + Bowser's Fury.
Basics
Learn the essential basics of Super Mario 3D World + Bowser's Fury, including character abilities, power-ups, enemy types, and core gameplay mechanics to enhance your adventure.
This guide covers the fundamental aspects of Super Mario 3D World + Bowser's Fury, including character differences, available power-ups, enemy behaviors, and basic controls.
Characters
Each character in Super Mario 3D World + Bowser's Fury offers unique advantages and disadvantages:
- Mario: An all-round character with easy controls but no special abilities.
- Princess Peach: Can hover in midair for a short time and sprint earlier, but runs significantly slower.
- Luigi: Has the ability to jump higher than any other character but sprints slowly and has low traction.
- Toad: The fastest character in the game but suffers a terrible jump due to his small stature.
- Rosalina: Has a spin attack and a high jump but runs slow and loses her spin attack when she acquires a power-up.
| Attribute | Mario | Princess Peach | Luigi | Toad | Rosalina |
|---|---|---|---|---|---|
| Speed | ★★ | ★★ | ★★ | ★★★ | ★★ |
| Jump | ★★ | ★★ | ★★★ | ★ | ★★★ |
Power-Ups
Power-ups transform Mario and friends, granting new abilities:
- Super Mushroom: Makes the character larger. If hit, they revert to their small form.
- Fire Flower: Grants the ability to shoot fireballs, useful for defeating enemies at a range.
- Super Bell: Allows the user to don a Cat Suit with abilities to claw at foes and climb walls for a limited time. A mid-air pounce is also possible.
- Double Cherry: Creates an additional clone of the character, useful for puzzles requiring multiple characters.
- Super Leaf: Grants the Tanooki Suit, allowing the character to hover in the air for a length of time.
- Mega Mushroom: Makes characters huge and virtually invincible, with the ability to smash trees and large blocks without taking damage.
- Super Star: Makes the character invincible and unable to die from enemy hits (falling still results in death).
- Gold Leaf: Grants a White Tanooki suit, which is an infinite Super Star and Tanooki Suit combination. This power-up appears if you fail a level several times consecutively, and using it renders level completion null.
- Propeller Box: Allows the character to fly through the air for short stints.
- Lucky Bell: Similar to the Cat Suit, but a Ground Pound turns the character into an invincible golden statue that produces coins.
- Kuribo's Skate: Allows a character to use a skate for better movement, especially on icy surfaces.
- Goomba Suit: Lets the wearer go incognito, avoiding enemies as long as it's worn.
Enemies
Super Mario 3D World + Bowser's Fury features a variety of enemies, some new and some returning:
- New Enemies: Ant Trooper, Big Ant Trooper, Big Galoomba, Blockstepper, Blurker, Brolder, Cat Banzai Bill, Cat Bullet Bill, Cat Goomba, Charvaargh, Conkdor, Flopter, Fuzzler, Grumblump, Hop-Chop, Horned Ant Trooper, Ka-Thunk, Madpole, Parabones, Piranha Creeper, Rammerhead, Ring Burner, Skipsqueak, Snow Pokey, Spiny Skipsqueak, Splorch, Splounder, Ty-Foo, Walleye.
- Returning Enemies: Baddie Boxes, Banzai Bill, Banzai Bill Blaster, Beach Koopa, Biddybud, Big Boo, Bill Blast, Blooper, Blue Lava Bubble, Bob-omb, Boo, Boomerang Bro, Bullet Bill, Bully, Cannon, Cannonball, Chargin' Chuck, Cheep-Cheep, Coin Coffer, Firebar, Fire Bro, Fire Piranha Plant, Fizzlit, Fuzzy, Galoomba, Goomba, Goomba Tower, Hammer Bro, Koopa Troopa, Lava Bubble, Magikoopa, Micro-Goomba, Octoomba, Para-Biddybud, Peepa, Piranha Plant, Big Piranha Plant, Porcupuffer, Raining Debris, Spike, Spiny, Stingby, Thwomp.
- Bosses: Bowser, Boom Boom, Pom Pom, Hisstocrat, Boss Brolder, King Ka-Thunk, Prince Bully, Motley Bossblob.
Most enemies can be defeated by jumping on them, but some require specific power-ups. The Cat or Tanooki Power-Up allows for swipes, the Fire Power-Up shoots fireballs, and the Boomerang Power-Up can clear multiple enemies. The Super Star makes the character invincible, defeating all enemies on touch.
Character Control
Here are the basic controls for Super Mario 3D World + Bowser's Fury:
Movement & Actions
- Spin Jump: Rotate the analog stick in either direction to begin spinning, then jump to reach maximum height from a standing position.
- Long Jump: While running, crouch then jump for a low height but long distance leap.
- Crouch Jump: Crouch for a few seconds until Mario shakes, then jump to perform a backflip with considerable height.
- Ground Pound: While in mid-air, press the crouch button to quickly smash enemies, blocks, and other objects.
- Ground Pound Jump: Jump again the moment you land from a Ground Pound to maintain momentum.
- Somersault: Crouch down then dash to perform a somersault, which can break blocks that cannot be ground pounded.
- Side Somersault: Dash in one direction, then simultaneously reverse direction and jump to tumble away.
Button Mappings (Wii U GamePad)
| Action | Wii U GamePad | Wii Remote | Wii Remote + Nunchuk |
|---|---|---|---|
| Crouch | ZL | B | Z |
| Dash | Y or X | 1 | B |
| Move | Left Analog | D-Pad | Control Stick |
| Jump | B or A | 2 | A |
| Pause | + | + | + |
| Item | - | - | - |
| Ground Pound | ZL in Air | B in Air | Z in Air |
| Bubble | L | A | C |
Walkthrough
Follow Mario, Luigi, Peach, and Toad into World 1 after Bowser captures a Sprixie in Super Mario 3D World + Bowser's Fury.
Mario, Luigi, Peach, and Toad begin by walking down a road when they discover a broken pipe. After Mario and Luigi repair it, a Sprixie emerges, quickly attempting to explain her predicament. Suddenly, Bowser appears and captures her. The group then follows the Sprixie down the pipe into World 1.
Level Totals:
- Green Stars: 380
- Stamps: 80
- Goal Poles: 90
World 1
Complete World 1 in Super Mario 3D World + Bowser's Fury, including Super Bell Hill, Koopa Troopa Cave, and Bowser's Highway Showdown. Find all Green Stars and Stamps.
You can run around the map in Super Mario 3D World + Bowser's Fury, unlike in previous installments where you were restricted to the path. You can find coins, blocks, and 1-Ups so keep an eye out for them! There isn't much to do at the start though so head to World 1-1: Super Bell Hill.
Levels in World 1:
- World 1-1: Super Bell Hill
- World 1-2: Koopa Troopa Cave
- World 1-A: Chargin' Chuck Blockade
- World 1-3: Mount Beanpole
- World 1-4: Plessies' Plunging Falls
- World 1-5: Switch Scramble Circus
- World 1-Toad: Captain Toad Goes Forth
- World 1-Castle: Bowser's Highway Showdown
World 1-1: Super Bell Hill
- Start off by running straight ahead to the ? Block to obtain a Super Bell and receive the Cat Power-Up.
- Run to the right and collect the coins, defeating the Goombas as you go.
- Head along the near side where the sand is located to find a hidden coin block and also start a chain of coins.
- Back up top you can jump into the clear pipe and hold up to claim Green Star #1.
- Continue to the right and into the second clear pipe which drops you off at the halfway point (checkpoint (an auto-save point you restart from on death)).
- From here you can visit the Sprixie with binoculars to get a look at what's ahead.
- Run over to the Rabbit and catch it to obtain Green Star #2 then head into the pipe against the wall.
- In this room you'll see the Stamp atop the pipe, just head inside to reach it.
- Back outside, climb the large back wall to the top where you'll find a Rabbit and Mega Rabbit.
- Catch the Mega Rabbit to release a Mega Mushroom and snag the Green +Clock to add some time.
- Use the Mega Mushroom and drop off the ledge heading right over the bridge demolishing everything in your path.
- Your goal is to reach the blocks after the bridge that you'll break.
- Drop down the hole to find Green Star #3 then use the Warp Box to go back out.
- Head to the end of the level where you can start a coin chain.
- With the Cat Power-Up you can climb up towards the top of the Goal Pole.
Secret 1-Up Mushroom: If you have time you can head underneath the bridge to discover a hidden 1-Up Mushroom.
World 1-2: Koopa Troopa Cave
- Proceed through the tube at the start of the level.
- You can claim a Fire Flower from one of the ? Blocks but you'll want to keep a Cat Power-Up in standby if you grab this.
- Break the purple blocks to reach a hidden area where you'll want to defeat the Koopa Troopa then toss it's shell around to quickly collect all the coins.
- Continue heading right and defeat another Koopa Troopa, but try to keep it's shell in tact if you are hunting for a secret.
- As you move towards the end of this segment hit the blocks along the back wall. There are actually three in a row going straight up, the top one is a 1-Up Mushroom.
- Head through the pipe to reach a section with moving cloud platforms.
- Jump between them to claim Green Star #1 then ride the right platform all the way to the top and jump off.
- Dash across this upper tier until you reach a pipe, then take it to a green pipe that leads to a room with three Gold Koopa Shells. Kick them around for a ton of coins then head back to the cloud platforms.
- Snag the Green +Clock on the mid level then go through the tube to reach the checkpoint.
- The back wall has a second level of blocks that yields a Fire Flower if you need it.
- Climb up the blocks to the right and jump into the Mystery Box. Defeat the two Koopa Troopas in time to claim Green Star #2 then exit.
- Another block along the way contains a Fire Flower -- continue through the next pipe.
- In the final section climb up the blocks to a ledge guarded by a Koopa Troopa. Defeat it then enter the pipe to be taken underneath this platform where the Stamp may be found. Claim it and return to the top, grabbing the Super Star from the block across the gap.
- Defeat the tower of Goombas to find Green Star #3 then continue to the exit.
Maximum Lives: If you take a turtle shell and stand at the south side of the narrowest path to your right, face north then toss the shell and immediately jump. This will cause Mario to jump on the shell repeatedly without requiring you to do anything. You'll collect 1-Ups very quickly and can cap at Triple Crown (1110 lives).
Secret Exit: There is a secret exit to this level that takes you to World 2-1: Conkdor Canyon. Above the area with the Stamp is a wall that leads up to a red pipe, you'll need a Cat Power-Up in order to reach it though. It's easy to reach, just climb the wall.
World 1-A: Chargin' Chuck Blockade
- In this tiny world you face off against two Chargin' Chucks.
- Jump on their heads or shoot fireballs (or use the Cat Power-Up to claw them) to remove their helmet then finish them off.
- Once they are defeated a bunch of coins and Green Star #1 appears in the center.
- Collect your reward and head to the next level.
World 1-3: Mount Beanpole
- At the very start of the level climb the tree on the left to claim Green Star #1.
- Continue across the bridge and work your way to the Red Pow Block that will take out the Piranha Plant.
- Collect the Super Bell from the ? Block then look right of the Pow Block for a hidden 1-Up Mushroom in a block.
- Climb up passed another Pow Block to spot the Stamp between two ledges.
- Just past this section at the left end is another Pow Block. Hitting this and the next one will open up a path to a pipe.
- In this new room is a P Switch that spawns several blue coins. Collect them all quickly so you can unlock Green Star #2.
- Continue to climb to the summit of the mountain.
- With the Cat Power-Up, climb up the large wall.
Warp Zone: A Warp Zone is available from World 1-2 to World 2.
World 2
Complete guide to World 2 in Super Mario 3D World + Bowser's Fury, covering Conkdor Canyon, Puffprod Peaks, and more. Find all Green Stars and Stamps.
World 2 contains 24 Green Stars, 7 Stamps, and 6 Goal Poles. There are no Warp Zones in this world. The levels are: World 2-1: Conkdor Canyon, World 2-2: Puffprod Peaks, World 2-3: Shadow-Play Alley, World 2-4: Really Rolling Hills, World 2-A: Big Galoomba Blockade, World 2-5: Double Cherry Pass, World 2-Mystery: Mystery House Melee, and World 2-Castle: Bowser's Bullet Bill Brigade.
Before starting World 2-1, visit the Sprixie House to claim an easy Stamp.
World 2-1: Conkdor Canyon
At the start, trick the Conkdor into missing you, then jump on its head. Grab the Super Bell from the nearby ? Block. Climb the back wall to find Green Star #1. Continue right through sand pits and past more Conkdors. You can climb a wall to find a Gold Pipe leading to a room with a Gold P Switch. Pressing this causes coins to fall down a gap; jump across them to collect them. Back through the pipe, continue right to the Red Ring. Run circles around the Conkdor to collect the Red Coins for a Super Bell. Dash up the ramp or defeat the Conkdor as you climb to the Checkpoint (an auto-save point you restart from on death) Flag. Move across the moving platform to a Roulette Block, then pass the Conkdors on the narrow walkway. When you reach the Conkdor in the center of four blocks, trick it into smashing them to reveal Green Star #2. Run up the sandfall to the left to find a Green +Clock and a ? Block before proceeding. Cross the raised platform, grabbing the Stamp along the way, to find Captain Toad being chased by a Conkdor. Defeat the Conkdor to receive Green Star #3, then dash through the weaving bridge to the Goal Pole.
World 2-2: Puffprod Peaks
Touch the platforms on the Gamepad at the beginning of the level to raise them and access the next tier. On the third tier, raise the platforms to find a Fire Flower in one of the blocks. Underneath the second platform, drop down to find the Stamp. Continue to a wall that requires you to make platforms pop out so you can climb to the top. At the top, go left to find Green Star #1. To the right is the Checkpoint Flag and a Warp Box. In this new area, step on the moving platforms and blow into the Gamepad Microphone to make them move. Ride them to the far end, then enter the Cloud Cannon to race through the clouds and claim Green Star #2. When you arrive back on the platform, blow on the Microphone again to reveal the shadow of a block along the back wall; hit it for a 1-Up Mushroom, then climb up. Here you can pop out three platforms, but only pop out two, then blow on the Microphone again to move a platform to the third spot. Ride this platform down to Green Star #3, then head back up using the movable platform and pop out platforms to reach the Goal Pole. Completing this level grants access to a Toad House.
World 2-3: Shadow-Play Alley
At the start, grab the potted Piranha Plant; it will devour everything in its path. When you spot the shadow of the star move towards the screen to find Green Star #1. Continue right to a block with a Super Bell so you can acquire the Cat Power-Up, then cross the gap with the moving platforms to reach the Checkpoint Flag. Enter the door here to gain a new perspective. When you can drop down below the Mega Piranha Plant, do so, then slash the blocks away to reach the Stamp. Exit back into the 3D World and grab a potted Piranha Plant to eat away the Blurkers that hide a Mystery Box. Inside the Mystery Box, step on the P Switch, then run underneath the steps to find Green Star #2. Cross the moving platforms to a door, but do not go inside. Instead, move to the next area to see Captain Toad cowering in fear. Move towards the screen and knock down the Bowser Board to receive Green Star #3. Now exit via the door and reach the Goal Pole.
World 2-4: Really Rolling Hills
Start by collecting coins around the area and using the pipe at the back end to reach a cliff. If you have the Cat Power-Up, climb this wall to find Green Star #1. If not, hop down to a block with a Super Bell first. To the right of the starting area is a Mario Character Switch that must be pressed by Mario to reveal the Stamp; if you are not Mario, you will need to replay the level with Mario. Head through the pipe leading right and go under the far hill for a 1-Up Mushroom before going through the Red Ring. Collect all eight Red Coins quickly to get a Super Bell. If you climb the tall left and right ledges, you can get some coins to appear. Otherwise, continue to the far north and down the pipe. Once underground, take the top path to find a Super Bell (you need the Cat Power-Up). At the end of the floor, jump up and climb the wall to a bunch of coins, then drop down to a pipe that leads to Green Star #2, which is collected by lighting up the entire floor (there is no time limit). Head back out and willingly fall to find coin blocks and Green Star #3, then use the pipe to head back to the top. Use this final pipe to reach the final area with the Goal Pole.
World 2-A: Big Galoomba Blockade
You must fight three Big Galoombas in this level. The Cat Power-Up or Fireball Power-Up make these fights easier, but it is simple enough to jump on their heads.
World 2-5: Double Cherry Pass
Start this level by moving up to the Double Cher
Similar guides you might like


100% Human-Written. AI Fact-Checked. Community Verified. Learn how AntMag verifies content